Pages

7/28/2021

How to find Win10 Boot Screen Wallpapers

If you have Windows 10's default, Spotlight feature enabled, your lock screen shows gorgeous images courtesy of Microsoft. Some of these high-quality photos are nature shots while others are pictures of great cities around the world. The pictures rotate several times a day, but what if you see an image you like and want to keep a copy of it on your laptop? Windows keeps these Windows 10 lock screen photos buried deep in a hidden directory, but with a bit of digging, you can find them, save them and even use them as desktop wallpaper.

Here's how to find Windows 10's Spotlight lock screen images:

How to find Windows 10's Lock Screen Images

1. Click View in File Explorer.


2. Click Options. A Folder Options window will appear.


4.


3. Select the View Tab


4. Select "Show hidden files, folders and drives" and click Apply.


5. Go to This PC > Local Disk (C:) > Users > [YOUR USERNAME] > AppData >

Go to This PC > Local Disk (C:) > Users > [YOUR USERNAME] > AppData > Local > Packages > Microsoft.Windows.ContentDeliveryManager_cw5n1h2txyewy > LocalState > Assets


You'll be presented with a plethora of file names that make absolutely no sense and show no extensions. There's no great method of telling which ones are beautiful photos and which are icons, but you're better off clicking on items with larger file sizes.

Copy the image to a new location, and change the desktop background to that image.

Source: https://www.laptopmag.com/articles/find-windows-10-lock-screen-pictures


7/23/2021

AnyBurn DVD burner review-A complete and free solution for disc burning CD-DVD-Blu Ray


Our Verdict

Those looking for an easy-to-use, free, and powerful disc burning application with all the essential tools will find AnyBurn 5.0 is a great choice – particularly for older PCs given its minimal system requirements.

For

  • Flexibility and ease of use
  • Minimal hardware requirements
  • Impressively fast performance
  • Decent online tutorials provided

Against

  • Does not support drag and drop for files
  • Does not copy multisession discs

AnyBurn 5.0 is a robust disc burning app that’s flexible and easy to use, not to mention well-supported (running on Windows XP or better – not that you should still be using that particular version of Windows, as it’s a long way out of support now).

AnyBurn is freeware, and proof of the old adage that good things come in small packages – another plus point here is that the app is light on system resources. It also benefits from an intuitive interface.


Features

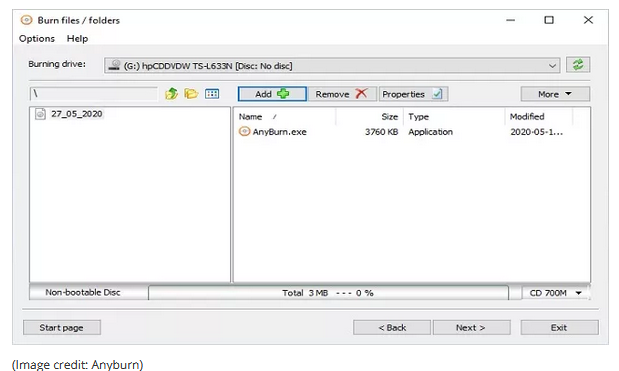
AnyBurn 5.0 benefits from a well-designed interface: a simple yet engaging traditional Windows-based UI that does not require the user to have any special tech knowledge. The software installation procedure is easy and hassle-free.

AnyBurn presents all of its features in a separate pane, from which you can select and perform disc burning tasks. You can easily select the burning speed and the target drive. The settings allow you to verify the written data, finalize the disc, and eject it after burning.

You can use the AnyBurn software to burn files to a disc, copy a disc, or erase a rewritable disc, or even to create an image file from other files or discs. You can also easily convert images to ISO or BIN/CUE and view the disc or drive properties. Ripping an audio CD is also available for MP3, FLAC, APE, WAM, and WAV formats.

The ability to create backups to discs – whether CD, DVD or Blu-ray – is also provided.

As we’ve already touched on, one of the best features of this application is that it doesn’t demand much in the way of your PC’s resources, using up little of your CPU’s precious power, and consuming hardly anything in the way of memory either. The system requirements are extremely low, and AnyBurn is capable of running on an old Intel Pentium 166MHz with only 64MB of memory.

The program is generally responsive and tasks are completed swiftly.


Support

The application comes with support for eight languages: English, French, Polish, Chinese, Italian, Japanese, German and Spanish.

These are a series of tutorials in text form on the AnyBurn website describing the application’s standard functions in detail. These include text-based tutorials on burning audio CDs from various file formats, ripping audio CDs to multiple formats, and even creating bootable USB drives for Windows 7/8/10. You can also get information on the AnyBurn command line functions and their use from these tutorials.

For any software-related complaints or queries, users can send a message to support@anyburn.com. There’s also a contact form on the official website, and the AnyBurn team promises to reply via email as soon as possible.

Final verdict

AnyBurn 5.0 is a robust CD/DVD burner which is free and commendably user-friendly. It allows you to perform a host of CD and DVD burning functions, with detailed tutorials provided online. AnyBurn’s developers seem vigilant enough to work on any user grievances and to modify the app and interface as necessary in respect to the feedback they receive.

The best free DVD burner apps

Source: https://www.techradar.com/reviews/anyburn

6/19/2021

Windows 11 Confirmed: What We Learned From the Leaked Build

Say goodbye to Windows 10: Windows 11 is on the way. We played with the first leaked build of Windows 11, which appeared on June 15, 2021. Here’s what Microsoft has in store for your PC.

Note: This is based on a leaked prerelease of Windows 11, so the final version will probably be more polished. (Then again, Microsoft has released some unpolished things lately.)

Is Windows 11 Just a Renamed Windows 10X?

Microsoft may have axed Windows 10X in name only. The new Start menu design being tested for Windows 10X makes an appearance here. Live tiles are gone.

Windows 11's leaked Start menu

For some reason, the Start button and pinned taskbar icons are now in the center of your taskbar. As you open and pin applications, the Start button gradually moves to the left on your taskbar. As you close and unpin them, it gradually moves to the right.

Now you can’t move your mouse to the bottom left corner of the screen to access your Start button by default. This seems like a big violation of Fitt’s Law—in other words, it’s easier to get your mouse cursor to a corner and click on it. It’s also a rather funny move from the company that brought us Windows 8, which was absolutely obsessed with the concept of mouse-based hot corners.

The good news is that you can move the Start button and pinned applications back to the left side of your taskbar. If you right-click the taskbar and select “Taskbar Settings,” it takes you to the Settings > Personalization > Taskbar window and you can change the “Taskbar Alignment” setting to control this.

Easy Window Management With Snap

Windows 11 includes some smart tweaks. Snap is much improved—something that was likely inspired by the dual-screen devices Windows 10X was originally designed for.

Advertisement

Now, you can mouse over the “Maximize” button on any window’s title bar to see a menu of Snap options. Click one of the gray rectangles or squares to choose a screen layout and position for the window.

You can do this on Windows 10 today by dragging a window to the left edge, right edge, or any of the four corners of the screen, but the new interface should make this more discoverable to the average Windows user.

The same keyboard shortcuts for Snap work on both Windows 10 and Windows 11, too: Press and hold the Windows key and tap the arrow keys to move the current window between Snap regions.

Windows 11's leaked Snap popup

The Weather Widget Becomes the Widget Widget

What if Windows 10’s Weather widget didn’t actually show the weather on your taskbar and was just a “Widgets” button that would open the News and Interests feed?

That’s the question Microsoft is answering with the “Widgets” button that appears to the right of the Task View button.

Advertisement

In the leaked build, clicking the button shows widgets over your open applications windows or the desktop. It’s called the “Windows Dashboard.” We think it looks cleaner with a background.

This already has us missing Windows 10’s Weather widget.

Windows 11's leaked widget menu

But What About the Rest of Windows 10X?

Unfortunately, there’s no indication that Windows 11 includes one of Windows 10X’s most exciting features: The ability to run apps in containers for security reasons, providing better protection from rootkit-like malware and buggy applications that can crash your operating system.

This container-based technology was designed to help Windows 11 install big updates in less than 90 seconds thanks to a read-only operating system. While this might change, Windows 11 mostly appears to be skin deep for now.

Windows 11 doesn’t appear designed to run on dual-screen devices, either. That was the original point of Windows 10X when it was originally announced, after all: A new interface for a new type of device.

In other words, It looks like the features in Windows 10X that were the most technically complex are gone. Instead, the interface being tested for Windows 10X is being recycled into Windows 11.

Are the Changes Just Skin Deep?

So is Windows 11 really a big change? Our sister site Review Geek is branding it “a lightly skinned Windows 10.”

Advertisement

There’s some merit to that. The Settings app looks straight out of Windows 10, for example. If you were hoping the Control Panel would finally be gone and we’d have a unified settings interface, too bad: The Control Panel lives on alongside the Settings app in Windows 11. Is the Control Panel ever going away?

Those new icons in File Explorer look pretty slick, though!

Will There Be a New Store App?

There’s been a lot of chatter that we’d see a new Microsoft Store app with more of a focus on desktop apps. It’s something that we wish Microsoft had originally done with Windows 8 rather than spending a decade trying to make Metro, Modern, and then Univeral Windows Platform apps happen.

However, in this leaked build, the Microsoft Store appears exactly as it does in Windows 10.

Want a Local Account? That Costs Extra

Finally, one change that isn’t a surprise: Microsoft has been pushing Microsoft accounts on Windows 10 users for a while now. It’s hard to create a local account while installing Windows 10—you have to disconnect your PC from the internet first.

In Windows 11, that doesn’t seem to work. With the standard Windows 11 Home, you can’t create a local account anymore. You’ll need the more expensive Windows 11 Professional edition to do that.

Advertisement

(With Windows 11 Professional, you can select Set Up for Personal Use > Sign-in Options > Offline Account > Limited Experience to create a local account. But you can’t do this on Windows 11 Home.)

Creating a Microsoft account in Windows 11's leaked setup process

But Wasn’t Windows 10 the Last Version of Windows?

Microsoft’s Jerry Nixon famously called Windows 10 “the last version of Windows” before it was released. Now, Microsoft is releasing a new version of Windows.

Well, let’s face it: “Windows as a service” was a bad idea anyway.

It does seem like Windows 10 users will likely get the upgrade for free: Our colleagues over at Review Geek were able to activate Windows 11 with a Windows 7 key. (Yes, you can still activate Windows 10 with a Windows 7 key!)

Stay Tuned For More

But when will it be released? Are there any other new features? What about the new Windows Store? Is the Settings app getting a visual upgrade? There are a lot of outstanding questions!

We’ll hear more about Windows 11 at Microsoft’s event on June 24, 2021.

Source: https://www.howtogeek.com/734768/windows-11-confirmed-what-we-learned-from-the-leaked-build/

5/07/2021

How to locate and open Windows Media Player in Windows 10

ummary
A lot of persons are asking about Windows Media Player availability in Windows 10. Good news, Windows Media Player is alive and well in Windows 10 and you can find it quick and easy.
Details

Please note, Windows 10 Enterprise and Windows 10 Pro LTSB (Long Term Service Branch) editions do not include Windows Media Player. Windows 10 LTSB editions are normally available to volume license customers. Your only option is to use a non LTSB version of Windows 10. This will require speaking with your IT department or Desktop Support Technician within your organization.

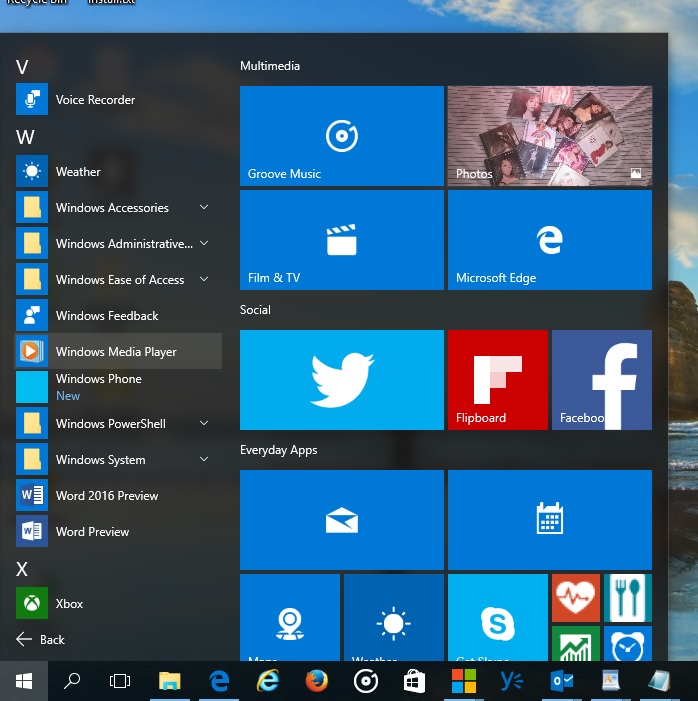
Click Start > All Apps > scroll down to W and click Windows Media Player

Image

or

Press Windows key + R

Type: wmplayer.exe

Hit Enter

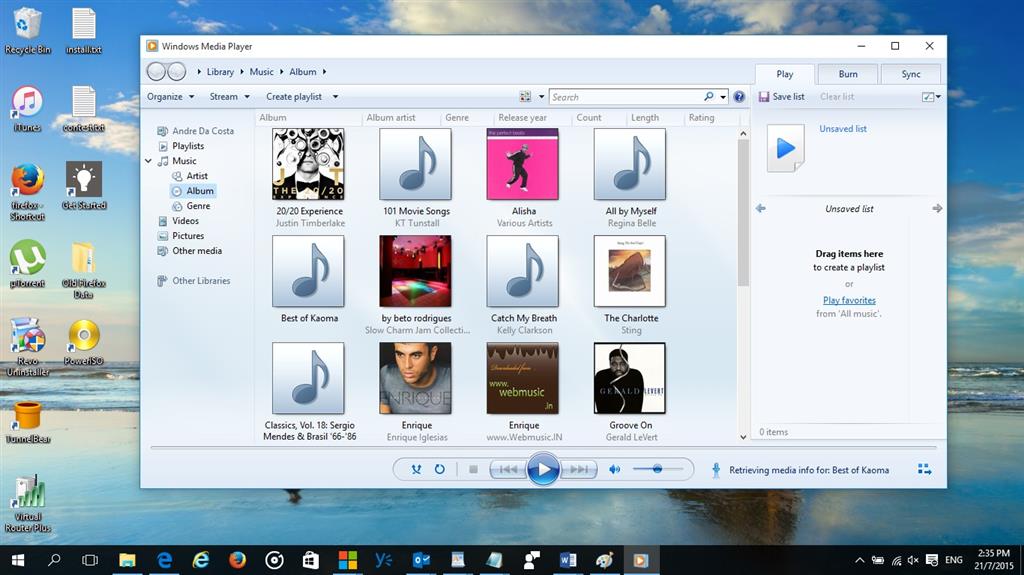
Right click and pin it to your Taskbar.

Image

Thats it!

Still not finding Windows Media Player?

If you are running Windows 10 N or K or KN editions, Windows Media Player is not included. You will need to download then install the Windows Feature Pack.

If you don't find it, press Windows key + R

Type: optionalfeatures.exe

Hit Enter

Expand Media Features

Make sure Media Player is checked.

If the option is not available:

Press Windows key + R

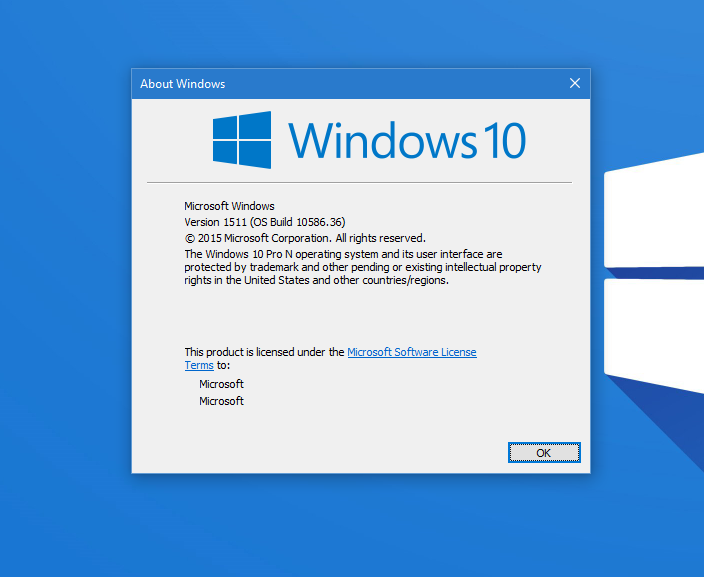
Type: winver

Hit Enter

Does it say Windows 10 Home N or Windows 10 Pro N anywhere on the dialog?

Image

If it does, then you will need to download and install Windows Feature Pack:

Microsoft had updated it for the November Update, you can download from the following link:

https://support.microsoft.com/en-us/kb/3099229

If you are running the Windows 10 Anniversary Update, you can download the latest version from the following link:

https://www.microsoft.com/en-us/download/details.aspx?id=53356


Source: https://answers.microsoft.com/en-us/windows/forum/all/how-to-locate-and-open-windows-media-player-in/7d0f31a1-2999-4597-9c43-b48b075c5e57


1/13/2021

Tweak Windows 10 with WinSlap

 by Martin Brinkmann on January 13, 2021

WinSlap is a free open source program for Microsoft's Windows 10 operating system to quickly modify system settings and tweak the system. Designed for use right after installation on first use, it may also be used on a running system.

Since it does modify system settings, it is recommended to create a backup of the system before proceeding. We did not notice any issues during our tests, but it is always a good precaution.

To get started, download the program from the project's GitHub repository. Right-click on the download file and select run as administrator from the options to run it with elevated rights. The program requires these as it makes changes to the system.

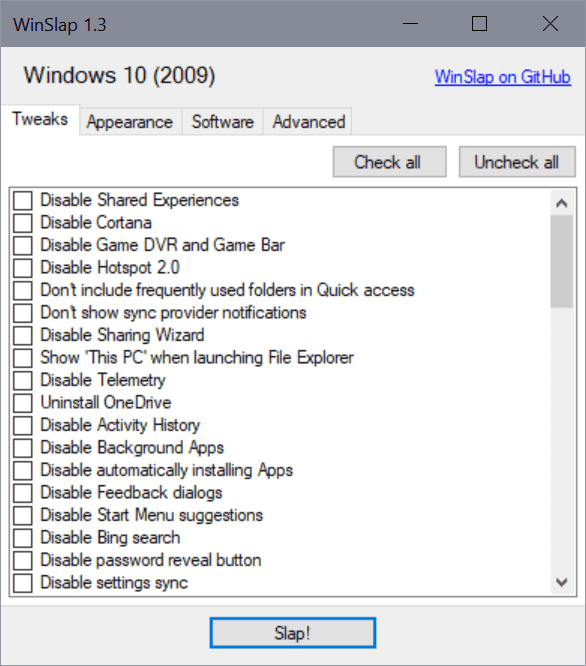
The less-than 900 Kilobytes program displays a lean interface that is divided into four main tabs.

winslap windows tweak

It works similarly to many other Windows 10 privacy and tweak tools; it provides a list of settings that you may check to modify the system, e.g. to uninstall OneDrive, disable the Activity History, or Bing Search.

All you have to do is make your selections and activate the "slap" button in the end to have it make the changes to the system. You may switch tabs in the interface without losing any selections in previously opened tabs.

The check all button checks all options; useful in particular if you want most settings to be applied. It is a good idea to go through them all though to avoid having changes made to the system that you don't want.

The Software tab is a special one, as it does not list apps that the program can remove from the system. Instead, you get a short list of popular third-party programs -- Firefox, Thunderbird, Telegram, VLC and StartIsBack -- that you can install using WinSlap.

Here is a short list of tweaks that WinSlap supports. You find the whole list of supported tweaks on the project's GitHub website:

  • Disable Cortana
  • Disable Shared Experiences
  • Disable Game DVR and Game Bar
  • Disable Telemetry
  • Uninstall OneDrive
  • Disable Bing Search
  • Disable sending info to Microsoft
  • Disable Miracast
  • Remove preinstalled apps
  • Remove third-party control panel menus (Intel, NVIDIA and AMD)
  • Disable Microsoft Edge preload
  • Disable Lockscreen Blur
  • Hide search in taskbar
  • Disable Windows Defender.

WinSlap displays a short disclaimer after you activate the slap button. Select the yes option to proceed or no to cancel. Note that the application will launch a restart of the system right after it has made the changes, so save all work before you start using the application.

Closing Words

WinSlap is a tweak program for advanced users as it does not provide descriptions for any of the listed tweaks. While some may be understood by users of all experience levels, e.g. "show this PC when launching File Explorer", others like "disable web proxy auto-discovery" or "disable Wi-Fi Sense" are less descriptive and thus harder to figure out.

The list of supported tweaks matches those of other tweak applications, one difference is that WinSlap does not provide options to uninstall most of the apps that come with Windows 10 individually.

Still, it is a quick solution to modify dozens of system settings, if so desired, in a short period of time.

Source: https://www.ghacks.net/2021/01/13/tweak-windows-10-with-winslap/

7/30/2020

How to Install Custom Themes and Visual Styles in Windows 10


Windows has had support for themes, also known as “visual styles”, since Windows XP. By default, Windows only loads Microsoft-signed themes—but you can get around this limitation.

These aren’t your standard Windows themes. They modify the appearance of window title bars, buttons, and other visual elements.
Windows 10: Install WindowBlinds

You can still do this the old-fashioned way on Windows 7 (see our instructions in the next section for that), but it’s not so easy to do on Windows 10. UxStyle, the tool we recommend for Windows 7, no longer functions on modern versions of Windows 10. While you can directly modify the uxtheme.dll file, this change will be reverted whenever Windows 10 updates itself. And, because this is so hard to do, most user-created themes likely won’t be properly supported on the latest builds of Windows 10.

But there’s still a solution. If you want to theme your Windows 10 desktop, we recommend you install Stardock’s WindowBlinds software. It’s still fully supported on Windows 10, and doesn’t require hacking with system files. It does cost $10, but that $10 will save you a lot of trouble. A free 30-day trial is also available.
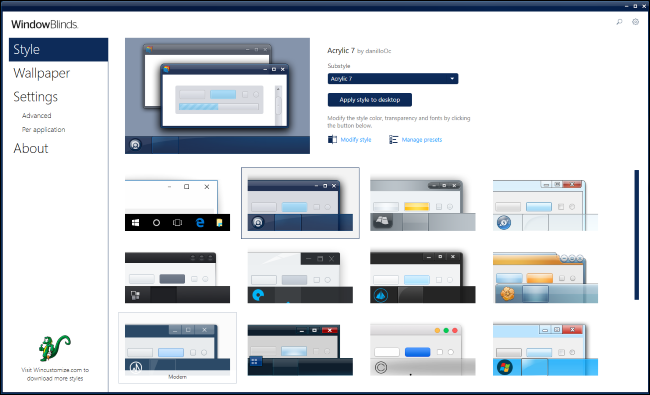


WindowBlinds also includes some polished custom Windows themes. To choose a theme, just click it in the WindowBlinds window and then click “Apply style to desktop”. Your change will instantly take effect, although you may have to close and restart some applications, including Google Chrome, before your change takes effect.


RELATED: How to Use a Dark Theme in Windows 10

WindowBlinds makes it easier to install custom themes, too. It uses its own WindowBlinds format for themes, and you can find more themes on WinCustomize.org.

For example, you can find a Dark Mode theme that, unlike Windows 10’s built-in Dark Mode, also applies to File Explorer and other apps.
Windows 7: Patch Your System Files With UxStyle

Windows checks if themes are signed by Microsoft before loading them. If they aren’t, Windows won’t load them at all. To use them, you’ll have to modify Windows system files—uxtheme.dll in particular—and disable the check. In the past, this required booting into Safe Mode and manually replacing system files. Today, there are easier ways to do this.

UxStyle is the ideal free solution for Windows 7 users (although it no longer works on Windows 10). UxStyle runs entirely in memory, disabling the check without modifying any system files. It’s the easiest, safest way to enable third-party themes without WindowBlinds. (You can choose to pay for a copy of WindowBlinds on Windows 7, too, if you like.)

To use UxStyle, download it, extract the .zip file, and then run the x64 installer (if you’re using a 64-bit version of Windows) or the x86 one (if you’re using a 32-bit version of Windows). After installation, a new process named “UnsignedThemesSvc.exe” will run in the background. Reboot your computer and you’ll be able to install unsigned themes.


How to Find Visual Styles Online

You’ll find custom visual styles for Windows on a variety of websites. One of the best places to hunt for visual styles is DeviantArt. For example, check out the Windows 7 visual styles page on DeviantArt to find themes.

Note that these files are generally unconfirmed ZIP or RAR files, which may contain malware or links to infected sites. Use a virus scanner for extra protection if you’re in any doubt. Also note that specific versions of Windows might require specific updates to theme files—double-check the information on DeviantArt or other pages to make sure the theme you’re downloading is compatible with your build.

Choose a theme you want and download it to your computer. To illustrate the process, we’ll use the Maverick for Win7 theme that attempts to port Ubuntu’s old default theme to Windows 7.

Many themes are distributed in .rar format. If you want to open these, you’ll need a file-extracting program like the free 7-Zip.
How to Install Visual Styles

Themes are located in the following folder:C:\Windows\Resources\Themes\


Each theme has its own subfolder here. To install a new theme, just drop its files into the Themes folder and agree to the UAC prompt. The .theme files should be in the root of the folder.


Note that some themes may include other assets, and will require you to follow additional instructions before they work as intended. For example, themes may include custom fonts and icons. The theme’s download page—or included README file—will generally contain information on completing the installation process.

If you do need to install fonts, just drop the included .ttf font files into the following folder:C:\Windows\Fonts


When you have a theme installed, you can double-click its .theme file to switch to it. You’ll also find it listed alongside the themes included with Windows in your desktop personalization control panel.


Because Microsoft doesn’t officially support third-party themes, you’ll likely run into the occasional graphical glitch or rough edge when using custom visual styles with third-party applications. You can’t do much about this. Developers generally don’t take unofficial Windows themes into account when designing their applications.


Source: https://www.howtogeek.com/168270/how-to-install-custom-themes-and-visual-styles-in-windows/


5/14/2020

Windows 10 version 2004: Here’s what’s new

Microsoft will be releasing their next major update in spring of 2020. The new update is dubbed as Windows 10 20H1 or Windows 10 version 2004 but Microsoft will most likely give it an official name closer to the rollout. The company recently published the ISO files of the 2004 update on Windows Insider website so we expect Microsoft to announce the update rollout dates soon.
Microsoft started working on Windows 10 version 2004 last year which came as a surprise to many users. The company decided to make 19H2 an incremental upgrade and save the major features and changes for Windows 10 version 2004. Now, that Microsoft has almost rolled out Windows 10 19H2 to all the Windows 10 users, the company has started focusing on the next big update which is Windows 10 version 2004. As noted above, Windows 10 version 2004 will be rolling out in the spring of 2020 and Microsoft has already finalized the feature list and is almost done with the testing of the update.

What’s new in Windows 10 version 2004:

Cortana on Windows (Beta)

As part of evolving Cortana from a general digital assistant to a personal productivity assistant that helps you in the Microsoft 365 apps, Microsoft has made several changes that will give you a glimpse into how your assistant will help you manage tasks and time and connect with people. Read more about these changes.
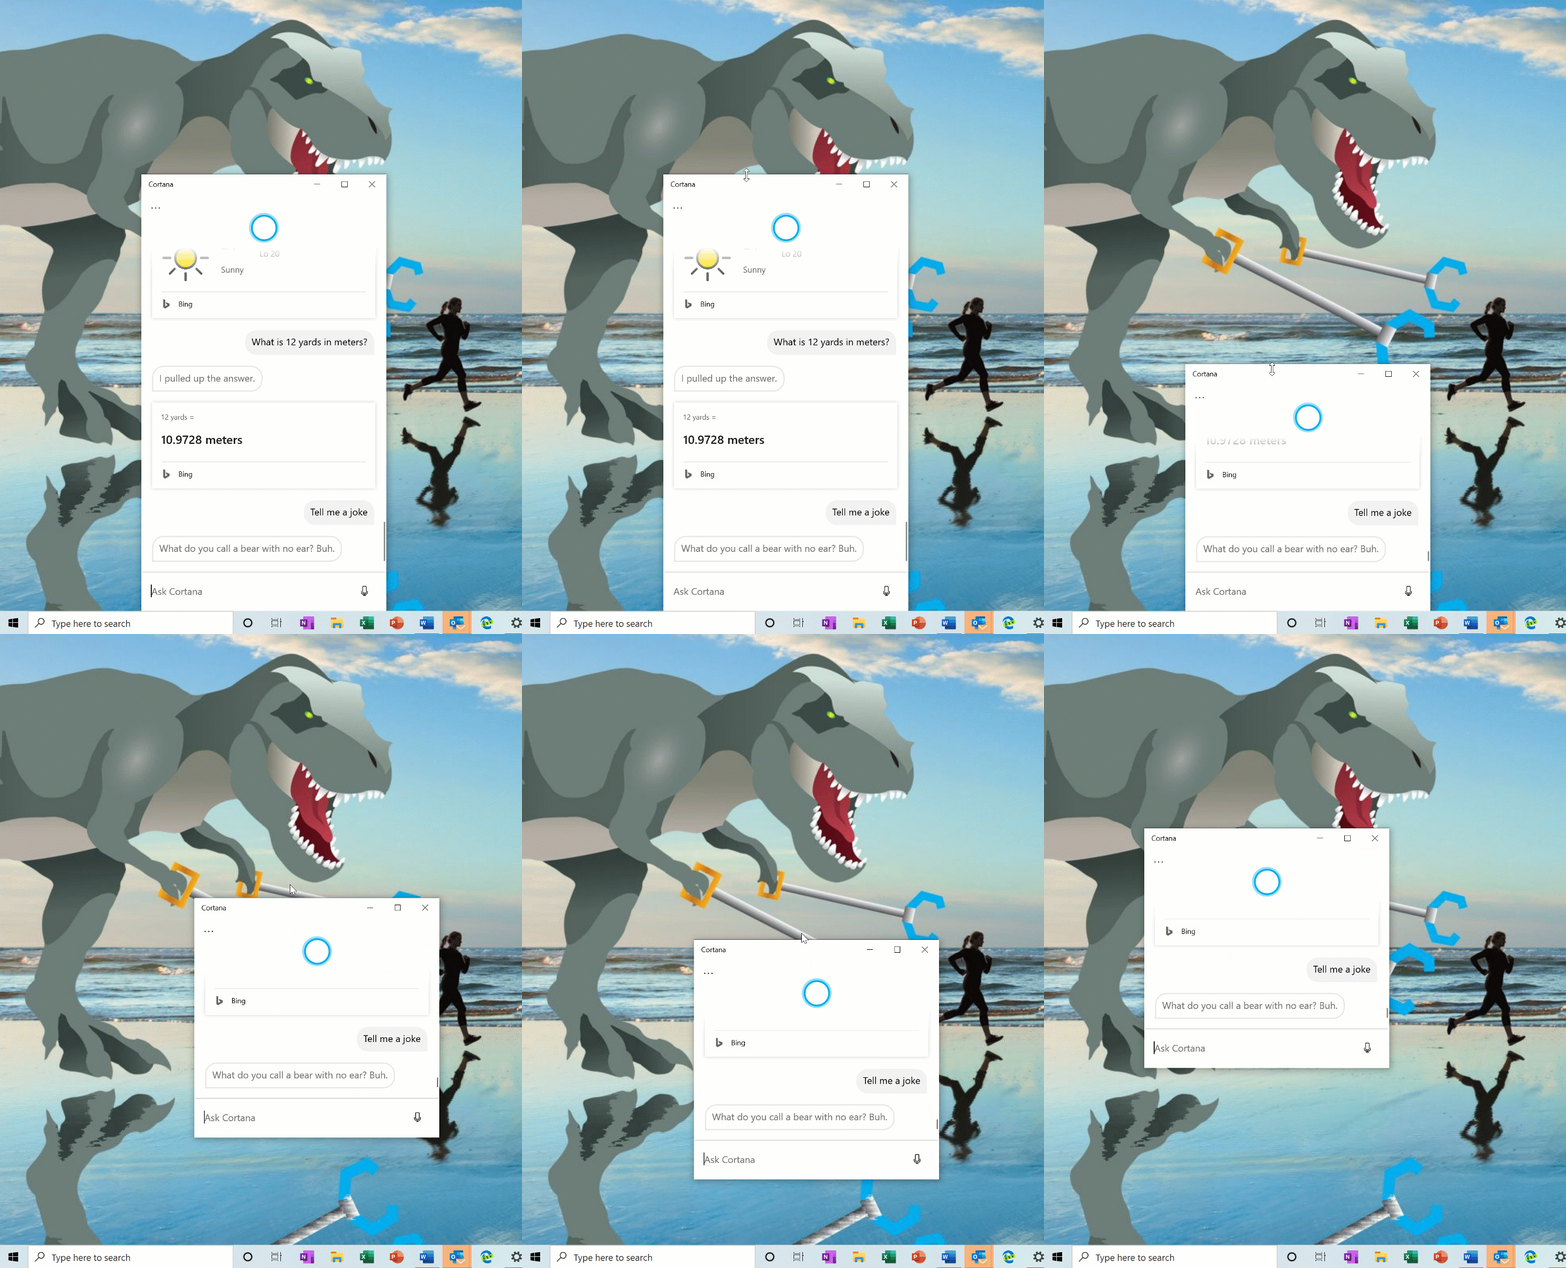
With the new conversational Cortana experience, Microsoft understands that you want to keep the chat going sometimes, and the default position of the window isn’t always where you’d prefer to have it docked if you’re going to have a longer back and forth. That’s why Microsoft is starting to roll out the option to be able to move the window (by dragging the title bar area), to anywhere you’d like on the screen–just like you can with other windows. You can also resize the window if you’d like.
Please note that Microsoft is still in the process of expanding language/region support of the new Cortana app, and Insiders outside of English (United States) will see a message when launching Cortana saying “Cortana isn’t available.” Microsoft will update you when the availability increases.
Cortana experience

Improved disk usage for Windows Search

In 19H1, Microsoft asked Insiders why they were turning off the search indexer. Your feedback helped Microsoft make improvements then and helped focus on three key areas of improvement in Windows 10 version 2004: excessive disk and CPU usage, general performance issues, and low perceived value of the indexer.
Based on this, Microsoft is introducing an algorithm that detects high disk usage and activity, so it can better identify peak usage times and manage the indexer accordingly. Microsoft is also making changes for developers to prevent searches of certain repositories and project folders to improve disk usage.

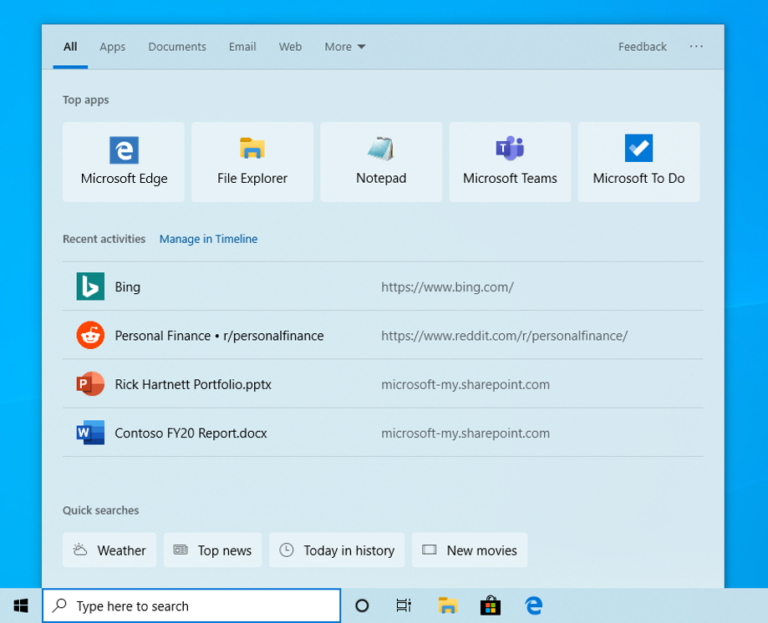
Quick searches now in Search Home

To help you find the info that matters even faster, Microsoft has added four quick web searches to your Search Home:
  • Weather: Get current conditions and the upcoming forecast
  • Top news: Read the latest headlines from popular news sites
  • Today in history: Explore four events that happened on this day
  • New movies: Find out what’s playing in theaters near you
Occasionally, Microsoft will also feature a seasonal topic or interesting quiz.
Quick Searches
To try any or all of these searches, click the search box on your taskbar or press the Windows logo key + S to open Search Home. Want answers and results for other searches? Just type to enter your search and get the info you’re looking for quickly and easily.
Note: This is a server-side change that’s currently rolling out and will appear for users across builds from version 1809 to Windows 10 version 2004. Currently, quick searches are only available in the US but will be available soon internationally.

Updated design for web preview in search results

Microsoft has made a few small tweaks to how it looks–here’s what you’ll see now:
Search

More kaomoji

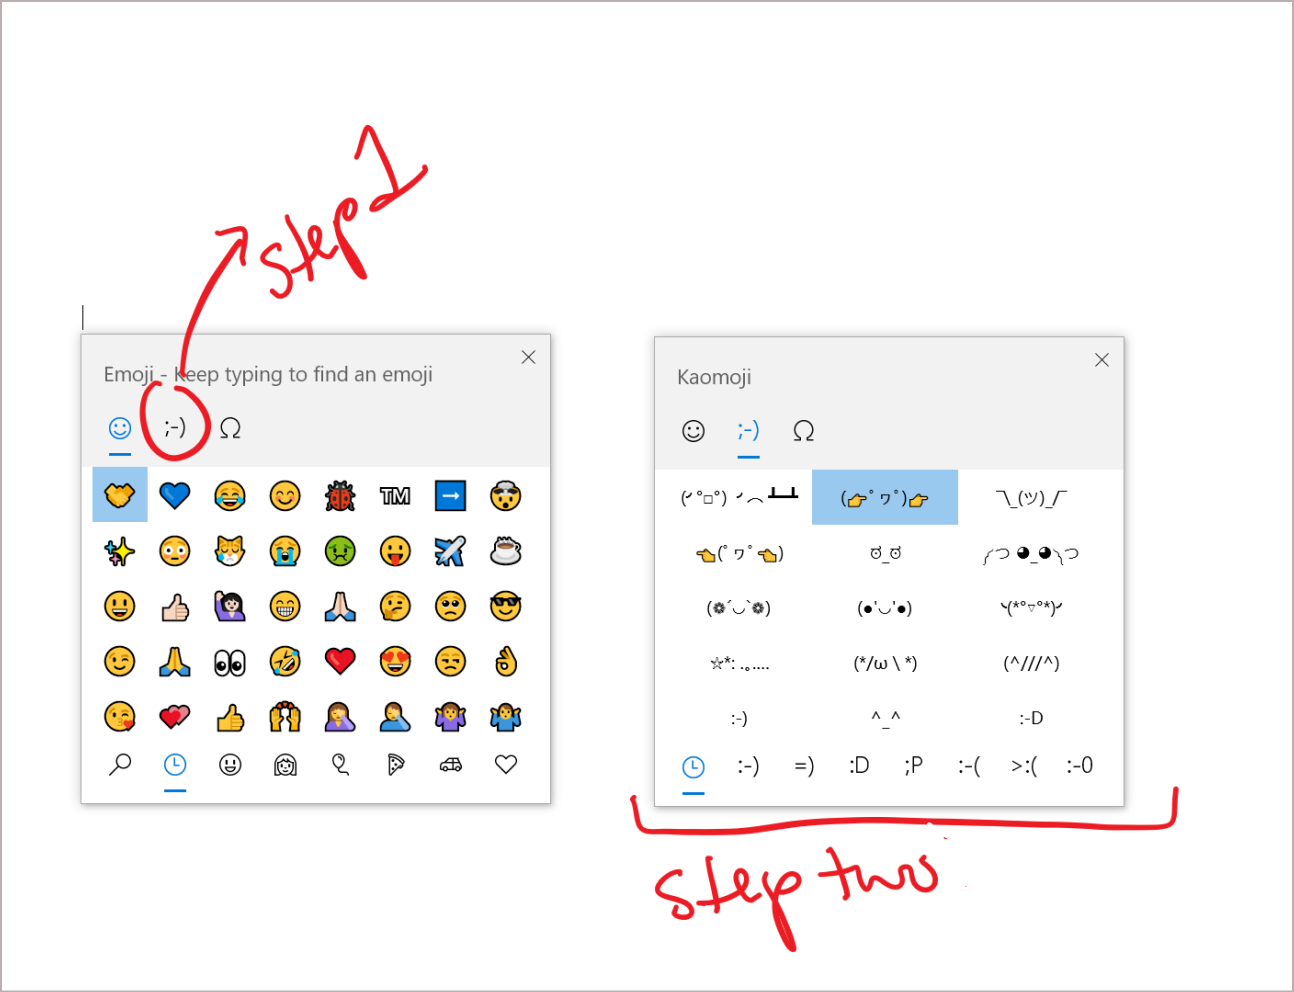
As some of you may know, with Windows 10 version 1903, Microsoft updated our WIN+(Period) / WIN+(Semicolon) keyboard shortcut to not only include emoji but to also now contain kaomoji and special characters. What are kaomoji? Basically, they’re faces with expressions you can make by combining various characters–for example, you might be familiar with the shruggie:
¯\_(?)_/¯
Kaomoji

Windows Subsystem for Linux (WSL) 2 improvements

Previously, your WSL 2 Virtual Machine’s (VM) memory would grow to meet the needs of your workflow, but would not shrink back down when the memory was no longer needed. With this change, as memory is no longer in use in the Linux VM, it will be freed back to Windows, which will shrink in memory size accordingly.
Microsoft has also added WSL2 support for ARM64 devices! Microsoft has also added the ability to set your distribution’s default user using the /etc/wsl.conf file. For the full details of changes in this latest Insider Preview build, please see the WSL release notes.

Added connecting via localhost to WSL 2 Linux apps from Windows and global WSL configuration options

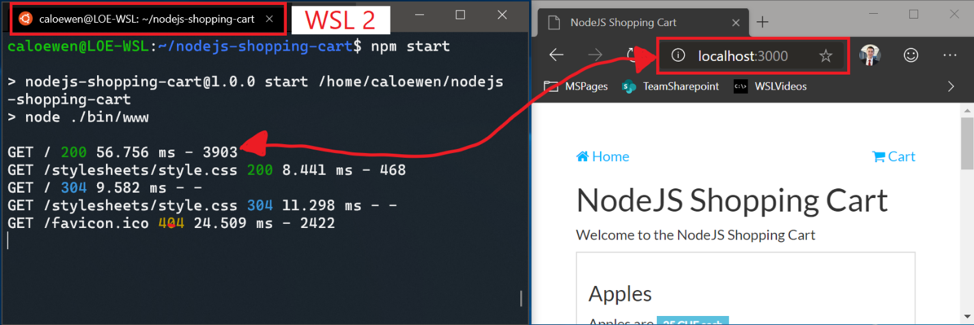
You’ll now be able to connect to your WSL 2 Linux networking applications using localhost. For example, the image below shows starting a NodeJS server in a WSL 2 distro, and then connecting to it in the Edge Browser with localhost.
WSL 2
Additionally, Microsoft has added global configuration options for WSL. These are options that will apply to each of your WSL distros. This also allows you to specify options that relate to the WSL 2 virtual machine (VM), as all your WSL 2 distros run inside of the same VM. The most exciting option that you’ll get access to in this build is being able to specify a custom Linux kernel! For the full details on what’s new in this release, check out What’s new for WSL in Insiders Preview Build 18945 on the Windows command line blog.

Windows Hello PIN in Safe mode

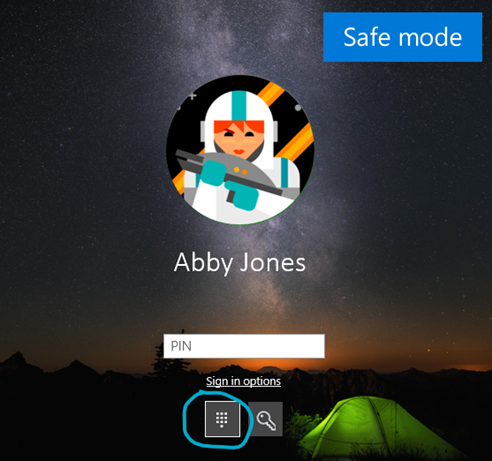
Microsoft is taking another step forward in our Passwordless journey by adding Windows Hello PIN sign-in support to Safe mode so that you no longer have rely on your password when troubleshooting your device. Try it out with the instructions below and let Microsoft know what you think!
  • Set up Windows Hello in Settings > Accounts > Sign-in options
  • Boot your device into Safe mode:
  1. Go to Settings > Update and Security > Recovery.
  2. Under Advanced startup select Restart now.
  3. After your PC restarts to the Choose an option screen, select Troubleshoot > Advanced options > Startup Settings > Restart. You may be asked to enter your BitLocker recovery key.
  4. After your PC restarts, you’ll see a list of options. Select 4 or press F4 to start your PC in Safe Mode. You can also select 5 or press F5 to use Safe Mode with Networking.
  • Sign in to your device with your Windows Hello PIN
PIN access in safe made

Connecting network cameras to Windows 10 devices

Network cameras, which are Internet Protocol-based cameras that transmit video data over a local area network (LAN), are becoming increasingly prevalent—especially in surveillance and security scenarios. Windows now allow users to associate network cameras to their PC, enabling photo capture and streaming of video in camera applications.

Enabling automatic restart for UWP apps

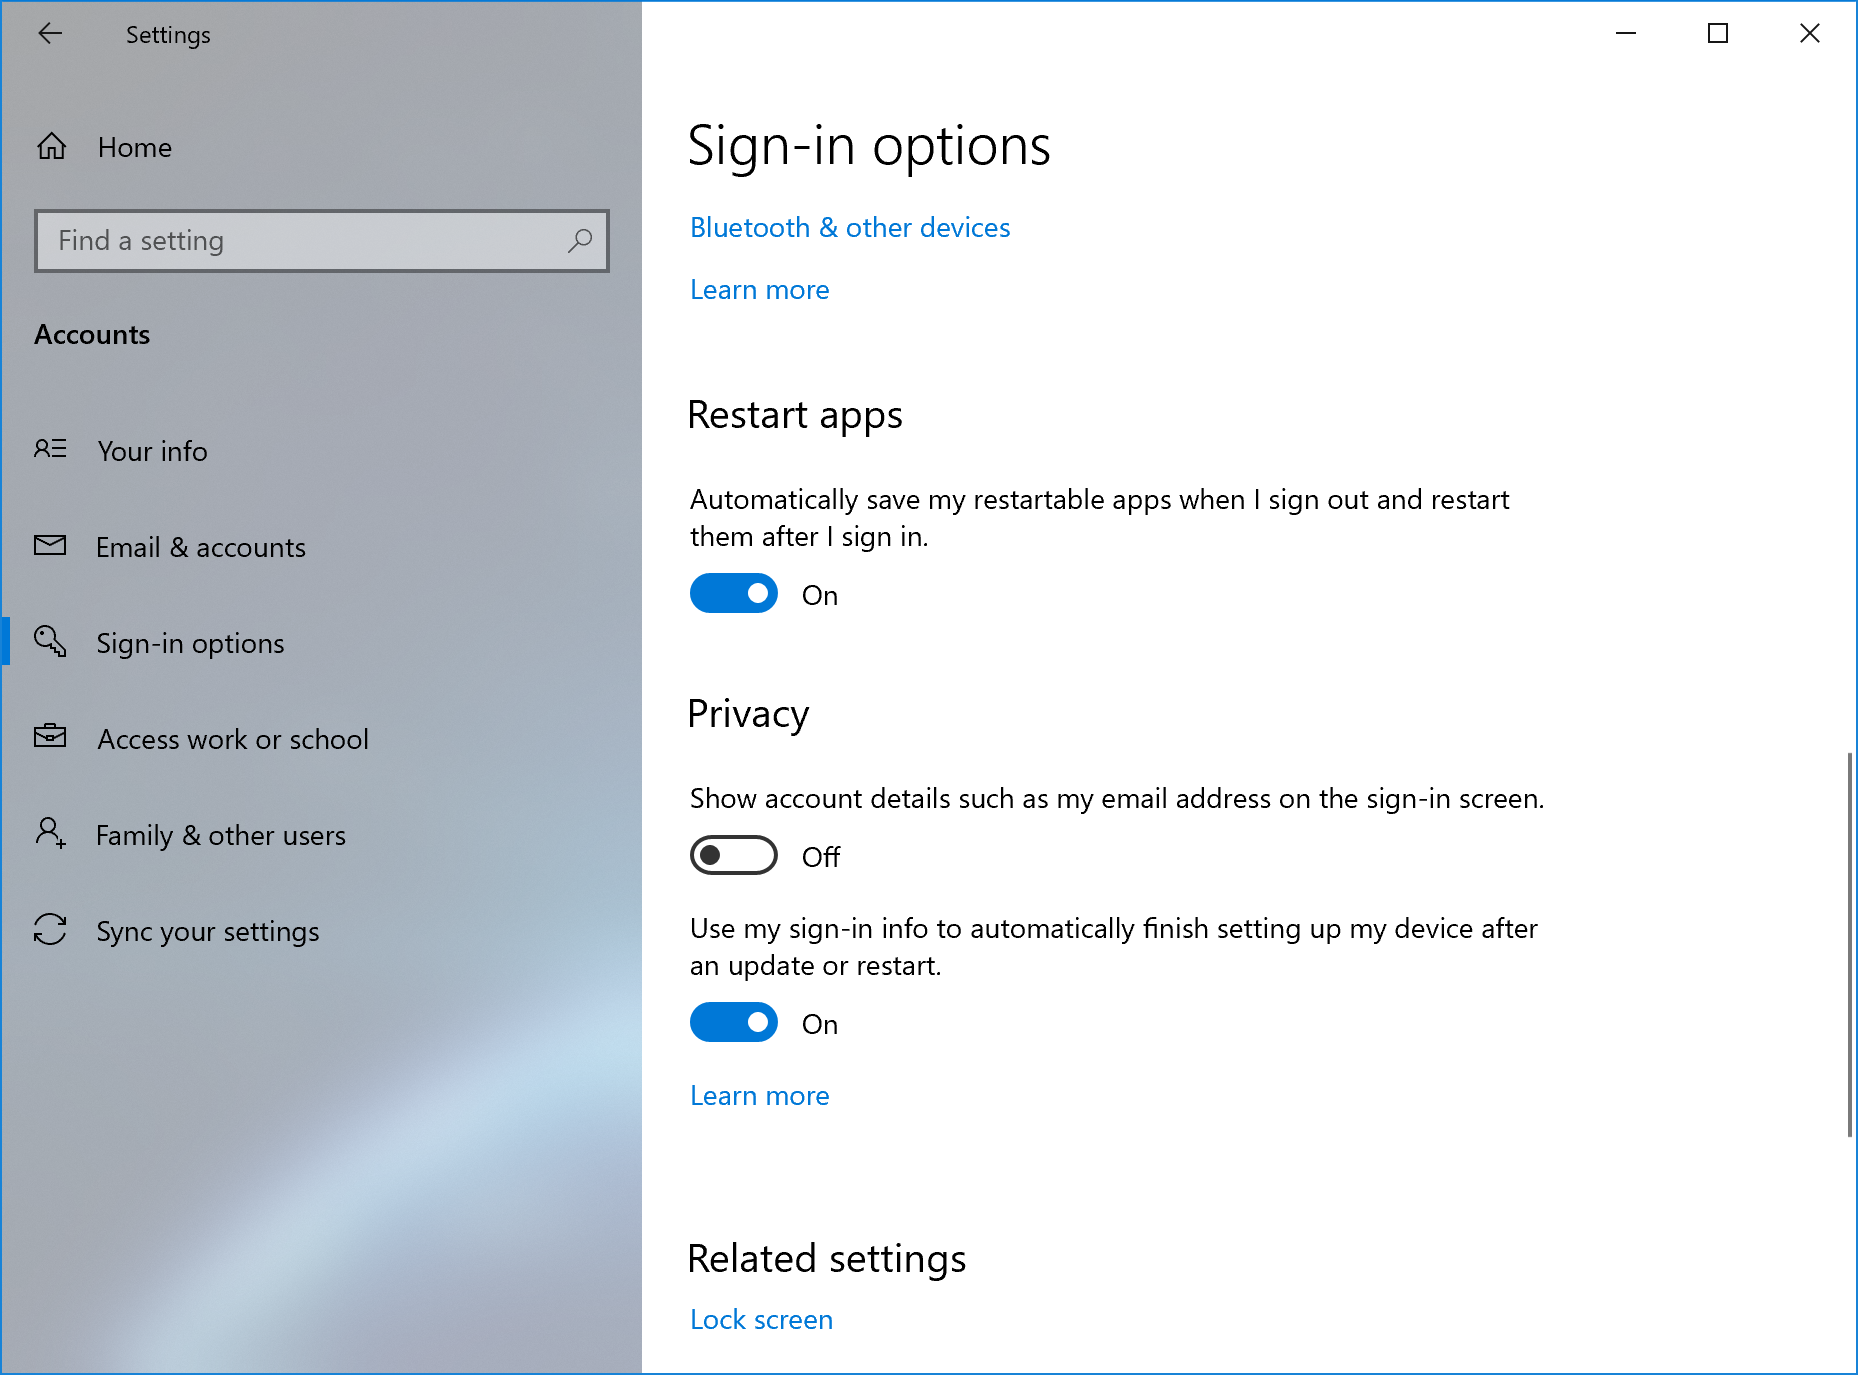
Microsoft already introduced a new separate setting to control if registered desktop apps from your previous sign-in session are restarted when signing back into Windows. In the latest Insider Preview builds, in addition to registered desktop apps, when you opt in to this setting, the majority of open UWP apps are now also automatically restarted as well! To reduce sign-in time, UWP apps are restarted minimized, in a suspended state, giving Windows and other apps more resources to get started. To try it out:
  1. Go to Settings > Accounts > Sign-in options and turn on “Automatically save my restartable apps when I sign out and restart them after I sign in.” under “Restart apps”.
  2. Start one or more UWP apps, such as Feedback Hub.
  3. Sign out and then sign back into Windows.
UWP apps that were started, such as Feedback Hub, should restart minimized with a taskbar button.

Xbox Game Bar Updates

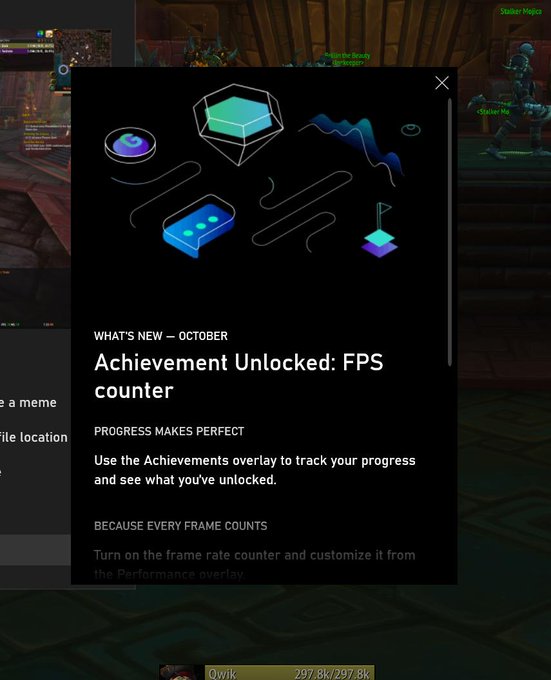
In case you hadn’t seen, Microsoft is starting to roll out an FPS counter and achievement overlay!  The update will come via the Microsoft Store. Just set focus to your favourite game and press WIN + G to get started.
xbox game bar updates

Improving your Bluetooth pairing experience

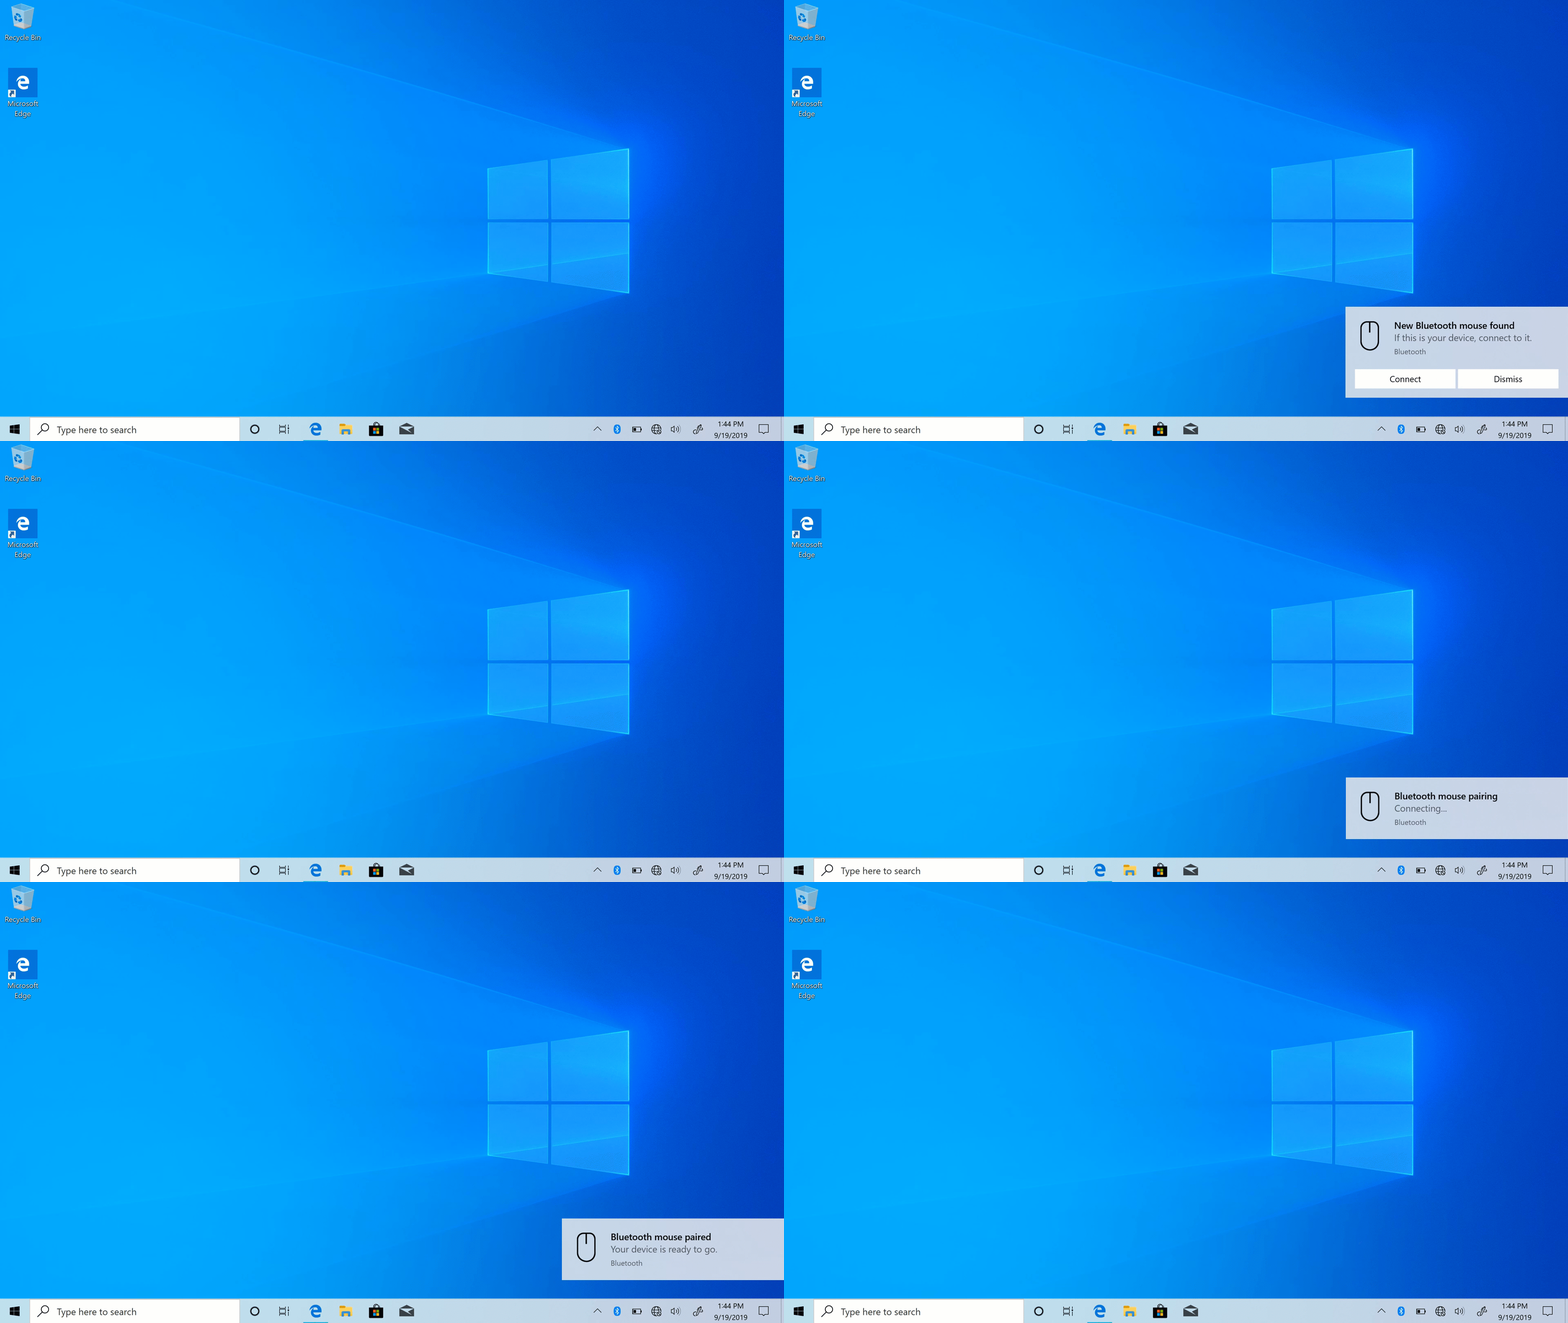
For Windows 10, version 1803, Microsoft announced a new streamlined experience for pairing supported Bluetooth devices. The idea was simple—if a supported device was nearby and in pairing mode, Windows will show a notification that prompted you to go through pairing. This saved you from opening Settings yourself and finding the right place to go. Today, Microsoft is rolling out an update with improvements Microsoft hopes you’ll like. Here’s what’s new:
  • Pairing is all done in notifications now. You don’t need to go to the Settings app anymore to finish pairing.
  • For faster pairing time, Microsoft has improved the UI by showing one less notification.
  • Microsoft added a Dismiss button to the first notification to give you more control while using Swift Pair.
  • To make the notification more helpful, now Microsoft shows the device name and category.
Supported devices include:
  • Surface Ergonomic Keyboard
  • Surface Precision Mouse
  • Surface Mobile Mouse
  • Surface Arc Mouse
  • Surface Headphones
  • Microsoft Arc Mouse
  • Microsoft Modern Mobile Mouse
  • Microsoft Bluetooth Keyboard
  • Microsoft Bluetooth Mouse
Bluetooth pairing

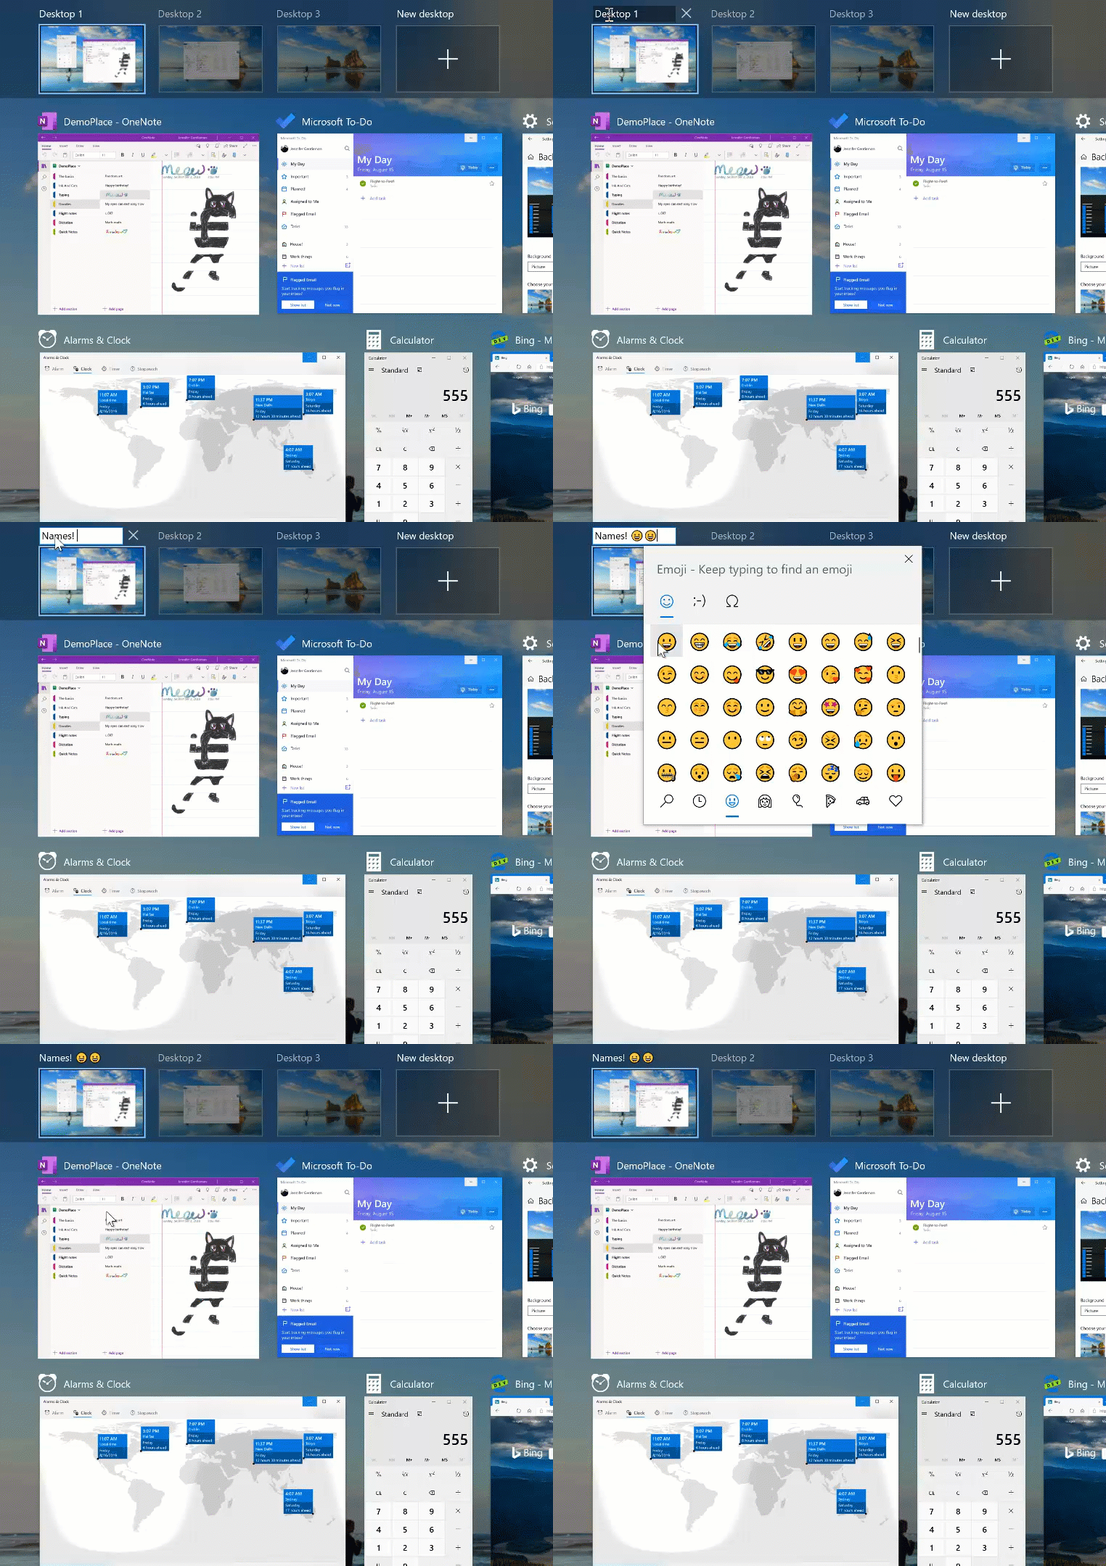
Update on Virtual Desktop renaming

The ability to rename your virtual desktops is now available.  To get started:
  1. Open Task View by selecting the Task View icon in the taskbar or pressing WIN+Tab.
  2. Select the New Desktop.
  3. Select the desktop name (“Desktop 1”) and it should become editable, or right-click the desktop thumbnail and a context menu will appear with a Rename entry.
  4. Input whatever name you’d like, and press enter.
  5. Done!
Virtual Desktop renaming

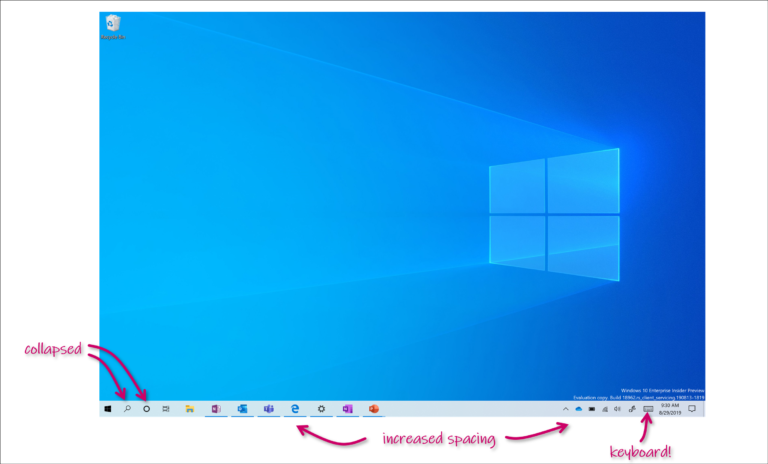
Introducing a new tablet experience for 2-in-1 convertible PCs!

Now available: a new tablet experience for 2-in-1 convertible PCs as a Beta to Windows Insiders.
tablet experience
This new experience allows users entering tablet posture to stay in the familiar desktop experience without interruption, plus a few key touch improvements:
  • Increased spacing between Taskbar icons.
  • Search box on taskbar collapsed into an icon.
  • File Explorer switches to touch optimized layout.
  • Touch keyboard auto invokes when you tap text fields.
As part of this, Microsoft has also made a few small changes to the tablet section in Settings. Here are the steps to use on your PC:
  1. Use your convertible PC as a laptop as you normally would–opening apps and interacting with them.
  2. When you’re ready to pick it up and go or simply lean back on the couch, you can fold back the keyboard or remove it altogether, and it should switch to this new mode shown above.
  3. Now use your device as a tablet with touch.

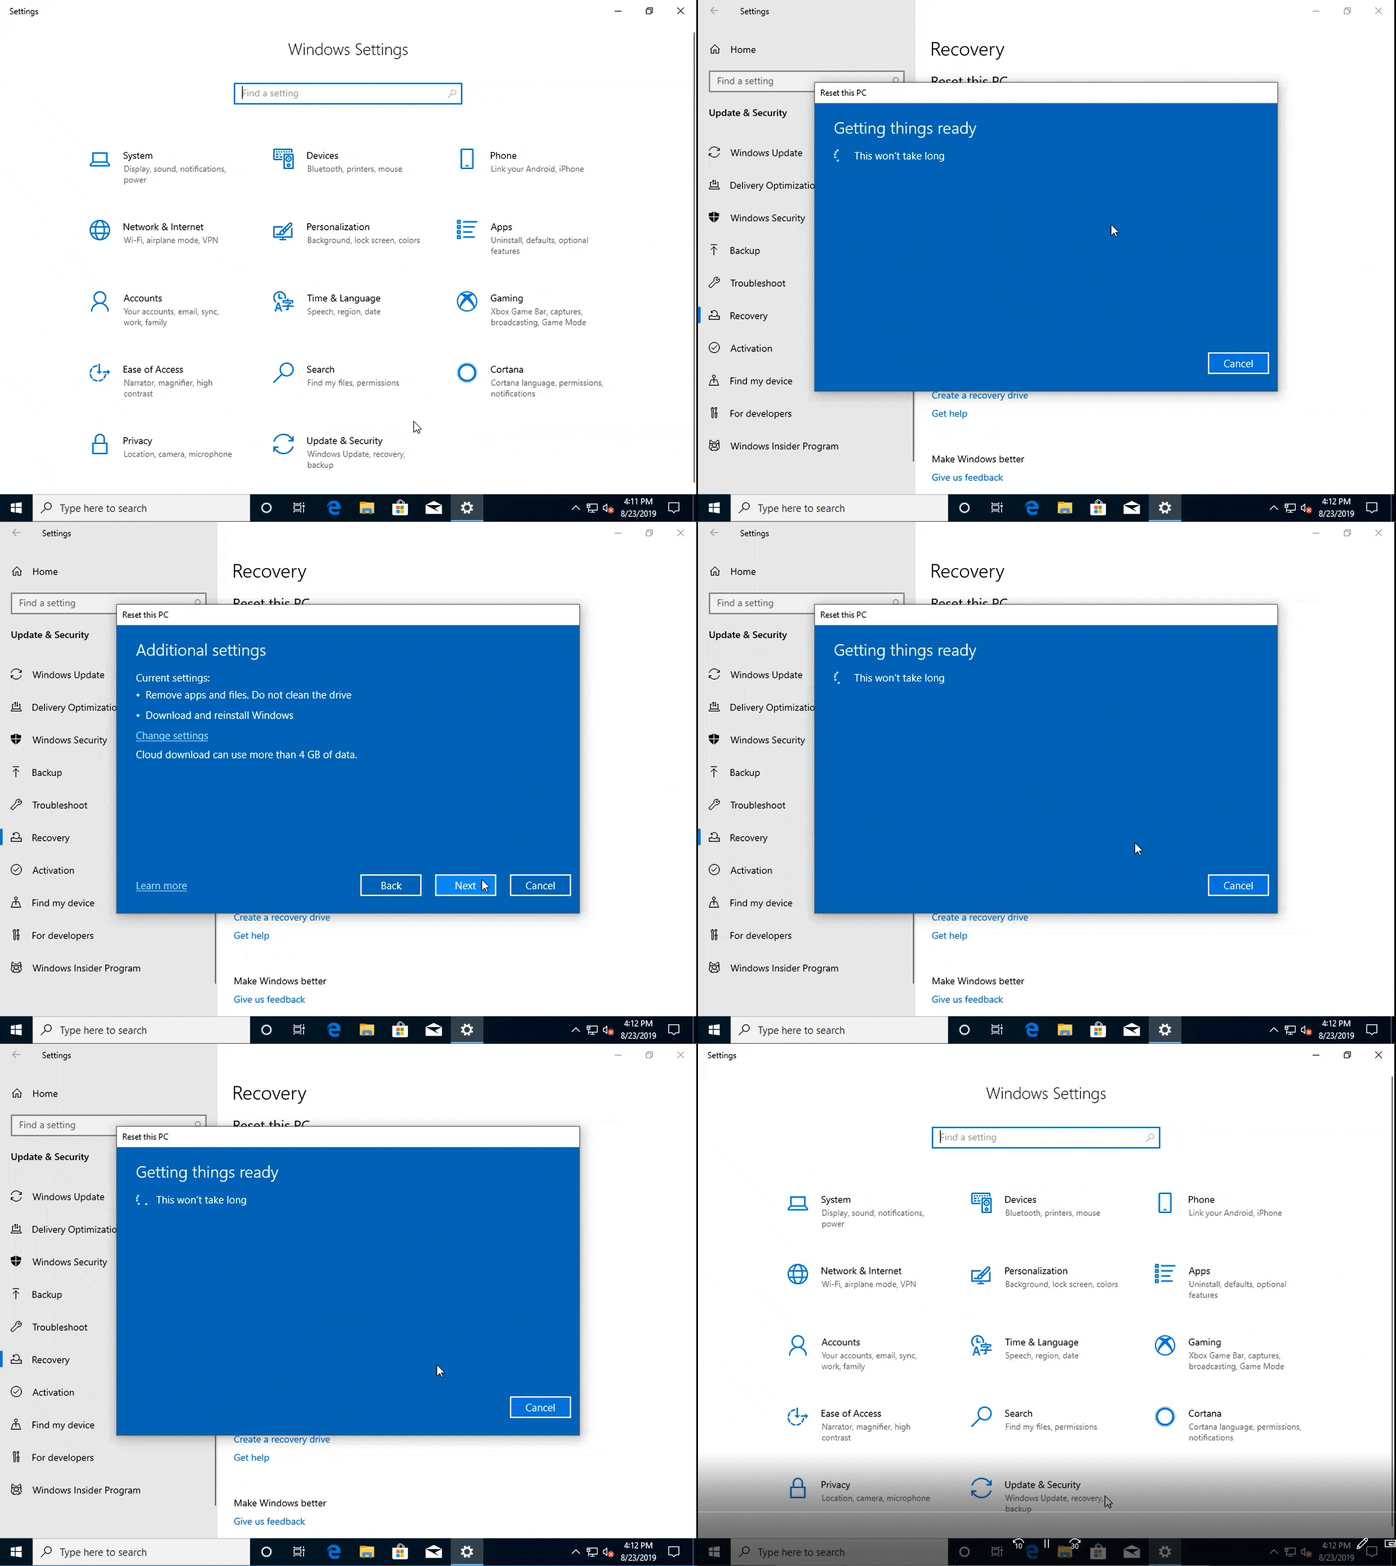
Reset your PC from the cloud

Reset this PC provides users a new choice to download Windows or use local reinstall. Previously, Reset this PC was only able to do a local reinstall and would build a new Windows installation from existing Windows files. When this feature was introduced in Windows 10 version 1507, it provided the advantage of enabling Windows to be recoverable without requiring extra disk space to store a compressed, backup copy of Windows in a hidden partition.
 Note: This is a recovery operation and will remove the apps you have installed. Additionally, if the “Remove everything” option is selected, user data will also be deleted. For more information on Reset this PC and other recovery options, visit the link here.
The cloud download option will reinstall the same build, version, and edition, that is currently installed on your device. This new cloud download option is available to all Windows 10 devices and is different from the “Recover from the cloud” feature available on some earlier Windows 10 devices.
For more information, check out this article.
recovery improvements

Control over restarting apps at sign-in

Windows now put you in control with a new app restart setting. When turned on, Windows automatically saves your restartable apps when signing out, restarting, or shutting down Windows, and restarts them next time you sign in. This setting is off by default and you can change it any time in Settings > Accounts > Sign-in options, and can find it by searching for “restart apps” in Start or the search box.
Sign-in options

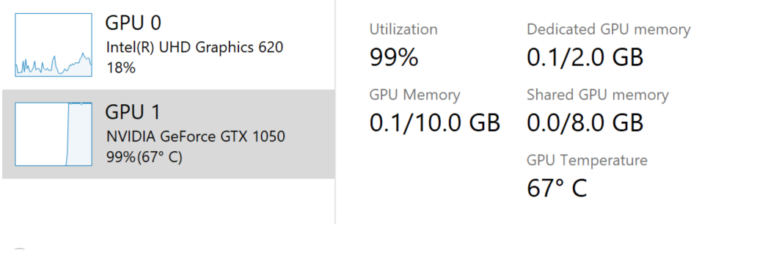
GPU temperature comes to Task Manager

If you have a dedicated GPU card, Microsoft will now bubble up the current temperature next to its listing in the Performance Tab.
Task Manager
If you have any further feedback for Task Manager, please don’t hesitate to share it. To make suggestions or report issues in this space, press WIN+F and file the feedback under Desktop Environment > Task Manager in the Feedback Hub.
Notes:
  • Showing the GPU temperature in Task Manager is currently only supported if you have a dedicated GPU card.
  • You may need an updated graphics driver to see the temperature. Specifically, one which supports version 2.4 (or higher) of WDDM is required. To check which version your PC has, press WIN+R and enter dxdiag. Under the Display tab, it will say your WDDM version next to the Driver Model.
  • Currently, the temperature value is only supported in Celsius.

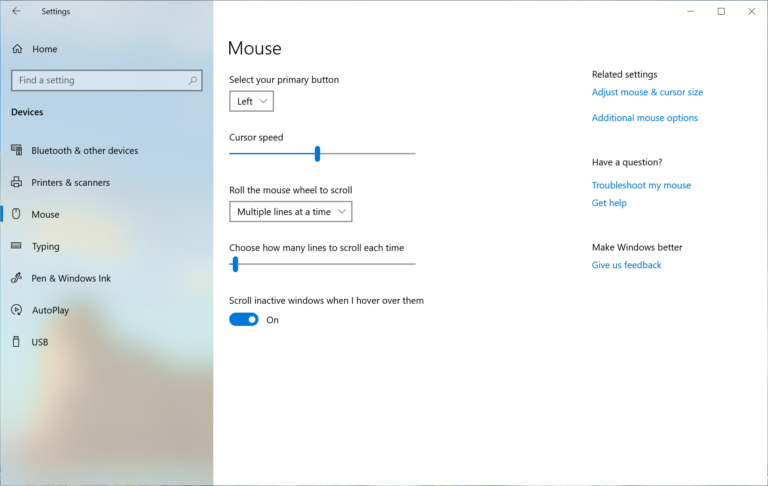
Adding Mouse Cursor speed to Settings

You can now set your mouse cursor speed from within Settings! This is the latest piece of Microsoft’s larger ongoing effort to converge Settings and Control Panel experiences. You can find the setting under Settings > Devices > Mouse.
Mouse Cursor

Notepad improvements

Notepad has been a well-loved text editor in Windows for over 30 years. Over the last few releases, Microsoft has been making a number of small improvements to Notepad based on your feedback including:
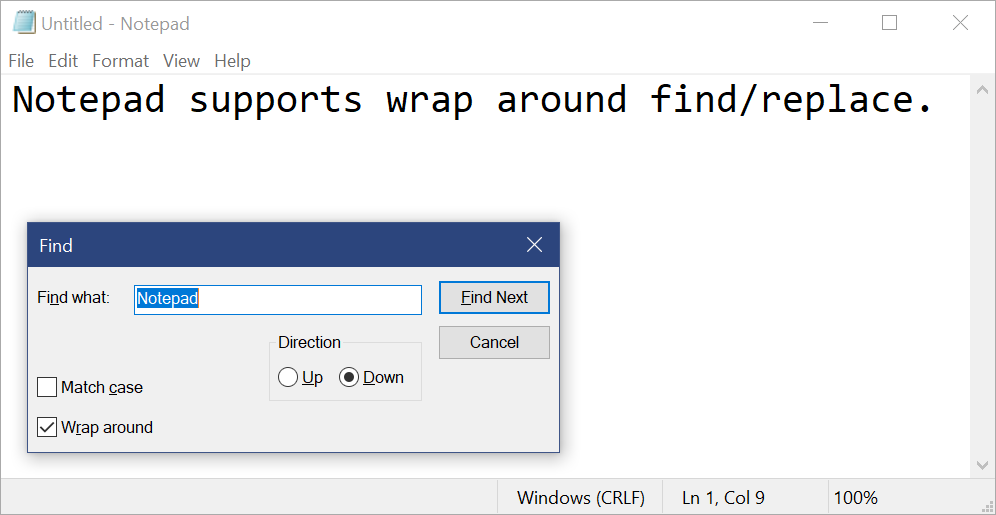
  1. Wrap-around find/replace: Microsoft has made significant improvement to the find/replace experience in Notepad. Microsoft has added the option to do wrap-around find/replace to the find dialog and Notepad will now remember previously entered values and the state of checkboxes and automatically populate them the next time you open the find dialog. Additionally, when you have text selected and open the find dialog Microsoft will automatically populate the search field with the selected text.
Wrap-around
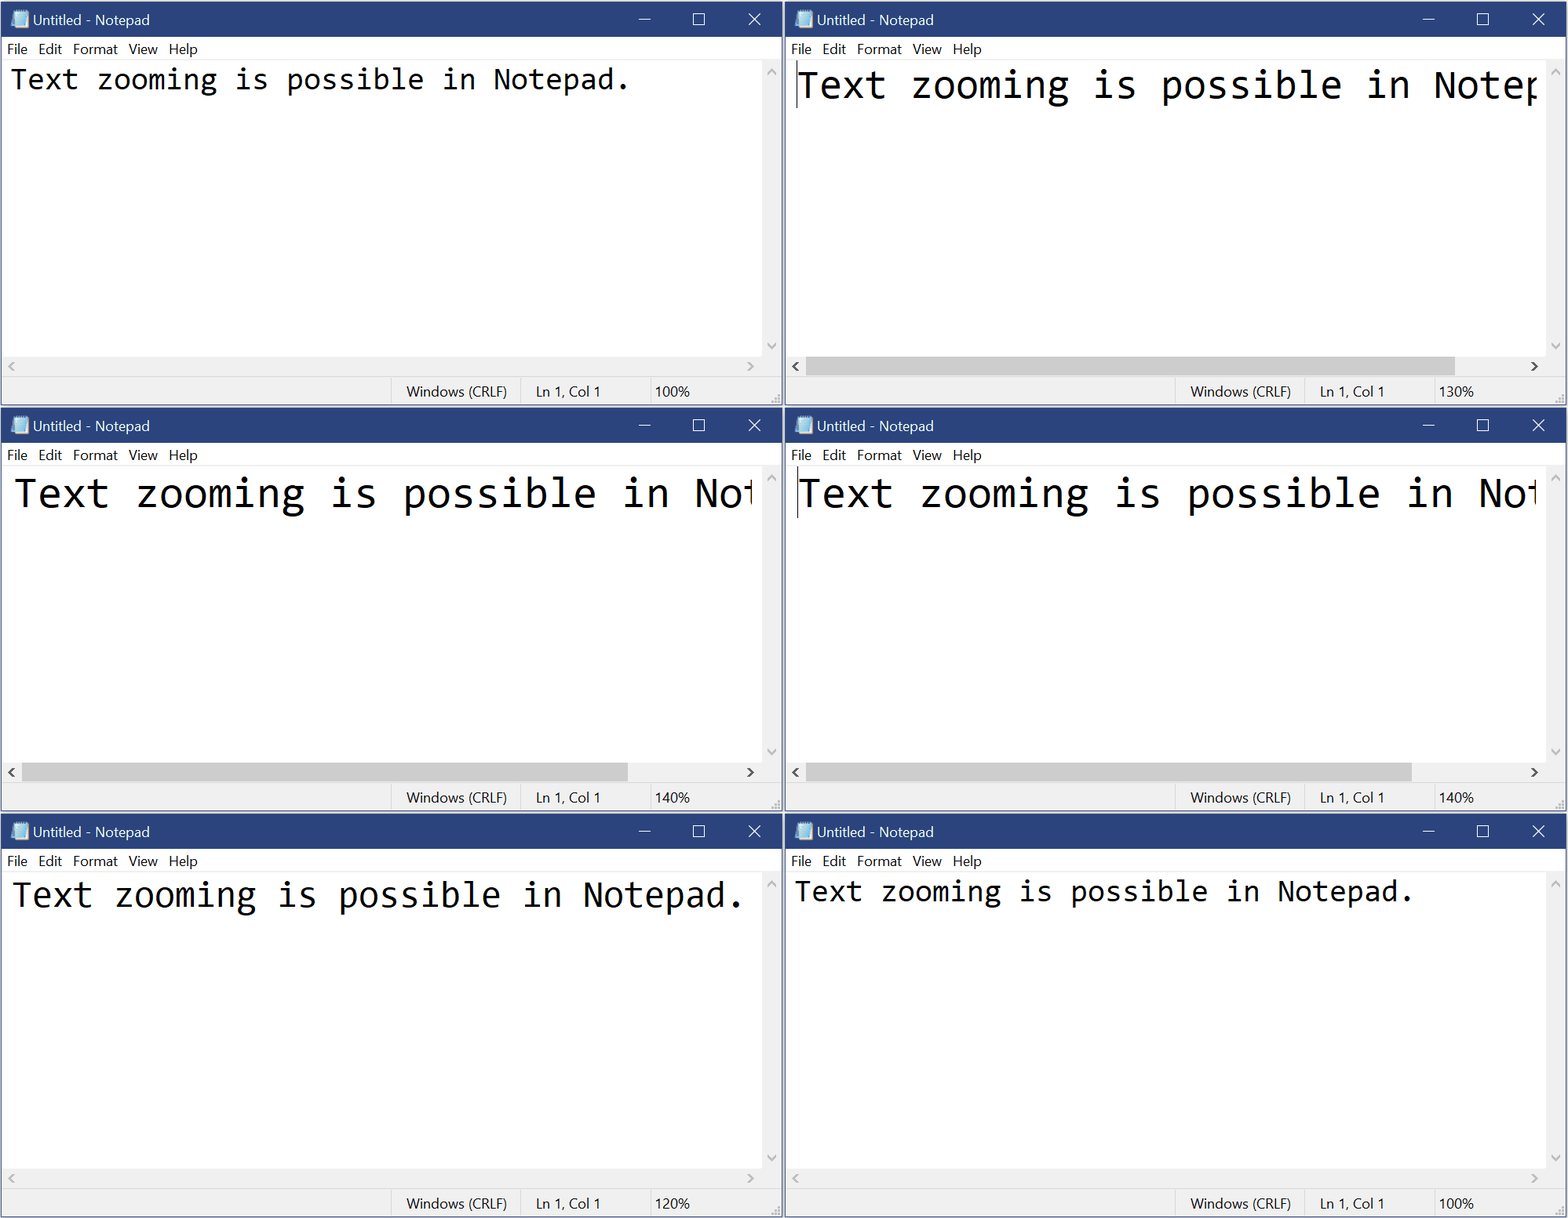
  1. Text zooming: Microsoft has added options to make it quick and easy to zoom text in Notepad. There is a new menu option under View > Zoom to change the zoom level and Microsoft displays the current zoom level in the status bar. You can also use Ctrl + Plus, Ctrl + Minus and Ctrl + MouseWheel to zoom in and out and use Ctrl + 0 to restore the zoom level to the default.
Text zooming
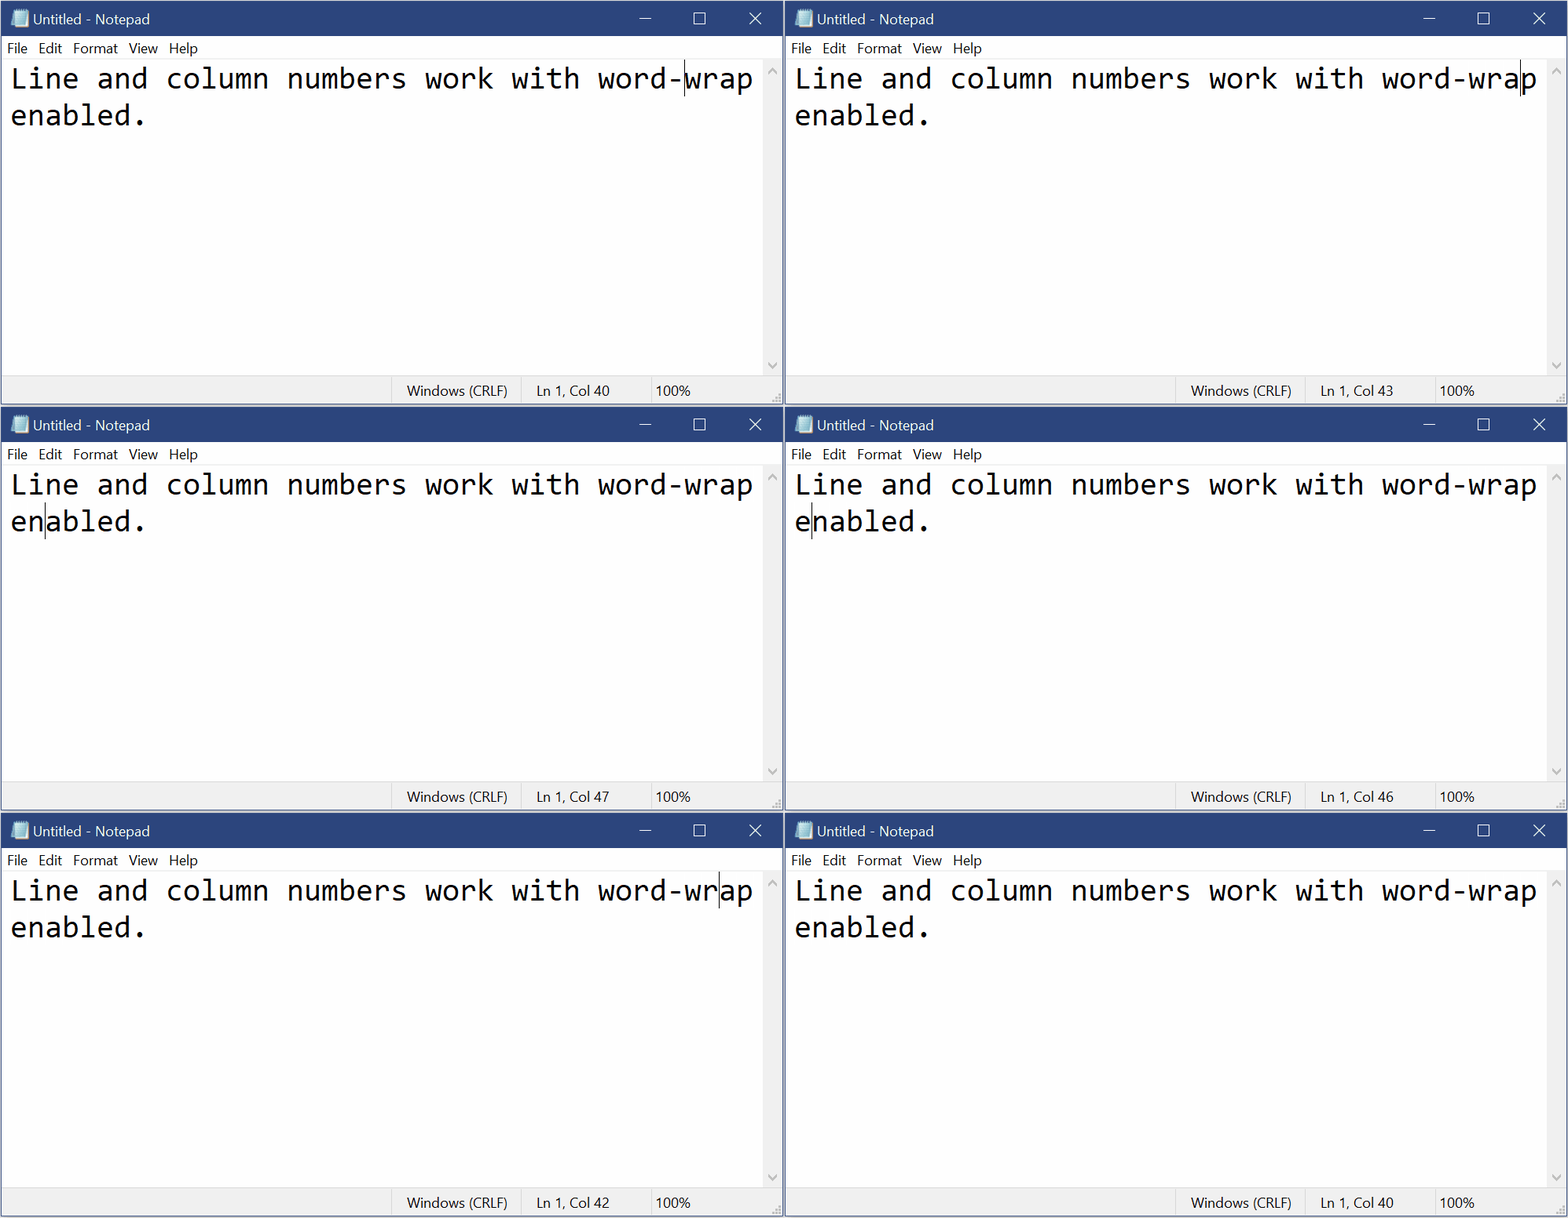
  1. Line numbers with word-wrap: A long outstanding request has been to add the ability to display line and column numbers when word-wrap is enabled. This is now possible in Notepad and Microsoft has made the status bar visible by default. You can still turn the status bar off in the View menu.
Line numbers with word-wrap
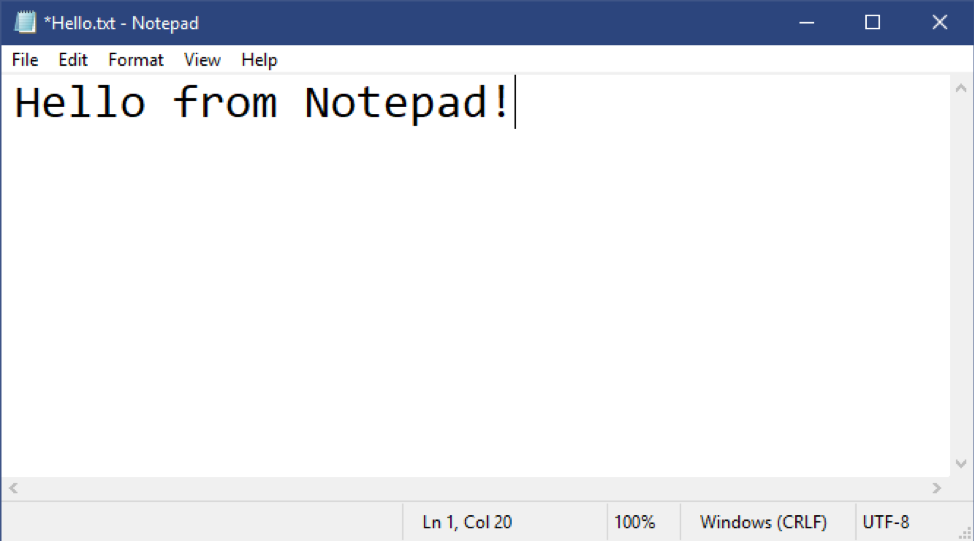
  1. Modified indicator: Notepad will now show an asterisk (*) in the title bar before the title of a document to indicate that a document has unsaved changes.
Modified indicator
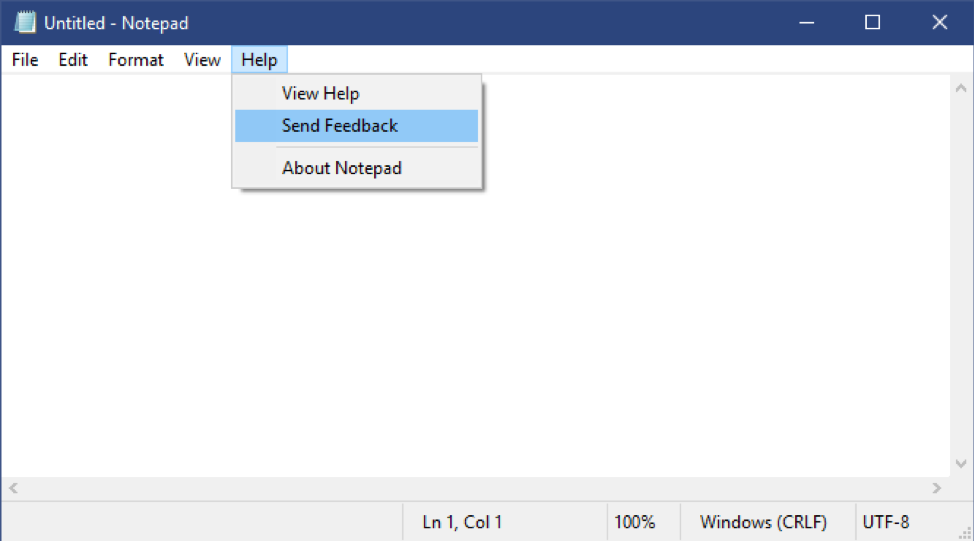
  1. Send Feedback: You can now send feedback directly from Notepad! Click Help > Send Feedback to open the Feedback Hub with the Notepad category selected and get your feedback directly to the product team.
Send Feedback
UTF-8 Encoding: Microsoft has made significant improvements to the way Notepad handles encoding. Starting with this build, Microsoft is adding the option to save files in UTF-8 without a Byte Order Mark and making this the default for new files. UTF-8 without a Byte Order Mark is backwards-compatible with ASCII and will provide better interoperability with the web, where UTF-8 has become the default encoding. Additionally, Microsoft added a column to the status bar that displays the encoding of the document.
Other Updates
  • Expanding line support
  • Microsoft has added support for some additional shortcuts:
    • Ctrl+Shift+N will open a new Notepad window.
    • Ctrl+Shift+S will open the Save as… dialog.
    • Ctrl+W will close the current Notepad window.
  • Notepad can now open and save files with a path that is longer than 260 characters, also known as MAX_PATH.
  • Microsoft has fixed a bug where Notepad would count lines incorrectly for documents with very long lines.
  • Microsoft has fixed a bug where, when you select a placeholder file from OneDrive in the File Open dialog, Microsoft would download the file to determine its encoding.
  • Microsoft has fixed a recent regression where Notepad would no longer create a new file when launched with a file path that didn’t exist.
  • Microsoft has improved the performance when opening large files in Notepad.
  • Notepad now supports Ctrl + Backspace to delete the previous word.
  • Arrow keys now correctly unselect text first and then move the cursor.
  • When saving a file in Notepad, the line and column number no longer reset to 1.
  • Notepad now correctly displays lines that don’t fit entirely on the screen.

Changes to your account picture in Windows

Changing the picture for the account you use to sign in to Windows is now better than ever! Your updated picture will now show up quickly across Windows, apps, and many of the Microsoft sites you use every day. Previously, you might see as many as three or four different pictures for your account in different apps and sites at one time. It’s super easy to try out – just go to Your info in Windows settings and change your picture there!
Steps
  1. Open “Your info” in Windows settings by pressing the Windows key, and typing “Your info,” and selecting “Your account info.”
  2. Use the options in ‘Create your picture’ to select a new picture for your account.
  3. Check if your picture has been updated in Windows, and on the sites and apps you use.
Note: Microsoft is still working with many sites and apps that will need to be updated to work well with this new feature. For example, the account manager control that appears in the upper right of many Microsoft websites currently updates every 24 hours. This will be changed in the next few months to update quickly when your account picture changes.

Windows Search improvements

Here are some of the server-side search improvements Microsoft has been rolling out based on the user feedback:
  • Improved spell correction for Apps & Settings searches. Windows Search has built-in spell correction to help you find what you’re looking for. When you’re typing quickly sometimes mistakes happen – Microsoft is excited to announce that Microsoft has updated our spell correction technology to intelligently understand and correct small typos like “powerpiont” and “exce;” which previously would return no results. With these updates, you get better results faster. This feature is now available on both Insider and retail builds in English-language markets.
  • Hints to improve Best match results. Microsoft’s goal with Windows Search is to provide a simple to use experience, and a key aspect of this is making results easy to understand. Something Microsoft has heard from users is that sometimes settings search results don’t match your search. To help address this, in certain cases where the Best match result isn’t an exact match for your search, a “Related:” line will be included below the result to help clarify why this result is appearing. Microsoft will be expanding this feature to include Apps search in the coming weeks. This feature is now available on both Insider and retail builds in English (United States).
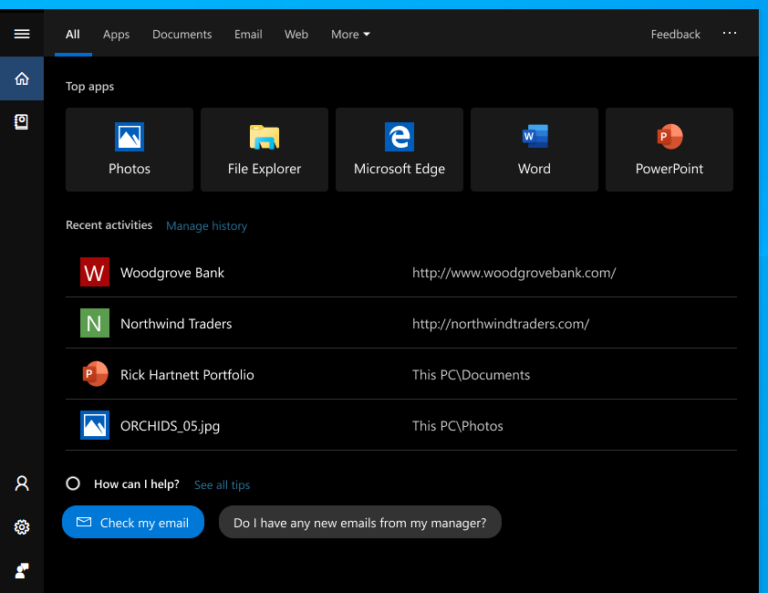
  • Bringing the latest Search Home experience to more users. With the Windows 10 May 2019 Update Microsoft updated Search Home to help you save time by adding quick access to your Top apps and Recent activities. After receiving positive feedback and comments about this new experience, Microsoft is now making it available to more users by rolling it out to everyone using the Windows 10 October 2018 Update as well. Here’s a glance at what it looks like for those on the Windows 10 October 2018 Update:
Windows Search

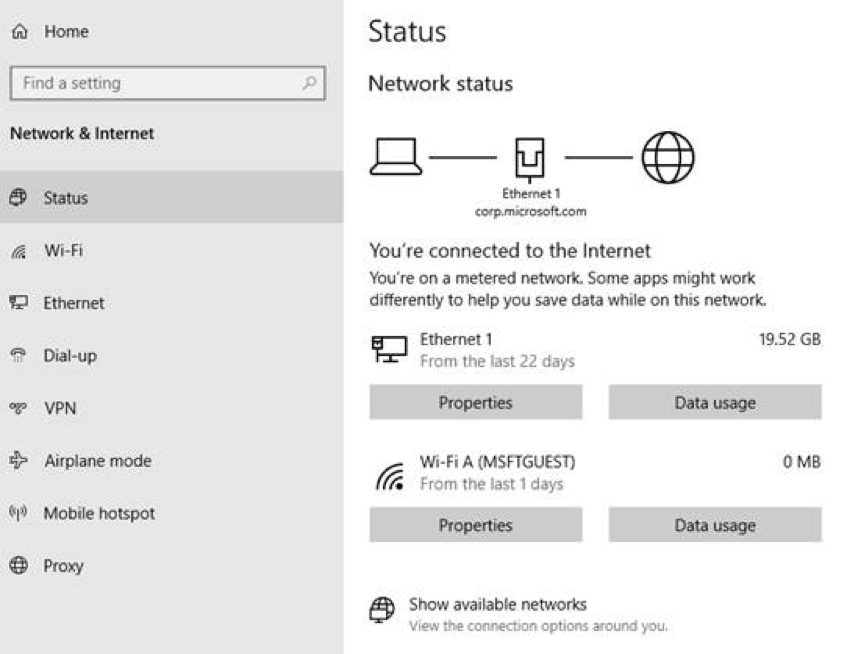
A redesigned Network Status page in Settings

Based on your feedback, Microsoft is revamping the Network & Internet landing page in Settings to provide more information at a glance about your device’s connectivity, combining several pages to give you one clear view of how you are connected to the internet.
  • New view of active connections: Microsoft now show all available connection interfaces on the Status page, so you can quickly see what is connected and view and change properties as needed. If you have multiple connections, only one will be used for internet connectivity at a time, and that one is still shown in the Status diagram at the top of the page.
Network status
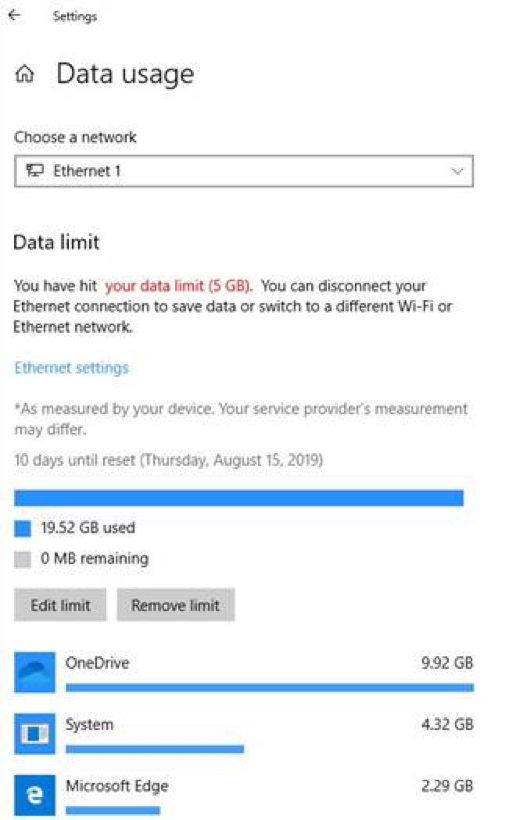
  • Integrated Data Usage: As you may have noticed in the picture above, you can now see how much data is being used by a network right from the Status page! If it looks like you’re using a lot of data, you can drill into the Data Usage page to create a limit for that network, which will warn you if you get close or go over your limit. You can also see how much data each app is using on that network.
Network status

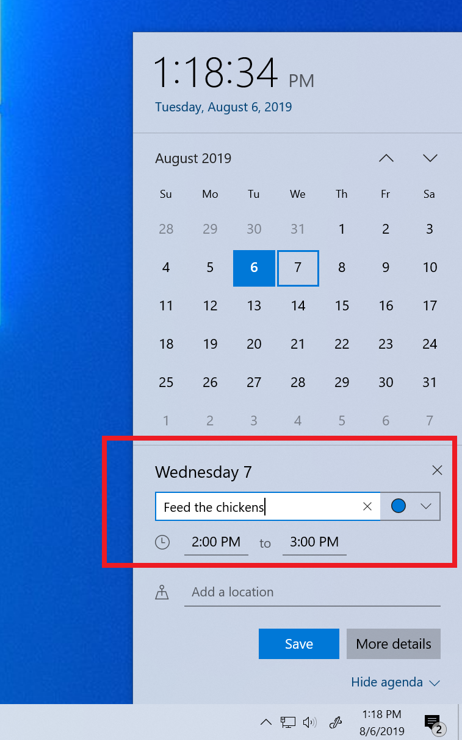
Quick Event Create from the Taskbar

You can now quickly create an event straight from the Calendar flyout on the Taskbar. Just select the date and time at the lower right corner of the Taskbar to open the Calendar flyout and pick your desired date and start typing in the text box. You’ll then see inline options to set a time and location.
Taskbar

Refining your notification settings

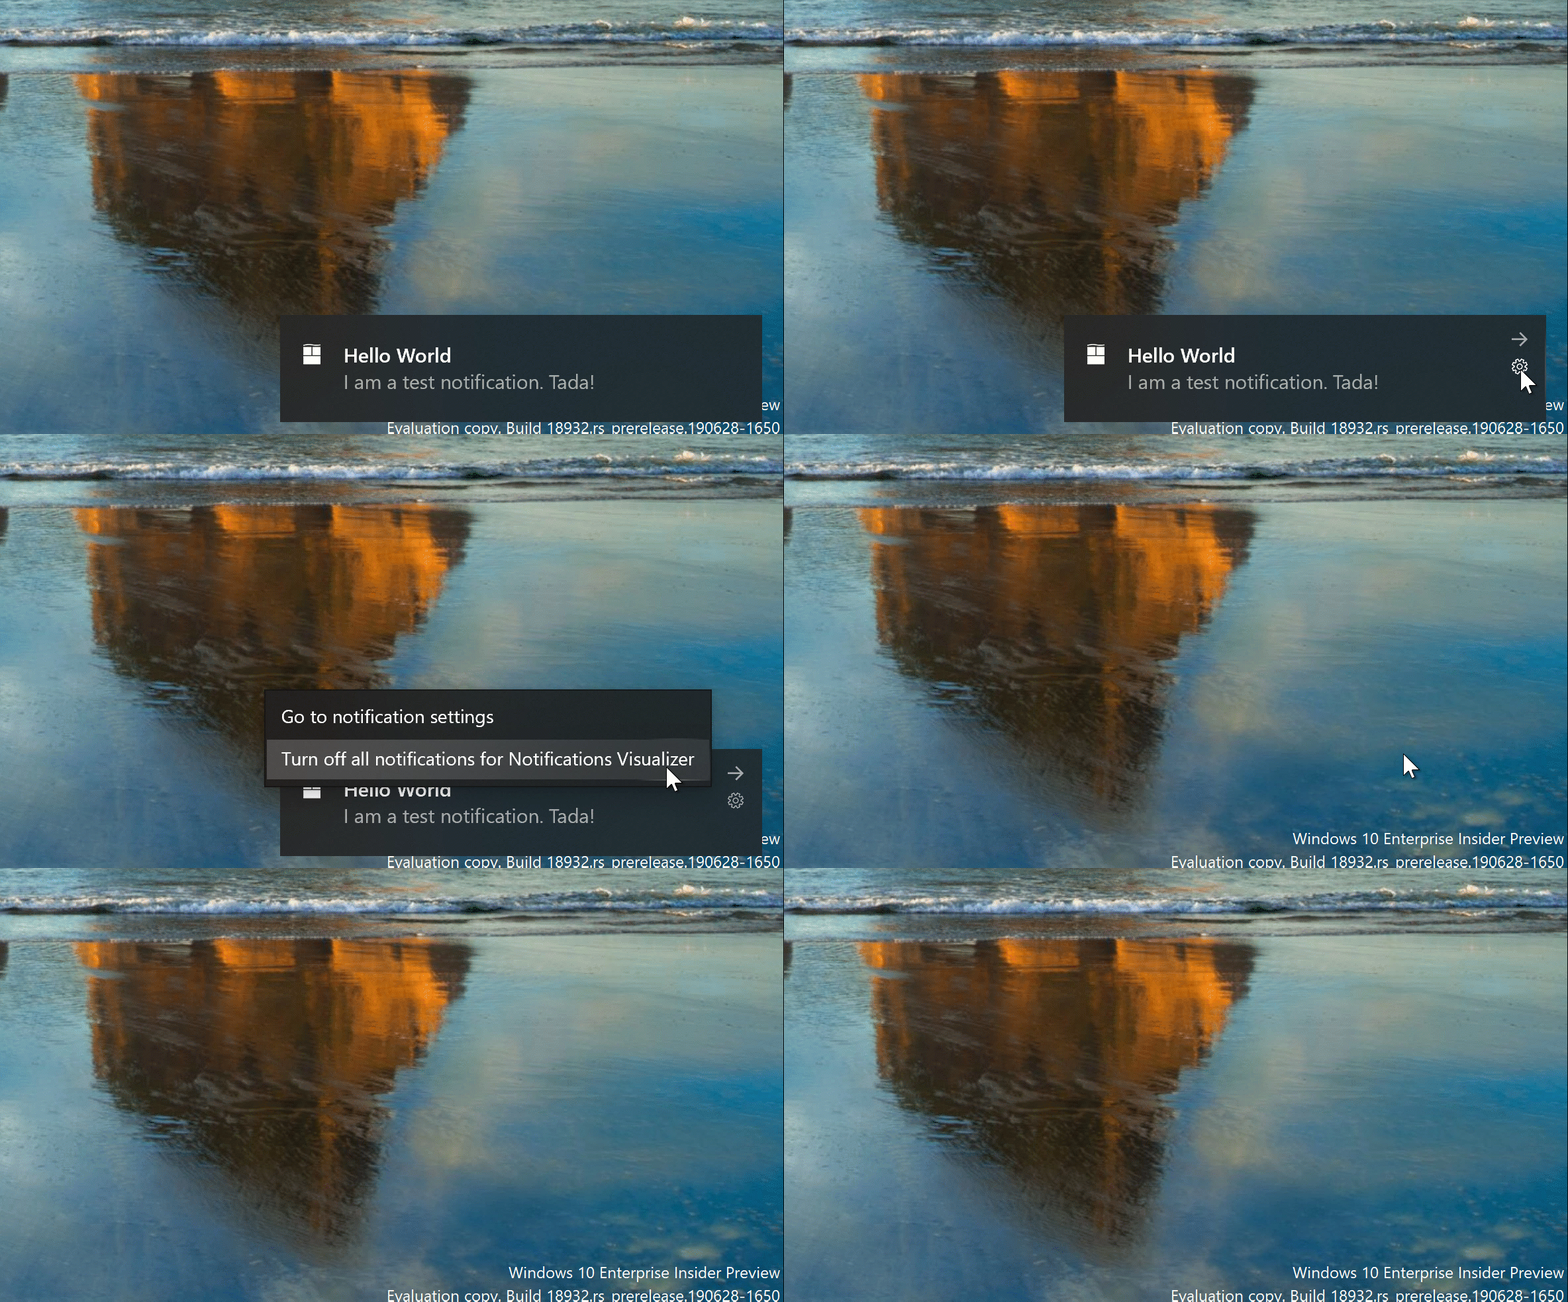
One thing Microsoft has heard from users, though, is that our notification settings aren’t easily discoverable. In addition, once you find the settings, they can be difficult to understand. In order to address this, Microsoft has begun rolling out a few changes, including:
  1. When you receive a notification toast, there will now be an inline option to turn off notifications for that app, or head to the app’s notification settings.
Notifications
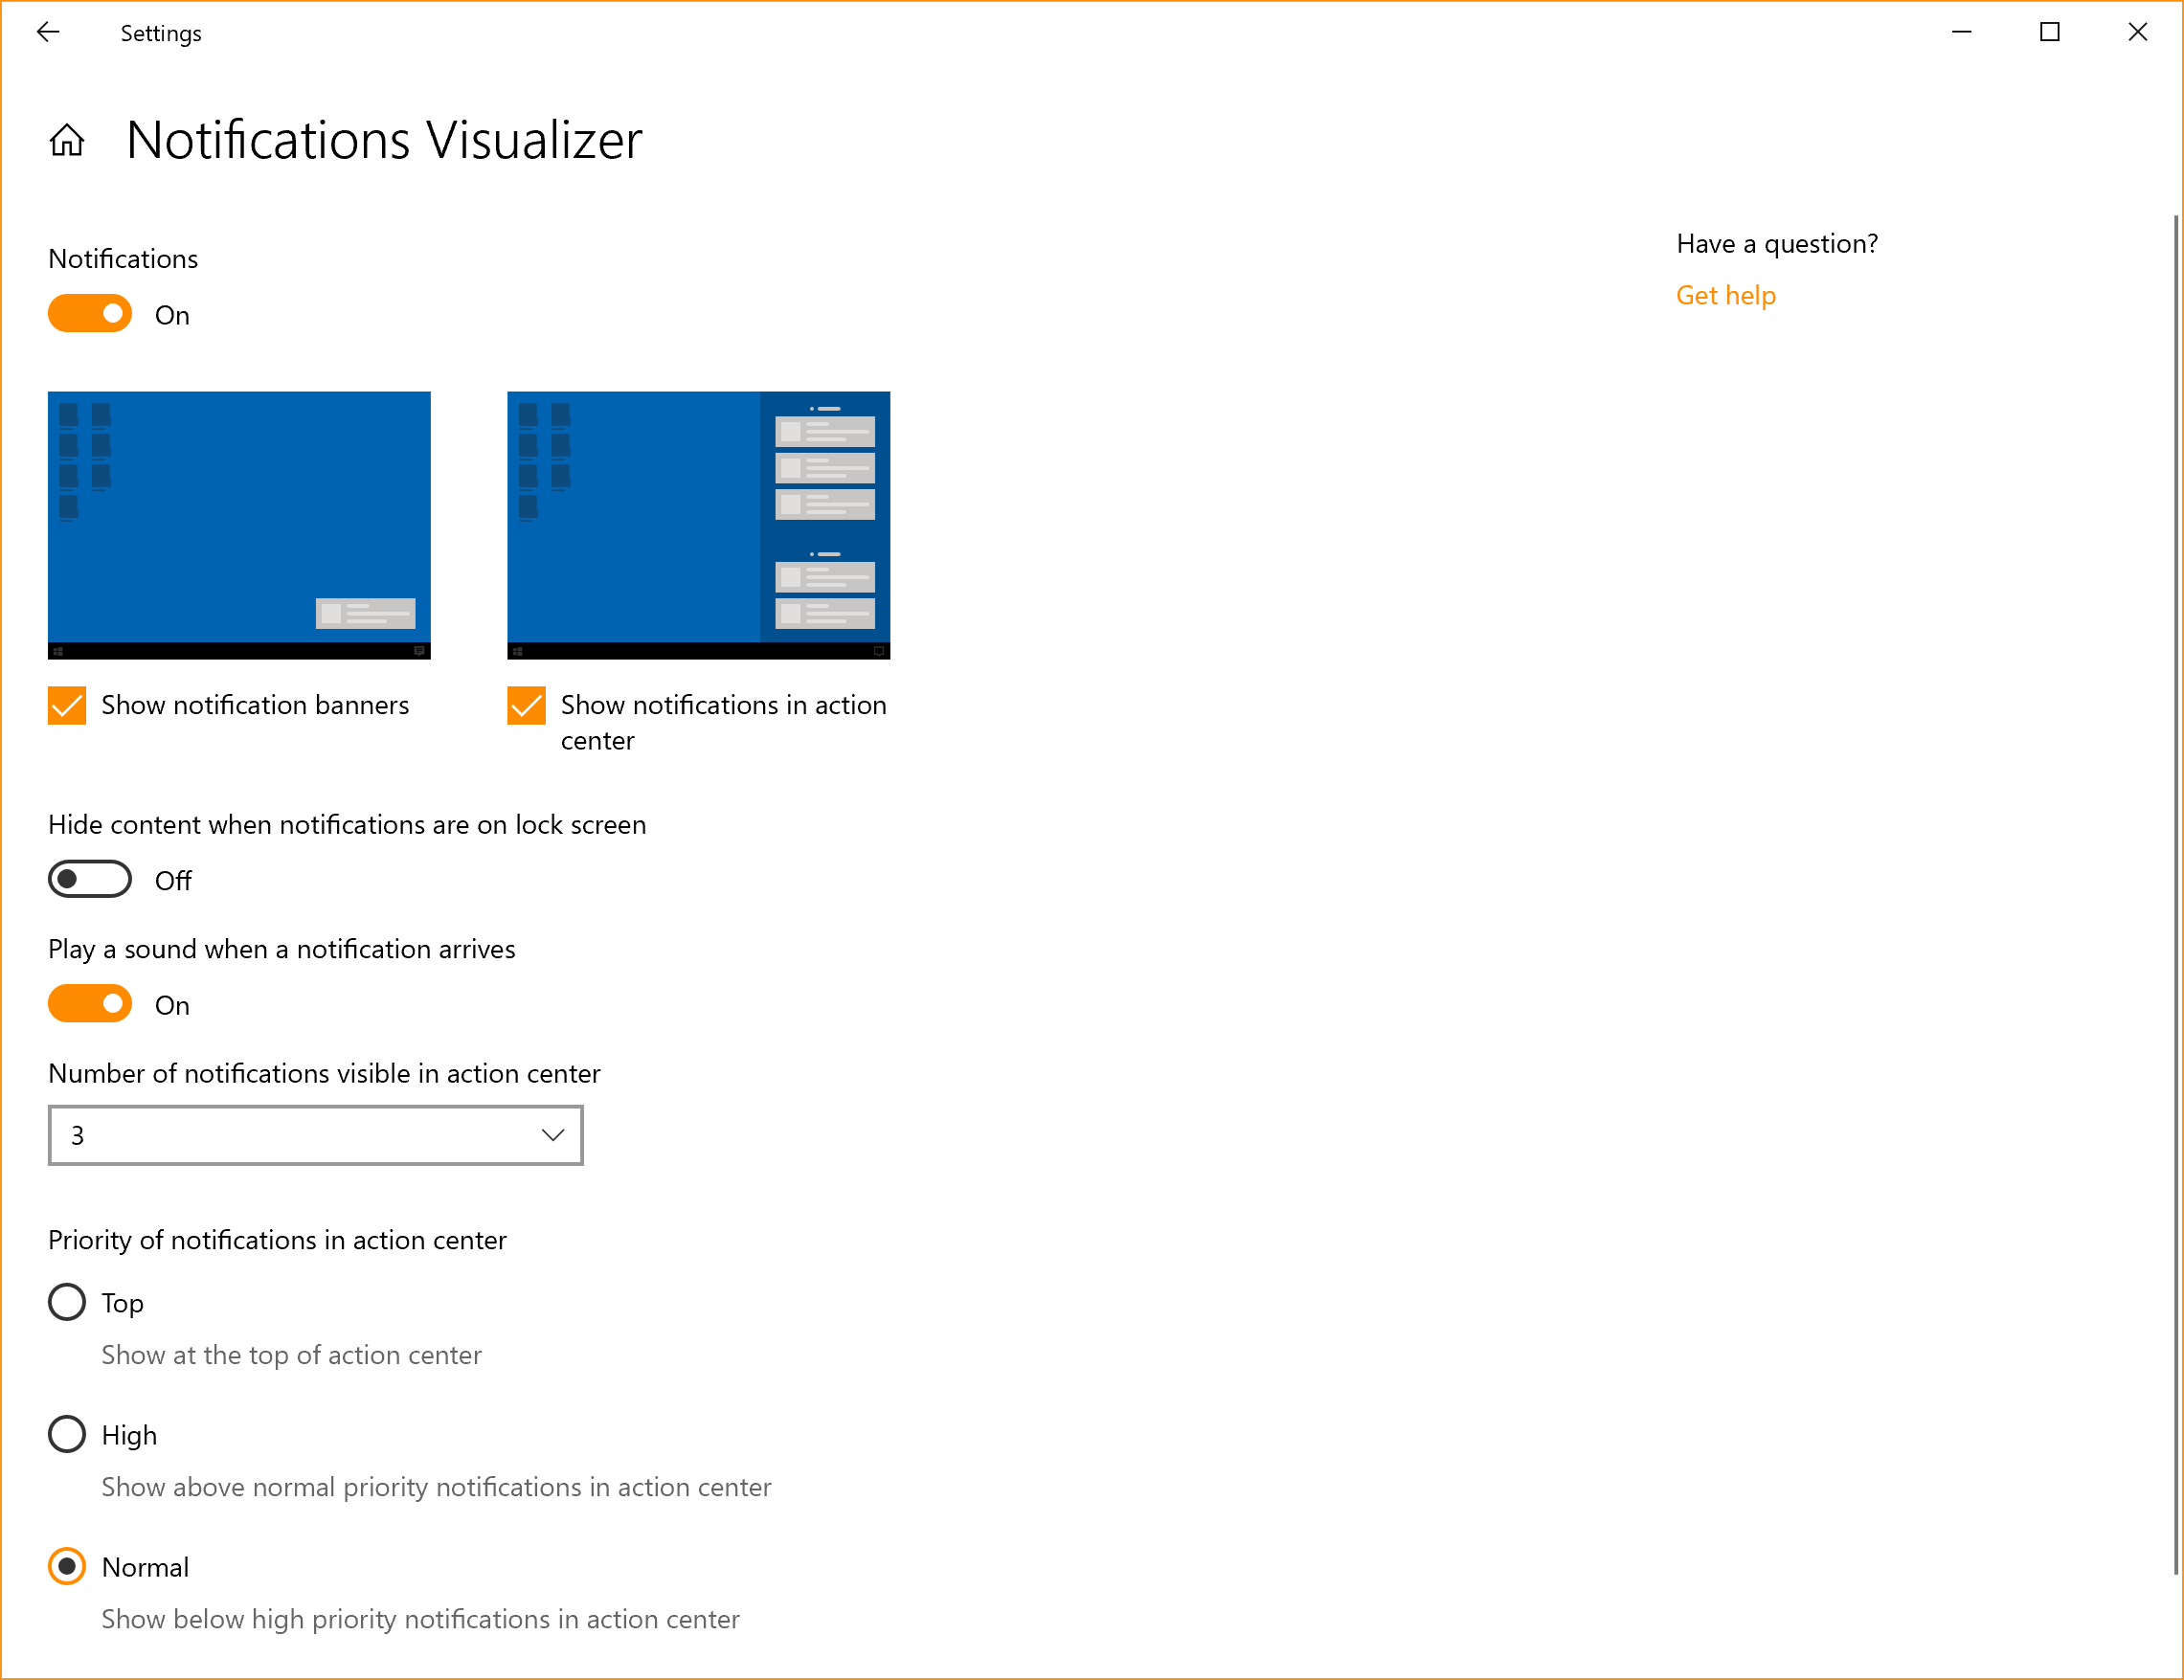
  1. When you dive into an app’s notification settings, you’ll find that Microsoft has added pictures to help articulate the impact of certain settings.
Notifications
  1. Prefer to have all your notifications muted? You no longer have to go to the old sound control panel to do that – Microsoft has added it as a top-level option in Notification & Actions Settings.
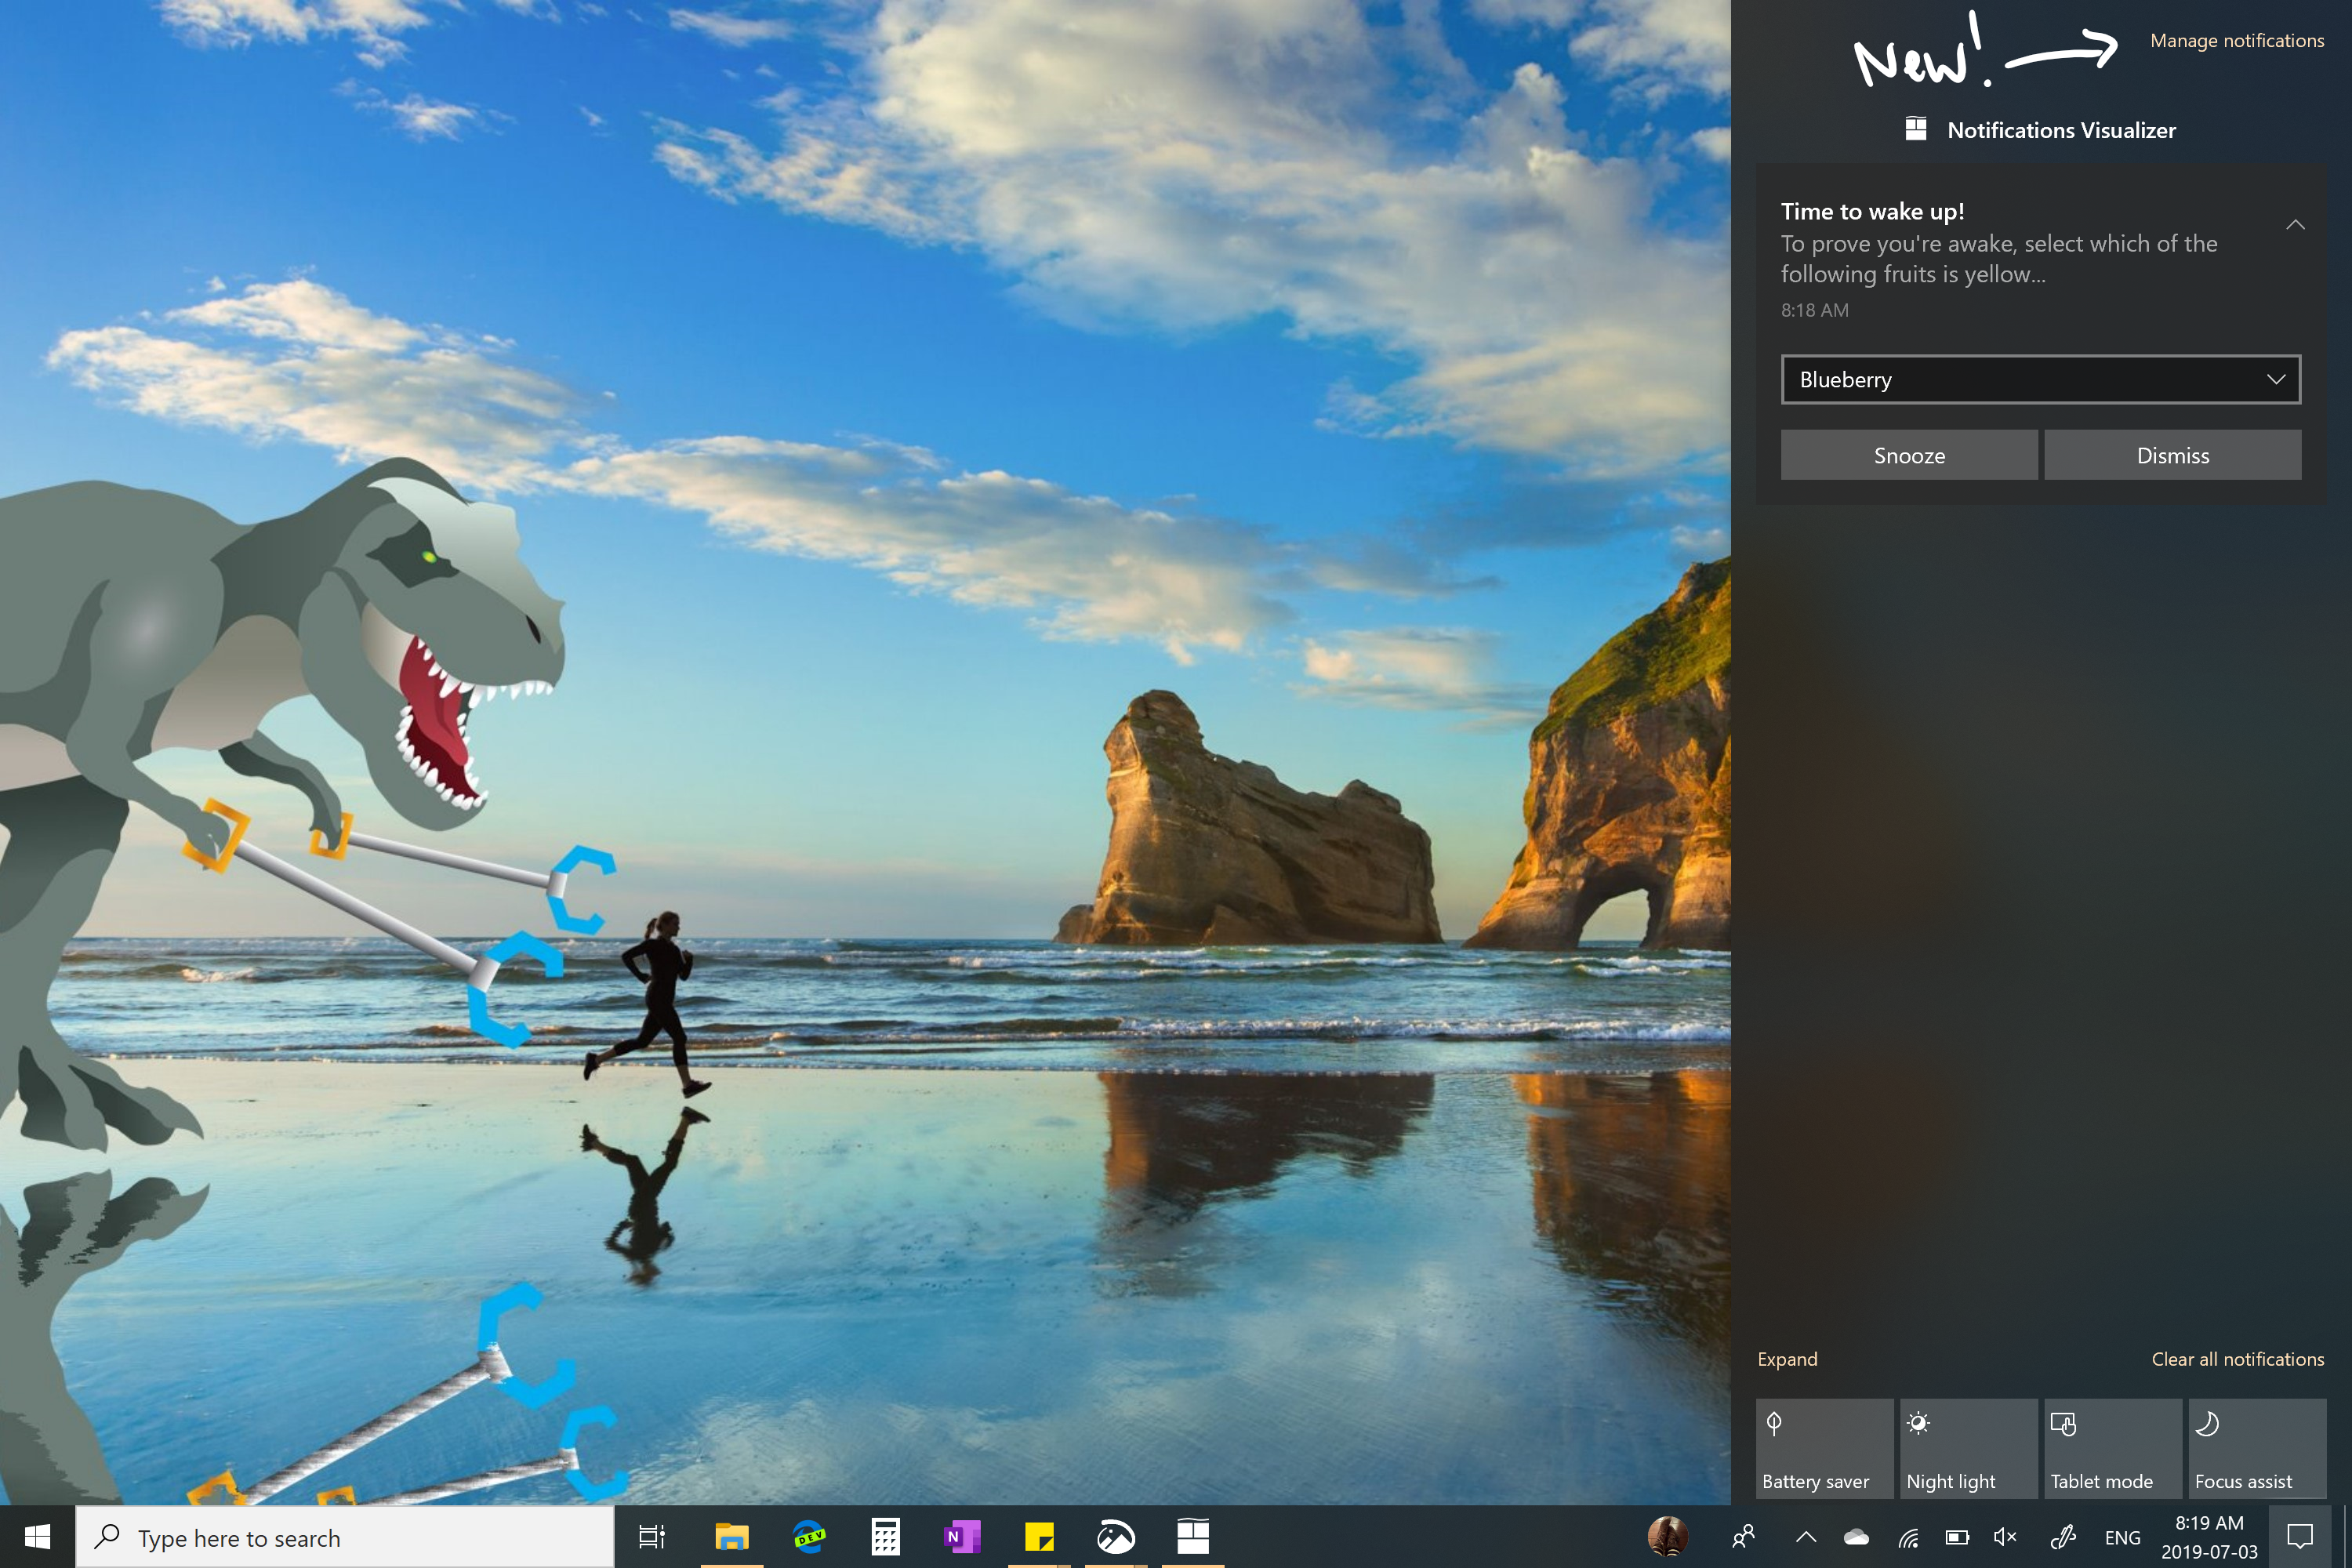
  2. Microsoft has also added a new direct link at the top of the Action Center to manage notifications, so it takes one less step to get to Notification & Actions settings. To make room for this Microsoft has moved the “no notifications” text down to the middle of the Action Center, which also means your eyes don’t have to traverse as far to see it when you launch the Action Center from the bottom of the screen.
Notifications
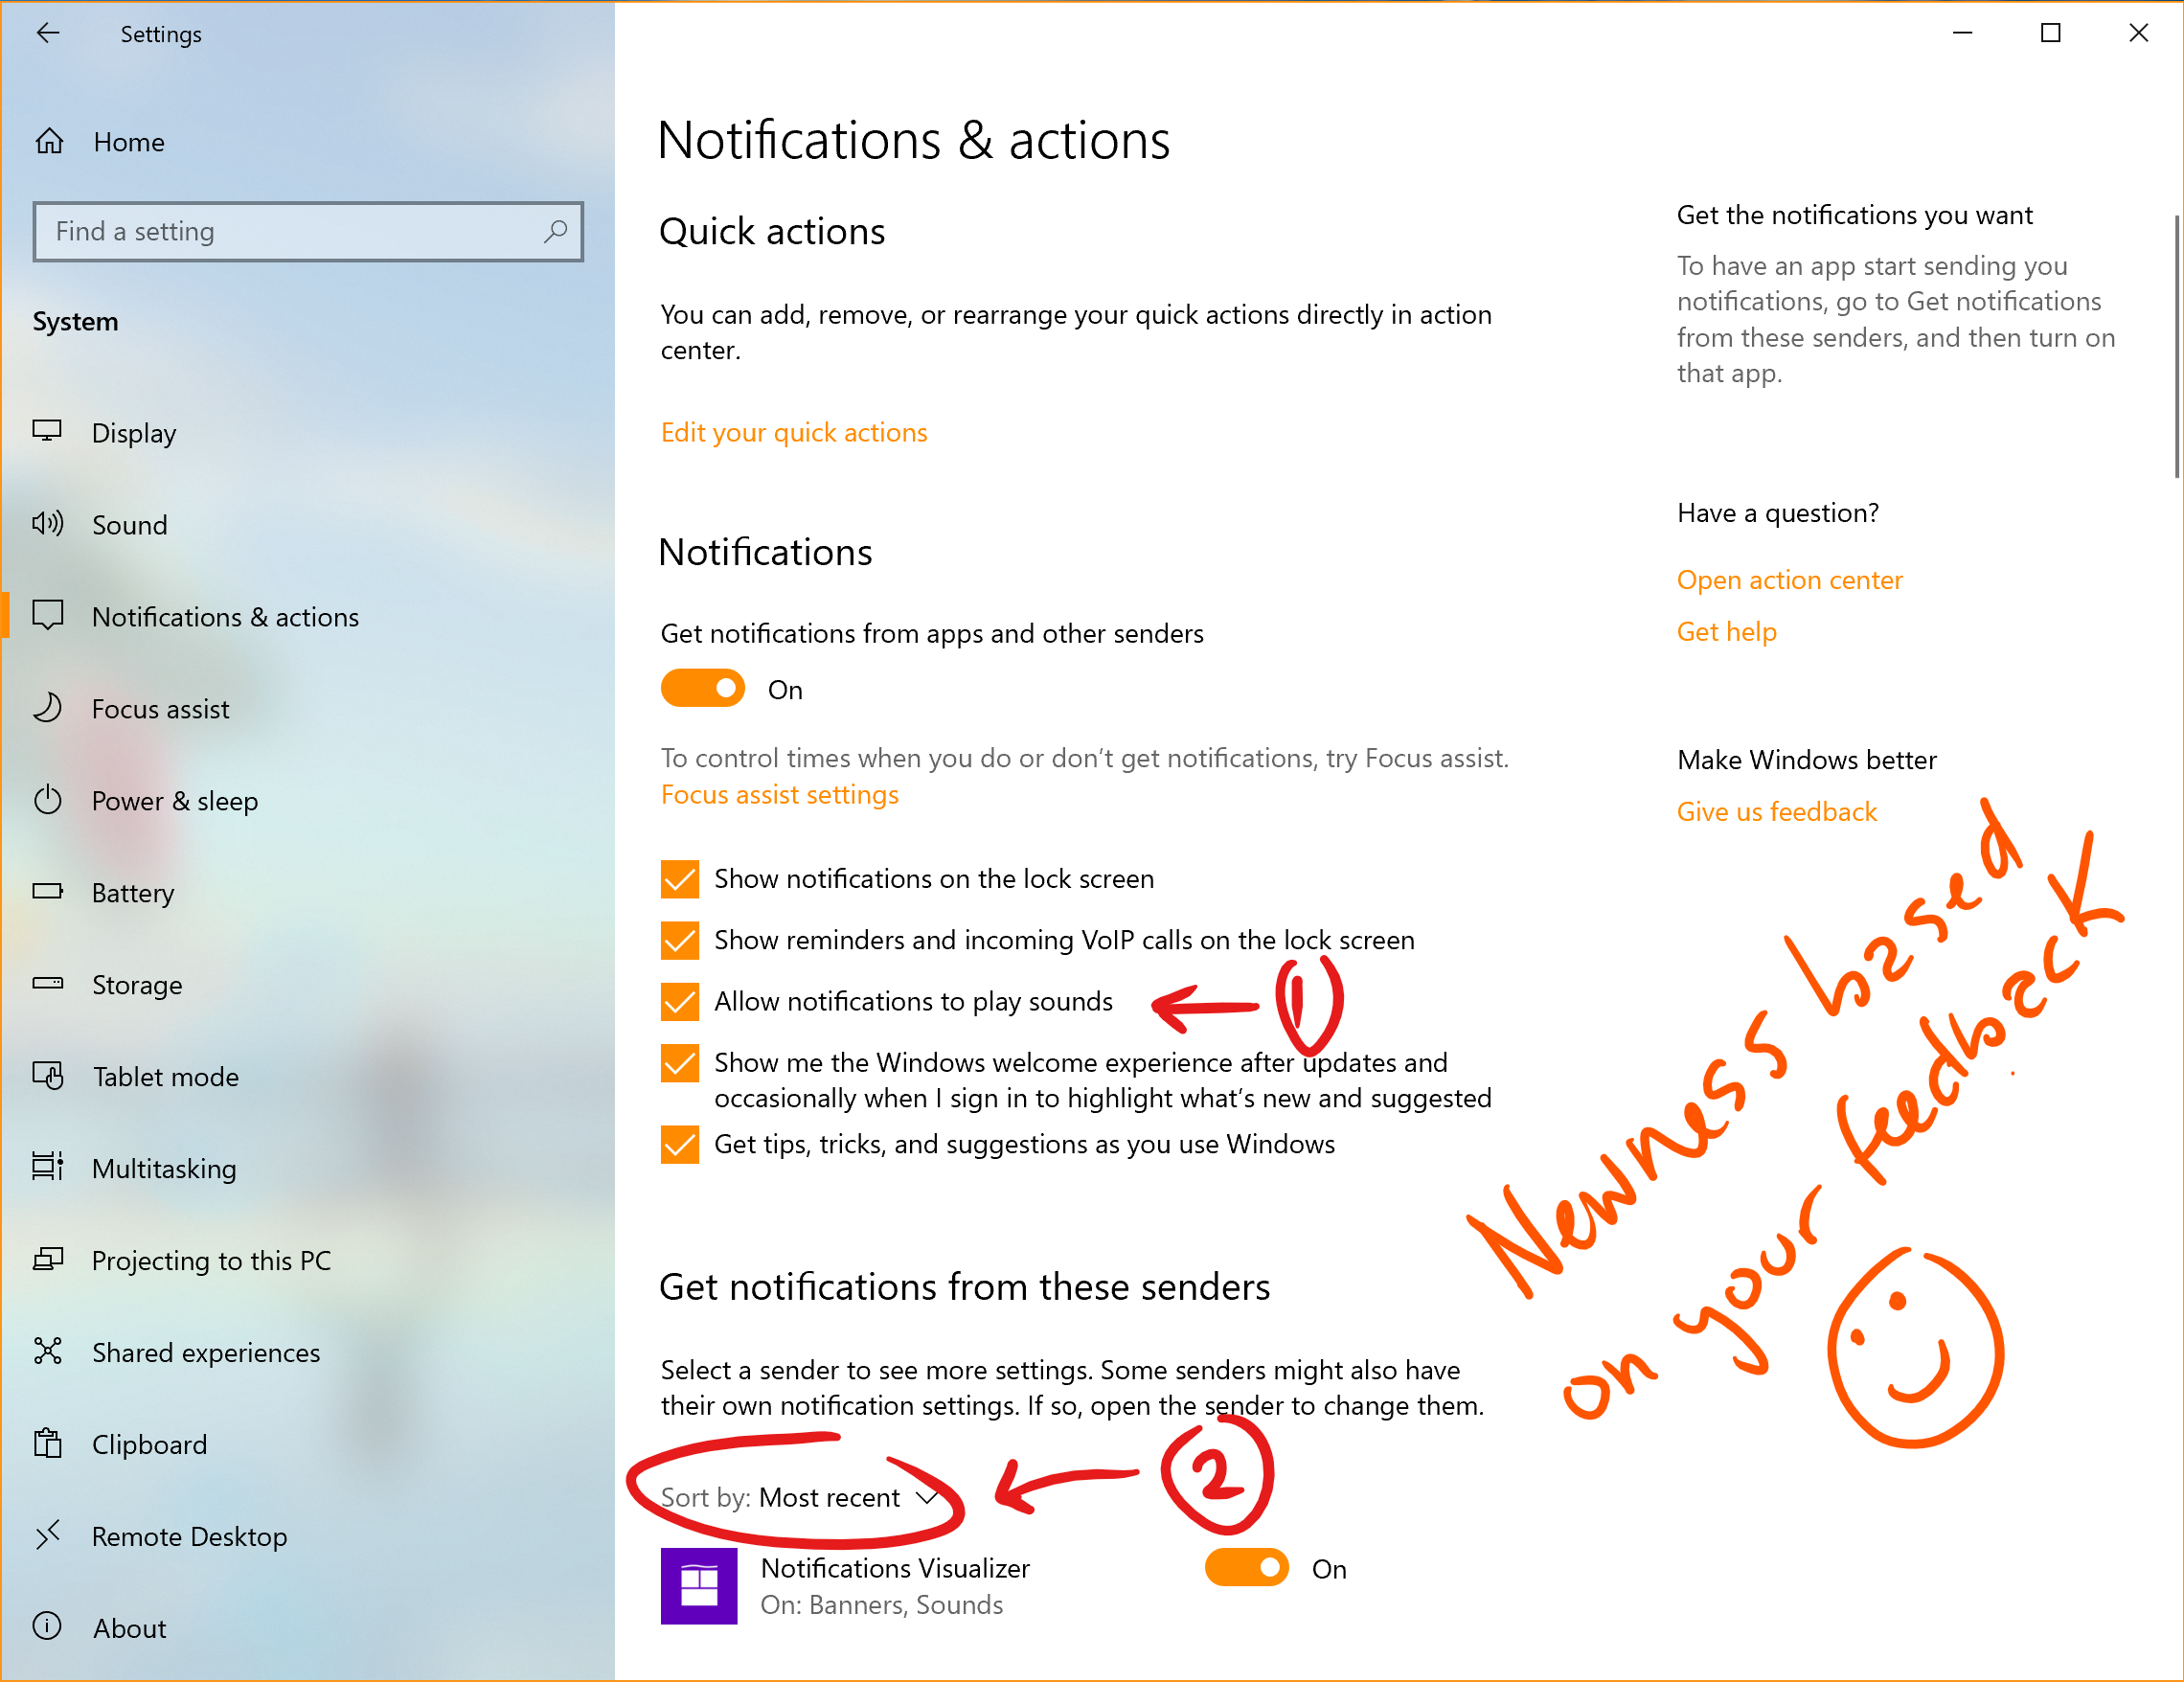
  1. Finally, ever dismissed a notification you wanted to disable, and went to Notification & Actions Settings only to find the list of notification senders to be really really long? You can now sort the list by which apps most recently sent notifications.
Notifications

Feedback Hub updates

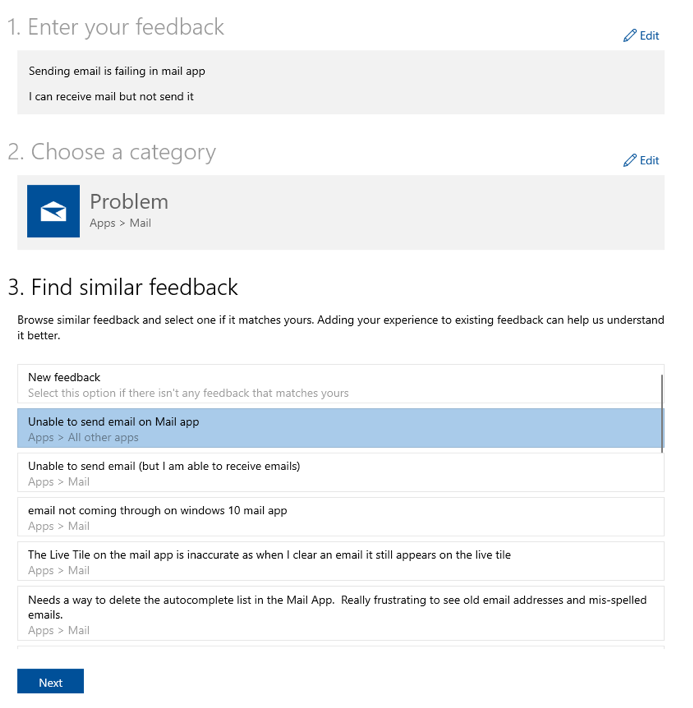
Based on your feedback, Microsoft is updating the Feedback Hub with a new feature called Find Similar Feedback! When you go to log a new piece of feedback, you’ll now see a section that looks to see if there’s any existing feedback that sounds similar to yours. You can now choose to automatically link your feedback to that existing feedback (rather than creating a new piece of feedback).
Find Similar Feedback
Microsoft has also updated the Thank You page a little bit, so that now there’s a direct button to share your feedback if that’s what you want do (rather than having to go find your feedback afterwards in the My Feedback section).

New download throttling options for Delivery Optimization

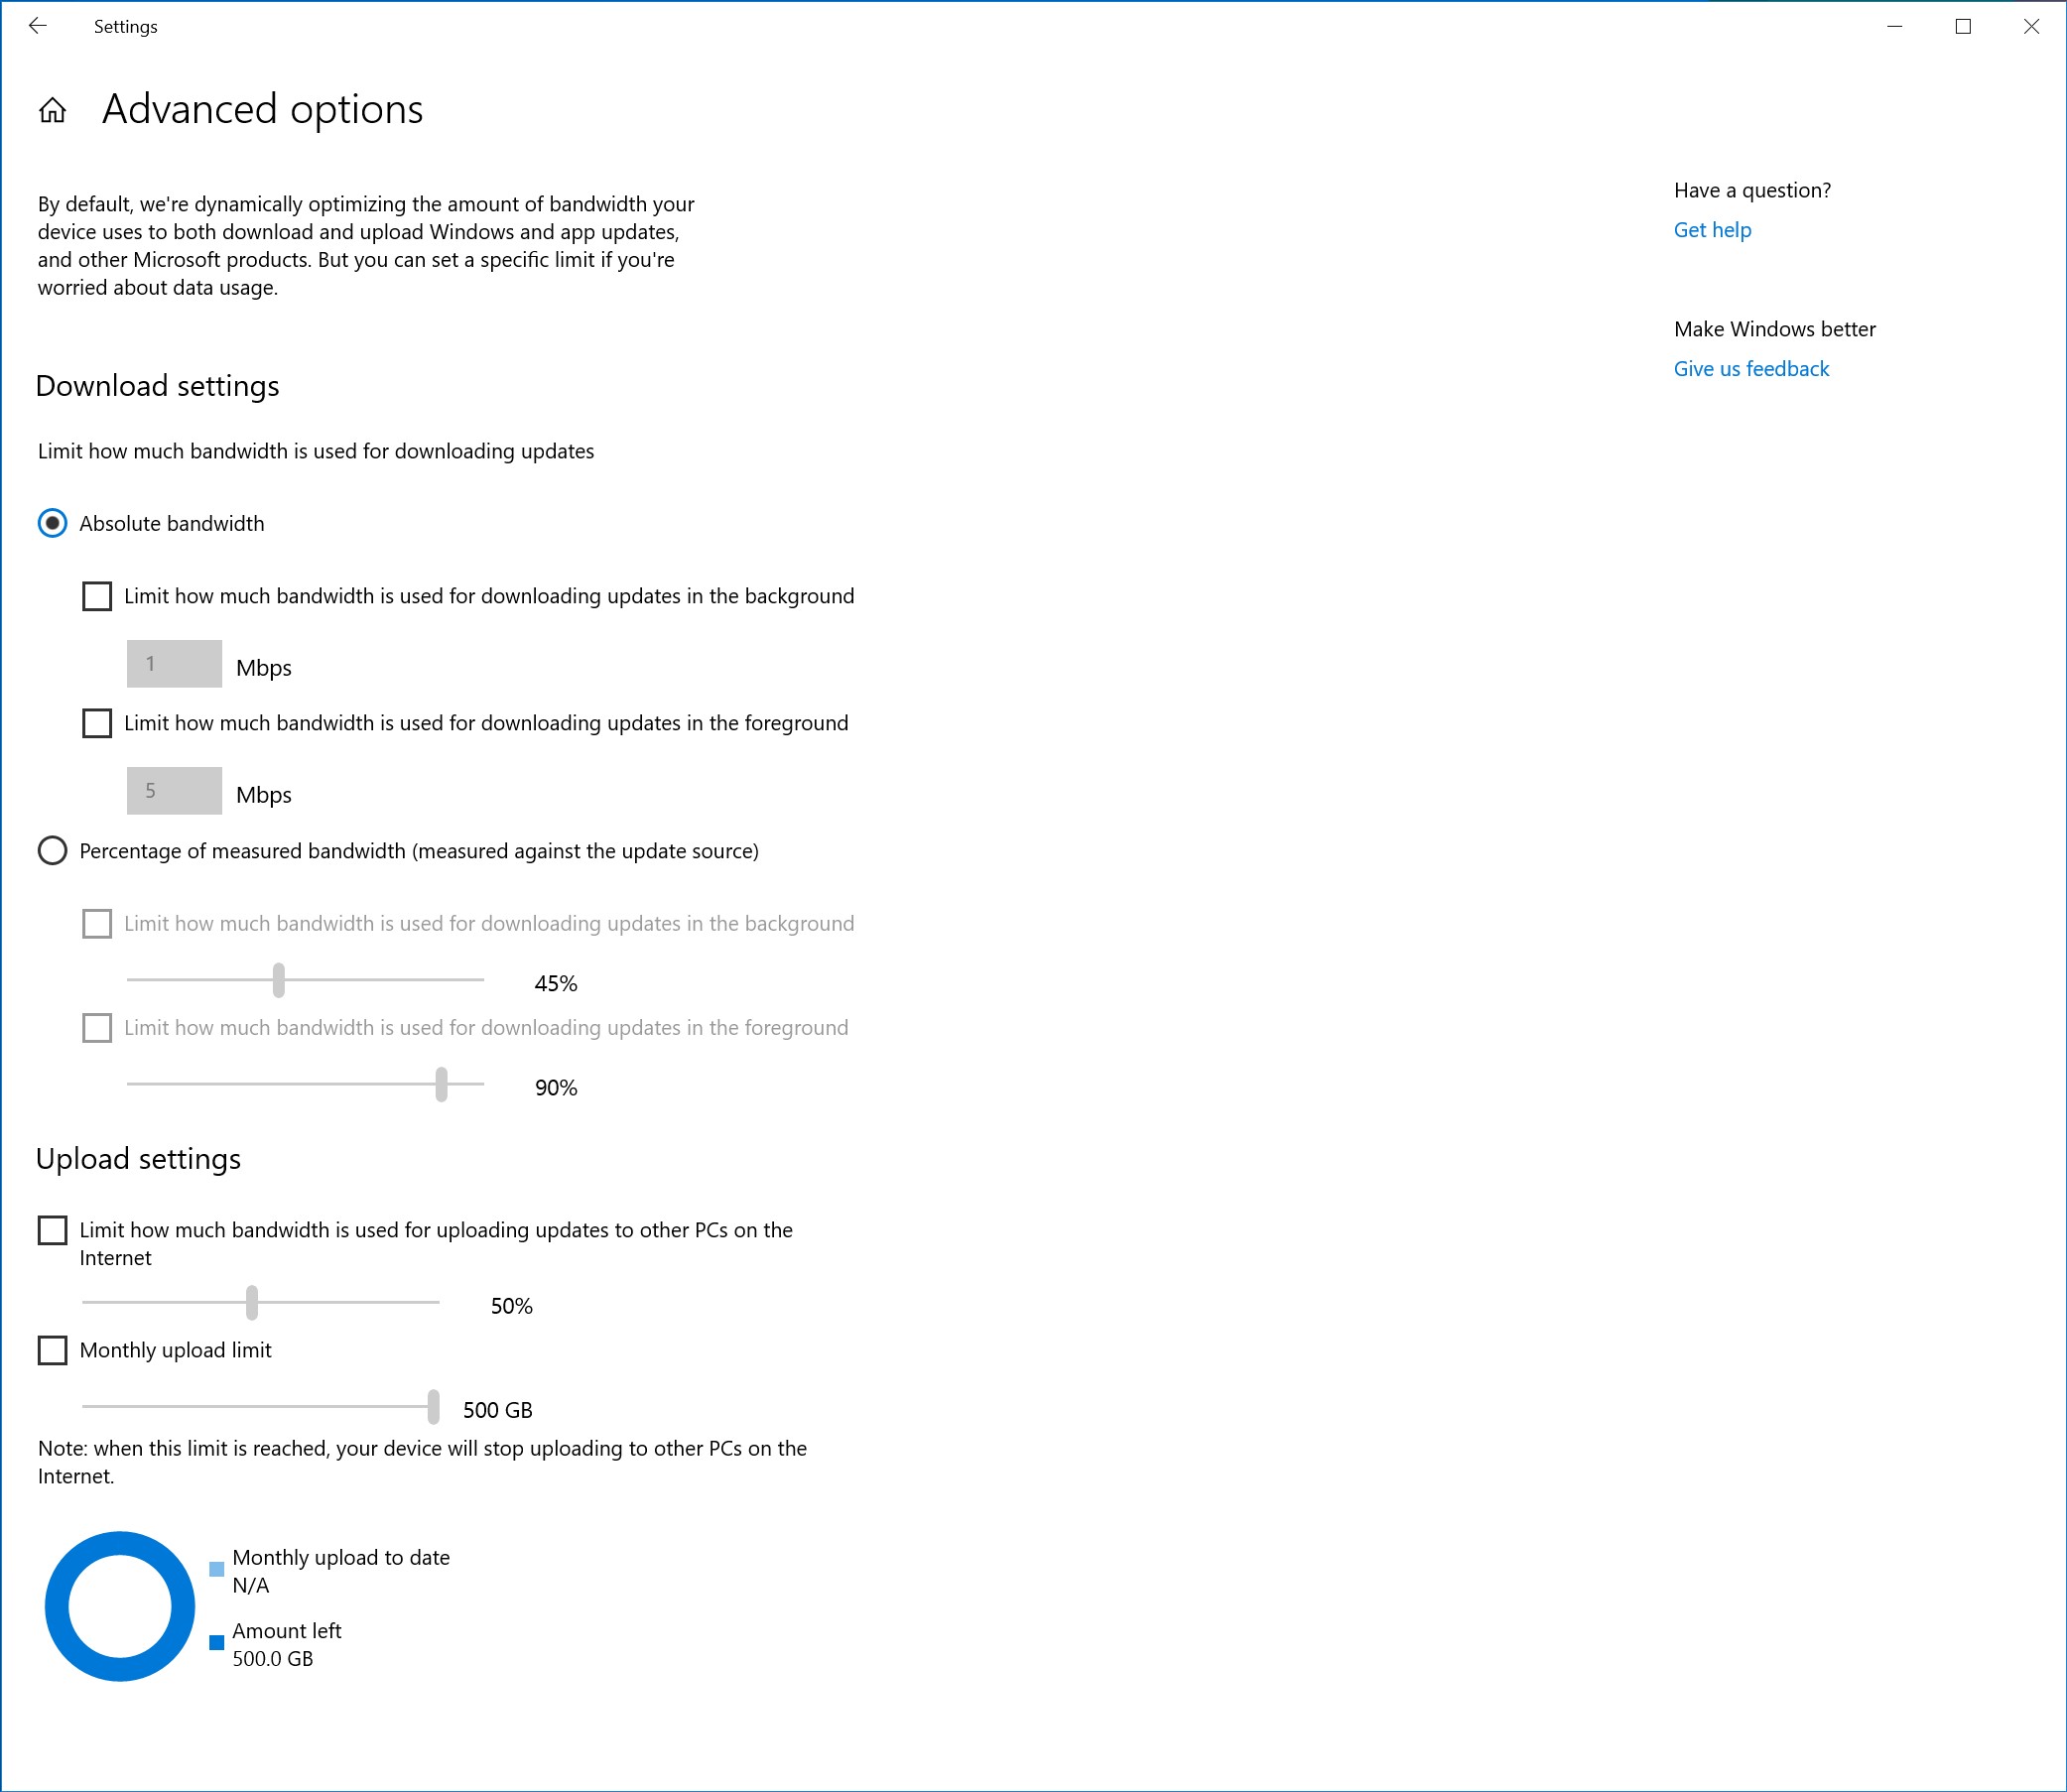
Microsoft has heard from our users with very low connection speeds that setting download throttling as a percentage of available bandwidth isn’t providing enough relief in reducing the impact on their network. That’s why Microsoft has added a new option to throttle the bandwidth used by Delivery Optimization as an absolute value. You can set this separately for Foreground downloads (downloads that you initiate from Windows Store for example) or background downloads. This option already exists for IT Pros who use Group Policies or MDM policies to configure Delivery Optimization. You can access this option via Settings > Update & Security > Delivery Optimization > Advanced Options
Delivery Optimization

Windows Ink Workspace Updates

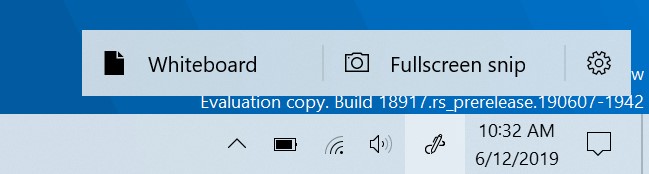
As part of this, Windows Ink Workspace now takes up less screen real estate, and Microsoft is converging their whiteboarding experiences with a new direct link to our Microsoft Whiteboard app. Microsoft Whiteboard is a freeform digital canvas where ideas, content, and people can come together. It includes an infinite canvas, optional backgrounds (including graph paper and solid dark grey) to choose from, rainbow ink support, multiple pages, and generally addresses much of the feedback you shared with Microsoft about Sketchpad. If you used Sketchpad, don’t worry – Microsoft saved the sketch you were working on in your Pictures folder.Windows Ink

Disk type now visible in Task Manager Performance tab

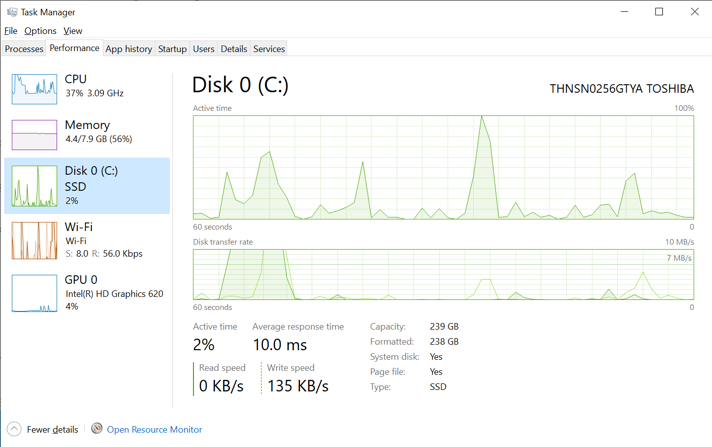
A small, but perhaps convenient change — you’ll now be able to see the disk type (e.g. SSD) for each disk listed in Task Manager’s performance tab. This is particularly helpful in cases where you have multiple disks listed, so you can differentiate between them.
dictation

Updated File Explorer search

Microsoft has heard the feedback asking for increased consistency, and to make it easier to find your files. This change will help integrate your OneDrive content online with the traditional indexed results.
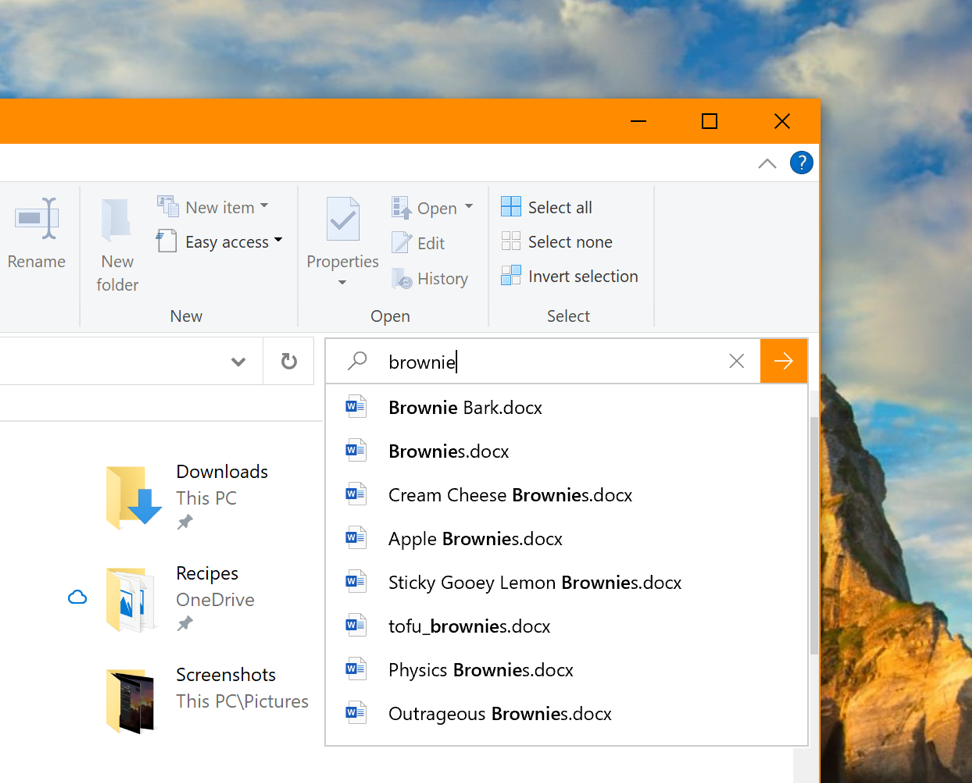
What does that mean for you? Once you have the new experience, as you type in File Explorer’s search box, you’ll now see a dropdown populated with suggested files at your fingertips that you can pick from.
These improved results can be launched directly by clicking the entry in the new suggestions box, or if you want to open the file location, just right-click the entry and there’ll be an option to do so. If you need to use commands or dig deeper into non-indexed locations, you can still press enter and populate the view with the traditional search results.
File Explorer
Microsoft has also updated the design, so now as soon as you click the search box in File Explorer (or press CTRL+E to set focus to it), you’ll see the dropdown list with your search history.
NOTES: You may notice in the screenshot, Microsoft has made the File Explorer search box wider so the suggestions dropdown has a bit more room to show results – that’s not a new option.

Expanding dictation support to more languages

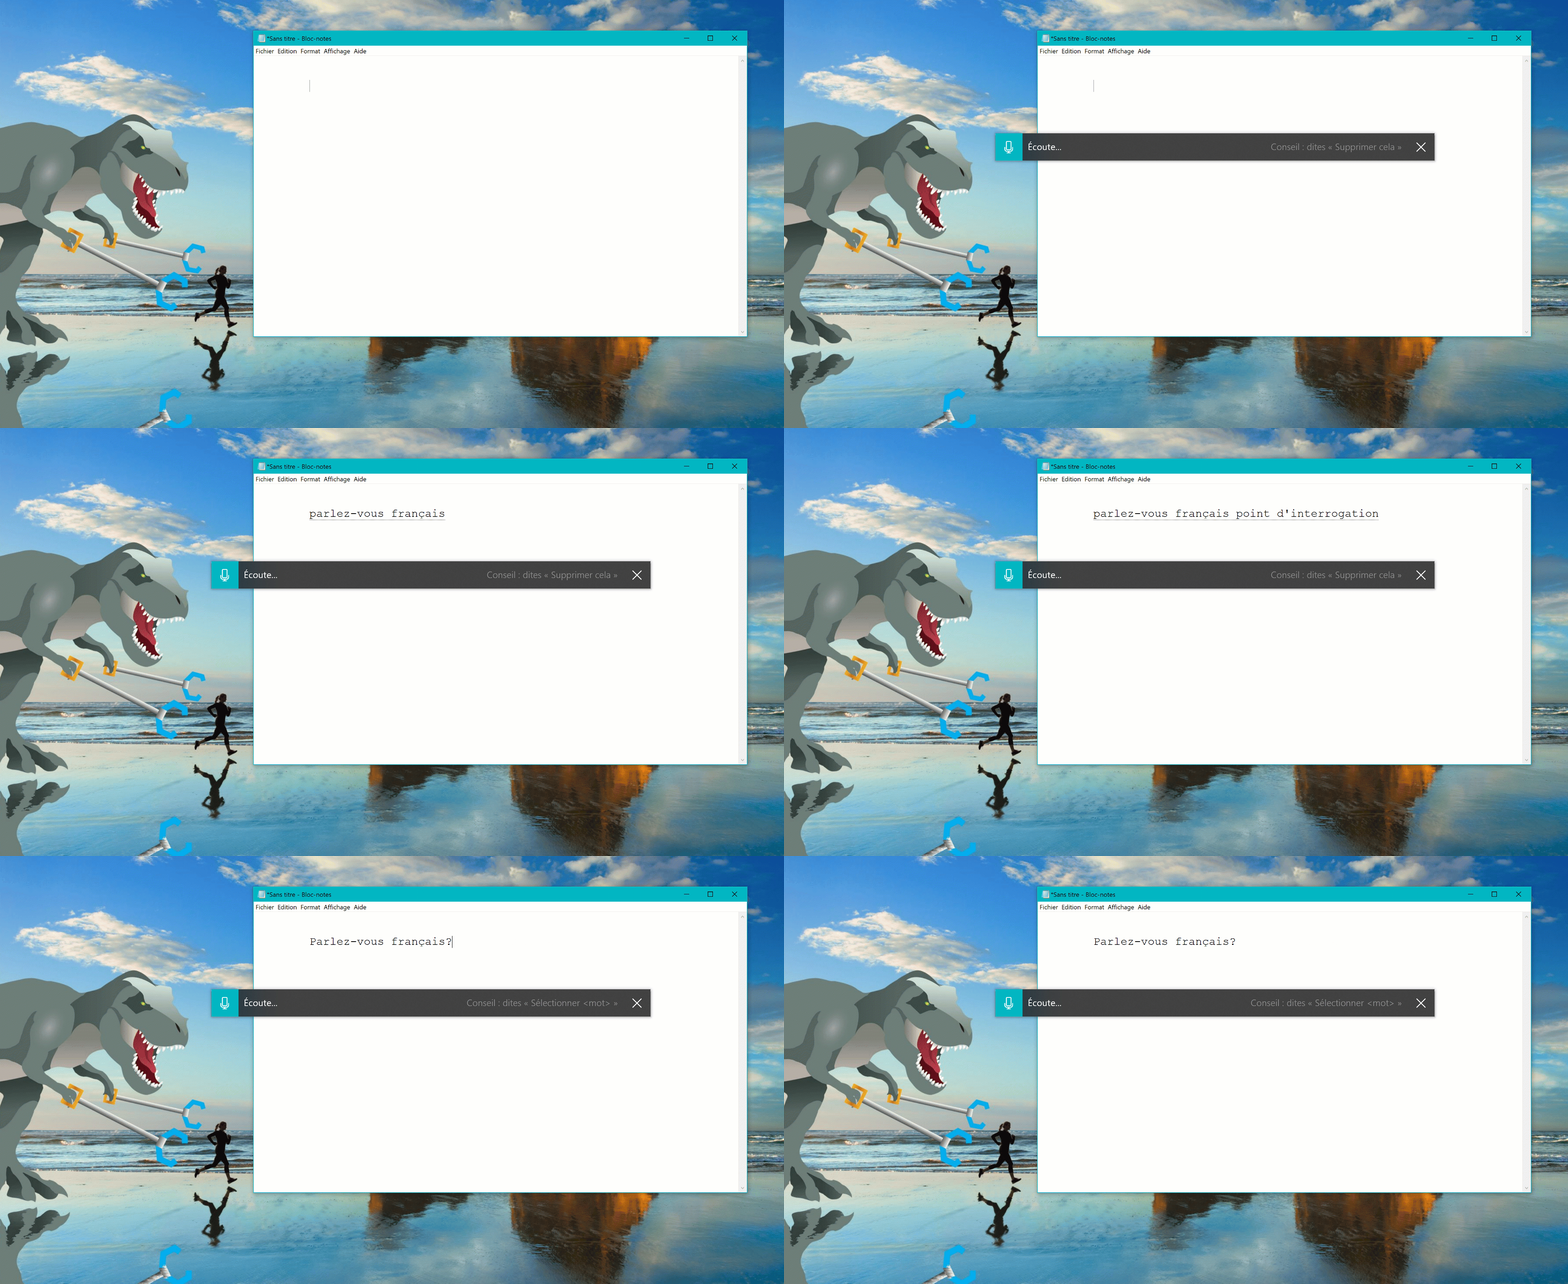
Ever had a word that you just can’t figure out how to spell? Or like to think out loud and wanna automatically jot it all down? In addition to English (United States), Microsoft now supports dictation when using English (Canada), English (UK), English (Australia), English (India), French (France), French (Canada), German (Germany), Italian (Italy), Spanish (Spain), Spanish (Mexico), Portuguese (Brazil), and Chinese (Simplified, China)
How to try it? Set focus to a text field and press WIN+H! Or you can tap the little microphone button at the top of the touch keyboard. Say what you wanna say, then press WIN+H a second time or tap the mic button to stop the dictation, or let the dictation session time out on its own.
dictation
Notes:
  • Speech resources will need to be downloaded for dictation to work. To check that they’re available, go to Language Settings, click on the desired language, and then click on Options. If speech resources are available but haven’t been downloaded, there should be a download button.
  • Dictation is based on the language of your active keyboard. To switch between preferred languages, press WIN + Space.

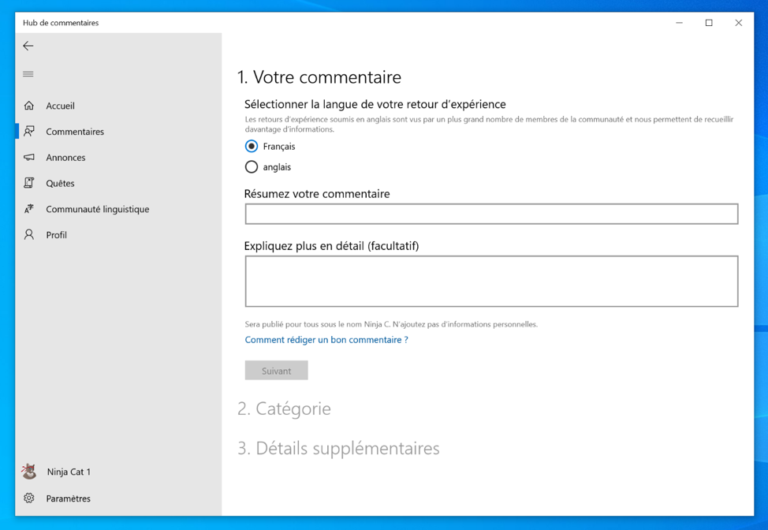
Cross-language support in Feedback Hub

Based on your feedback, with Feedback Hub version 1.1903, Insiders with Windows set to a language other than English now have the option of browsing English feedback within the Feedback Hub, as well as submitting feedback in English on the New Feedback form.
dictation

Bringing SwiftKey’s Typing Intelligence to Even More Languages

As many of you know, Microsoft has been working on bringing SwiftKey’s typing intelligence to Windows. Microsoft is announcing the support to these 39 languages:
Afrikaans (South Africa), Albanian (Albania), Arabic (Saudi Arabia), Armenian (Armenia), Azerbaijani (Azerbaijan), Basque (Spain), Bulgarian (Bulgaria), Catalan (Spain), Croatian (Croatia), Czech (Czech Republic), Danish (Denmark), Dutch (Netherlands), Estonian (Estonia), Finnish (Finland), Galician (Spain), Georgian (Georgia), Greek (Greece), Hausa (Nigeria), Hebrew (Israel), Hindi (India), Hungarian (Hungary), Indonesian (Indonesia), Kazakh (Kazakhstan), Latvian (Latvia), Lithuanian (Lithuania), Macedonian (Macedonia), Malay (Malaysia), Norwegian (Bokmal, Norway), Persian (Iran), Polish (Poland), Romanian (Romania), Serbian (Serbia), Serbian (Serbia), Slovak (Slovakia), Slovenian (Slovenia), Swedish (Sweden), Turkish (Turkey), Ukrainian (Ukraine), Uzbek (Uzbek)
What does this mean for you? Basically, Microsoft is updating the underlying language model when typing in each of these languages, to improve the accuracy of the autocorrections, shapewriting, and predictions. You’d notice this when using the touch keyboard, or the hardware keyboard text predictions (if enabled). If you use these languages above to type, help Microsoft make your typing experience even better by sharing feedback! (being as specific as possible, if you can). Microsoft will be posting a Quest about this improvement in the Feedback Hub soon.

Improved Windows Sandbox accessibility

Microsoft has made several updates to improve Windows Sandbox accessibility scenarios. This includes:
  • Microphone support
  • Added functionality to configure the audio input device via the Windows Sandbox config file
  • A Shift + Alt + PrintScreen key sequence in Windows Sandbox which activates the ease of access dialog for enabling high contrast mode.
  • A ctrl + alt + break key sequence in Windows Sandbox which allows entering/exiting fullscreen mode

When will Windows 10 version 2004 rollout to users?

Microsoft is yet to announce the official rollout dates of Windows 10 version 2004. Seeing Microsoft’s previous track record, it’s safe to assume that the company will be rolling the update out in phases spread around a couple of months. This will also allow Microsoft to act quicker if in case something goes wrong with the update.
Source: https://mspoweruser.com/windows-10-version-2004-update-here-is-whats-new/