1/20/2024
1/12/2024
The 6 Best Free Online Virus Scan and Removal Sites
Need to check for a computer virus but don't have antivirus software installed? Try these excellent online virus-scanning tools. from Makeuseof.com .
You've likely had some experience with a computer virus or malware. If not, you're one of the lucky ones. But you can never rest—especially if you're running Windows.
Online free antivirus apps are no match for a standalone antivirus tool. Let's make that clear. However, an online antivirus scan is a handy tool in a pinch. Perhaps it is an unfamiliar PC acting strangely? Or the computer of a relative acting up? It's time for a virus scan.
The Best Online Antivirus Scanners
The best online antivirus scanners offer a full system scan, analysis, and file removal. However, it is important to note that an online virus scan cannot replace an offline antivirus suite. Online scanners do not offer real-time analysis and protection, so you cannot rely on them to keep your system secure. Instead, you should check out the best antivirus software for real-time protection.
It's also worth noting that online virus scanners still require a small download. Otherwise, the tool won't have access to your computer to scan for malware. Each of the following online virus tools have a portable download, which means you don't need to install any files; you just run the downloaded antivirus file, and the scan will begin.
1. ESET Online Scanner


This is handy if the online antivirus scanner throws up false positives.
2. F-Secure Online Scanner

Of the free online antivirus scanners, F-Secure Online Scanner is the most basic. You don't choose which files to scan; the Online Scanner covers your entire system. Given the speed of the scan, it isn't an issue. The lack of options has a plus side, too: F-Secure Online Scanner is incredibly easy to use.
3. Trend Micro HouseCall

Trend Micro HouseCall is a useful online virus scanner that provides a fairly comprehensive scan of your machine. Better still, you can use HouseCall on Windows and macOS, so you're not limited by operating system.
As with all online virus scanners, the Trend Micro HouseCall interface is simple to use; you download the launch file, run it, and start scanning. The Smart Scan function will rapidly analyze the places malware is most likely to lurk and, once done, provide a review and quarantine option to help you cleanse your system.
Individual Malicious File Scanners
Individual malicious file scanners differ from online antivirus scanners in that you provide a single file sample instead of scanning your entire system for malware or otherwise. The onus is on you to scan a file before executing it on your system, rather than quarantining after the infection takes place.
However, you can determine if a file is malicious and what is wrong with it while helping security researchers update their definitions.
Again, an individual malicious file scanner is in no way a replacement for an a replacement for an antivirus suite on your device.Again, an individual malicious file scanner is in no way a replacement for an antivirus suite on your device.
1. VirusTotal
 VirusTotal allows you to search its database using an individual
file, a URL, an IP address, a domain, or a file hash. In that,
VirusTotal offers the widest range of tools and has one of the most
extensive databases of malicious files and file signatures.
VirusTotal allows you to search its database using an individual
file, a URL, an IP address, a domain, or a file hash. In that,
VirusTotal offers the widest range of tools and has one of the most
extensive databases of malicious files and file signatures.2. Kaspersky Threat Intelligence Portal

You can also submit IP addresses, file hashes, domain names, and more.z
3. MetaDefender

The MetaDefender UI is slick and offers different analysis options.
What Is the Best Online Antivirus Tool?
If you want a rapid online scan with great results, try F-Secure Online Scan. It is easy to use, takes minutes, and hits the majority of malware.
These free online antivirus scanners are great, but they are not an effective preventative against malware. They do not offer real-time scanning and protection. In the modern world, that's going to lead to a world of pain.
Source: https://www.makeuseof.com/tag/7-reliable-sites-quick-free-anti-virus-scan/
1/01/2024
How to restore USB drive back to full capacity?
This article you can find methods to restore USB drive back to full capacity so that you can make use of lost or unallocated disk space of USB drives. USB drive not showing correct capacity is one of the common issues that may happen to USB disks, if you are facing same problem, then you are at the right place. Keep reading and you can find step-by-step solutions to restore USB drive.
Issue overview
It’s really annoying to be unable to use all USB drive’s storage, but this issue just happens due to various reasons. Thus we should get a rough idea about this issue at least. USB storage devices such as external HDD, USB flash drive, pen drive, memory card, etc, play important role in daily lives. Likewise hard drive, USB disks come with different size, ranging 215 MB to 1TB. We can store large amount of data on SD card or flash drive so that we can take them to anywhere without difficulty. It’s possible that a 64GB flash drive shows as 54MB only. That does not necessarily mean you have to buy a new one, as the capacity can be restored in many cases.Let’s take a close look at a real cause about this issue:
“Lately I made a bootable USB drive on a USB flash drive for crashed laptop. I fixed the system problem successfully but a new problem arose in the flash drive. The problem is that the USB’s capacity shrank. The flash drive used to have 16GB storages, but it is 2.19MB in Windows Explorer only after it is made as a bootable drive. There is large free space on the flash disk when I checked it in Disk Management. But I can’t do anything to unallocated space. The size does not change even though I format the partition. Do you have any idea to restore capacity? Thanks!”
Why doesn’t USB drive show full capacity in Windows?
USB flash drive / SD card/ pen drive not showing full capacity can happen for several reasons. Let’s see some common reasons together:- The USB drive is made to bootable disk. For instance, you burn a portable operating system on your removable drive, and you may find that the disk loses capacity. Some system changes the partition of removable disk when writing booting data.
- The USB drive is divided into two or more partition. Unlike hard drives, USB flash drive or SD card usually have only one partition, because Windows cannot recognize and access data stored on the second or other partitions. If there are multiple partitions on a flash disk, you can only see the first volume in File Explorer. Thus the capacity you can use is the first partition.
- There is unallocated space. We all know that unallocated disk space cannot be used if there is not partition created on it. The result is that you can make use of allocated space only. Therefore we can fix the problem by adding unallocated space to existing partition.
- Card reader or host devices are not well suited with the larger memory card. If you are using a card reader which is compatible with 32GB card at most, but your memory card is 64GB. It might turn or repartition the memory card to 32GB and the rest capacity won’t show in Windows.
- The disk is physically damaged. If storage device is physically damaged, the capacity might change. The entire disk size in Disk Management shrinks or increases largely, or the USB drive shows 0 bytes if you check its properties. Physical damages cannot be repaired by solutions in this guide.
How to restore USB flash drive back to full capacity?
This part provides three solutions to restore USB drive backup to original capacity. The first method recovers capacity with the help of command DiskPart. If you feel this approach is difficult to you, you can try the second and third solutions which utilize a free third-part tool. Connect the USB drive or SD card to computer and you can try these resolutions.Caution: The first two solutions will completely wipe the entire USB drive in question, please backup any important files before proceeding. Besides, please be very careful to select correct before formatting or cleaning operations, or you might wipe wrong disk by mistake.
Solution 1: Restore USB flash disk back to full capacity with DiskPart
Step 1: Run Command Prompt as Administrator. On Windows 8.1 or 10, you can launch it easily by clicking the Start button and selecting option “Command Prompt (Admin)”. If you are using Windows 7, you should click the Start button and enter cmd in the search box; then right-click “cmd.exe” to select “Run as Administrator”Step 2: Type the following command in the Command Prompt windows and hit Enter key.
diskpartStep 3: Type list disk command so that diskpart lists all disks connected to your computer, and the command should be followed by pressing Enter.
list diskStep 4: Execute following command to select the USB disk you want to restore capacity.
select disk #Be very careful here! # is the disk number of your USB drive, You should replace # with the correct disk number. Be sure you select the correct drive, as all the rest actions will be performed on the selected disk, such as format the disk. If you select the wrong disk, you’ll lose all data stored on that disk.
Step 5: Type the follow command and press Enter
cleanStep 6: Create a new partition on the USB drive after DiskPart succeeded in cleaning the disk.
create partition primary

Step 7: The following command formats the newly created partition to FAT32 file system.
format fs=fat32 quickNow you can open Windows Explorer to check if the USB drive is restored to full capacity.
Solution 2: Restore USB drive back to full capacity with free partition manager
This solution will repartition the USB drive into one partition using free partition management software PartitionGuru Free. The partition process is simple and fast.- Install and launch PartitionGuru on your computer to get the main interface.
- Connect the USB drive to computer and it’ll be displayed in the software. All disks, partitions, files and disk parameters on the computer can be read on the main interface.
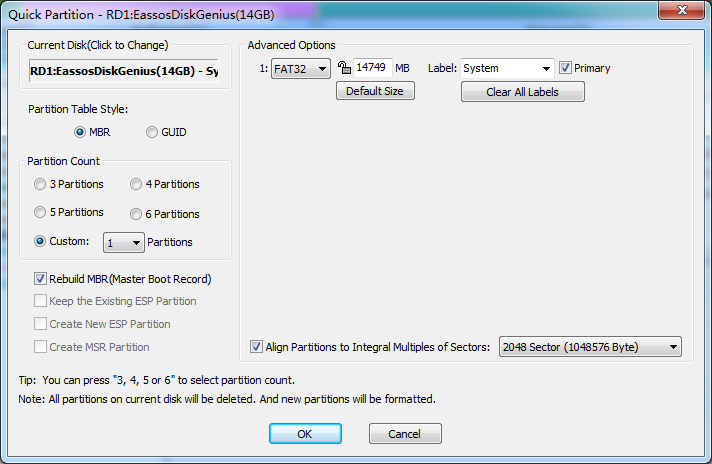
- Select the USB drive you want to restore capacity and click “Quick Partition” button from the toolbar.
- On the “Partition Count” section, you should select Custom option
and choose “1” so that there will be only one partition on the USB
drive; As to the Advanced
Options, you can choose file system format for the USB disk. Click OK button and PartitionGuru start repartition the USB drive.
- PartitionGuru will ask confirmation for the action which will wipe everything on the disk while repartitioning process. Click “Yes”, wait for a couple of seconds, and the partition will complete.

Solution 3: Reuse Unallocated Space
If your USB drive contains unallocated / free space, its size will be smaller than original capacity. In this situation, you can recover USB capacity by adding unallocated space to partition. It’s recommended to use PartitionGuru here again, as this software is able to add unallocated space to any existing partition on same disk without data loss.- Launch PartitionGuru again and connect the problematic USB drive to computer.
- Right click the partition on the USB flash disk and select “Extend Partition” from the context menu.
- Move mouse to the partition bar and drag it to include the free disk
space. Click “Start” button and PartitionGuru starts move unallocated
disk space to the partition.
- Click “Complete” button when the process finishes. Then you can check whether the capacity is restored.


Source: https://www.eassos.com/blog/how-to-restore-usb-drive-back-to-full-capacity/