Three years ago we were benchmarking Microsoft's then latest operating system, Windows 8. At the time we were keen to make sure Windows 8 performed as well as Windows 7, which was a huge upgrade from 2006's Windows Vista.
In the end, we determined that Windows 8 was on par with 7 and at times a fraction faster, leading us to this conclusion in our performance review:
"Looking beyond benchmarks, Windows 8 appears more polished than Windows 7, even if you plan to live on the desktop and aren't too fond of the Start screen, general usage is smoother and appears to be faster on Windows 8, which I found most noticeable on our somewhat underpowered Athlon II X4 system. If anything, it's a great start. Now the Metro/Modern style will have to prove itself as a cross-platform OS that marries desktop, laptop and tablet PCs."
It's obvious now that the 'Metro' Start screen was an epic failure and in my opinion it was the only real issue with Windows 8, as I thoroughly enjoyed using the operating system with Classic Shell installed.
Fortunately, Microsoft learned from its mistakes and addressed some of Windows 8's shortcomings in Windows 10, which we believe is the best version yet, if only for its improved looks and functionality across devices and form factors.
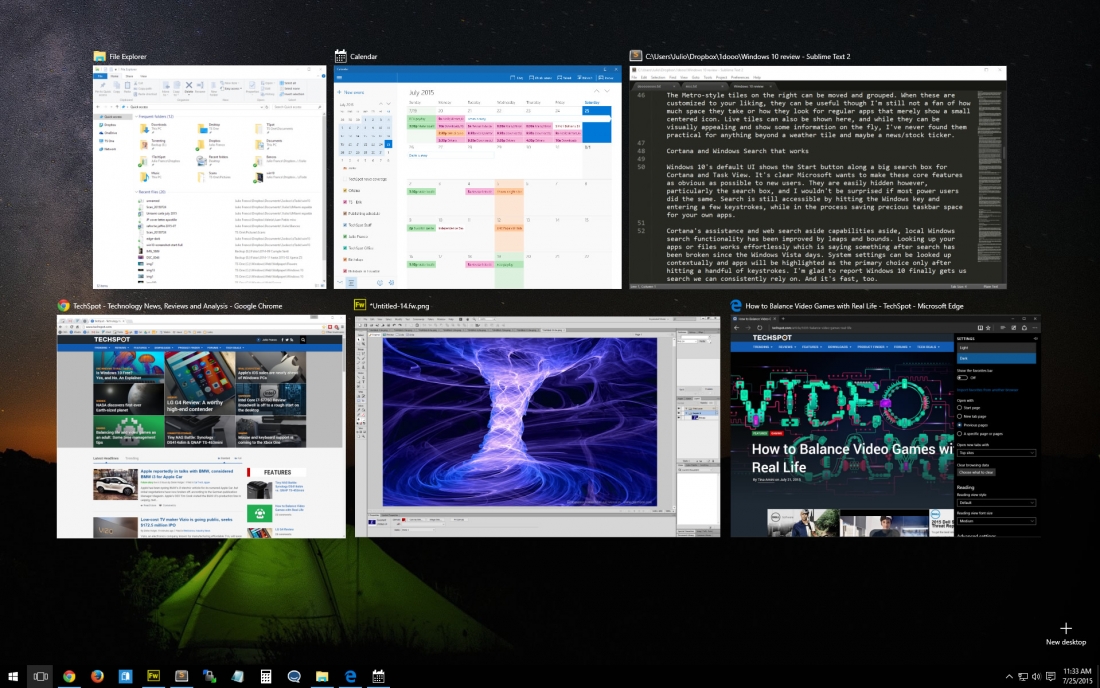
After running the beta for months, I installed Windows 10 on launch day with the impression that it was relatively fast and stable, though it remained to be seen precisely how fast it was compared to Windows 8.1 and the beloved Windows 7.
That's what we plan to find out today as we test various aspects of the operating system including boot up and shutdown times, file copying, encoding, browsing, gaming and some synthetic benchmarks.
Test System Specs
All three operating systems were tested using a fresh install with all the updates applied and then our test software installed. The exact same hardware was used for each configuration with the only difference being the OS used.
- Intel Core i5-4670K (3.4GHz - 3.8GHz)
- Asrock Z97 Extreme6
- 8GB DDR3-2400 RAM
- Nvidia GeForce GTX 980
- Crucial MX200 1TB
- SilverStone Essential Gold 750w
- Windows 7 Ultimate 64-bit, Windows 8.1 Pro 64-bit, Windows 10 Pro 64-bit
Boot, Sleep & Hibernate Performance
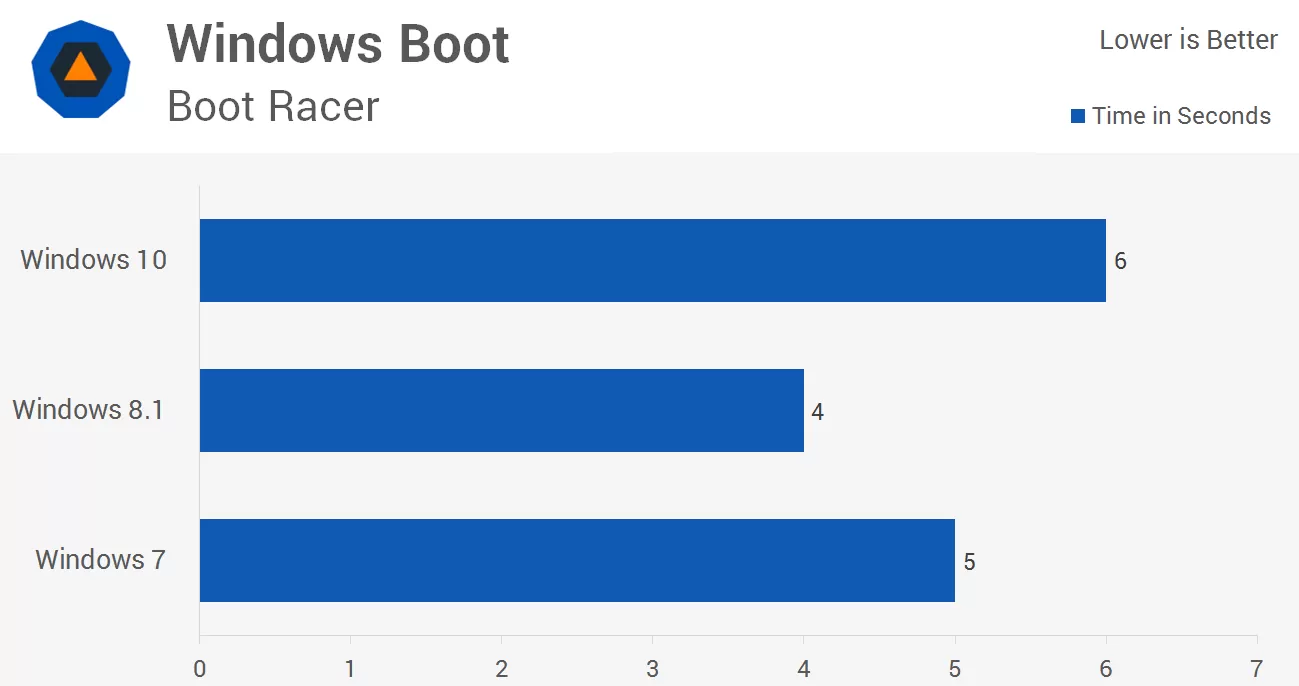
Using BootRacer we measured the time it took for Windows to boot. Windows 8.1 delivered the best result taking just four seconds opposed to six seconds on Windows 10, from the Windows logo to usable desktop.
Manually measuring boot time with a stopwatch delivered similar results, though in realistic terms I struggled to find real differences, with the three operating systems just one or two seconds apart from each other on a fresh install.
Surely these results will vary depending on hardware used, configuration and state of the operating system after months of use, patching and third party apps taking its inevitable toll. We know our hardware was identical for all three OS configurations, so with this setup Windows 10 does appear slightly slower at booting.
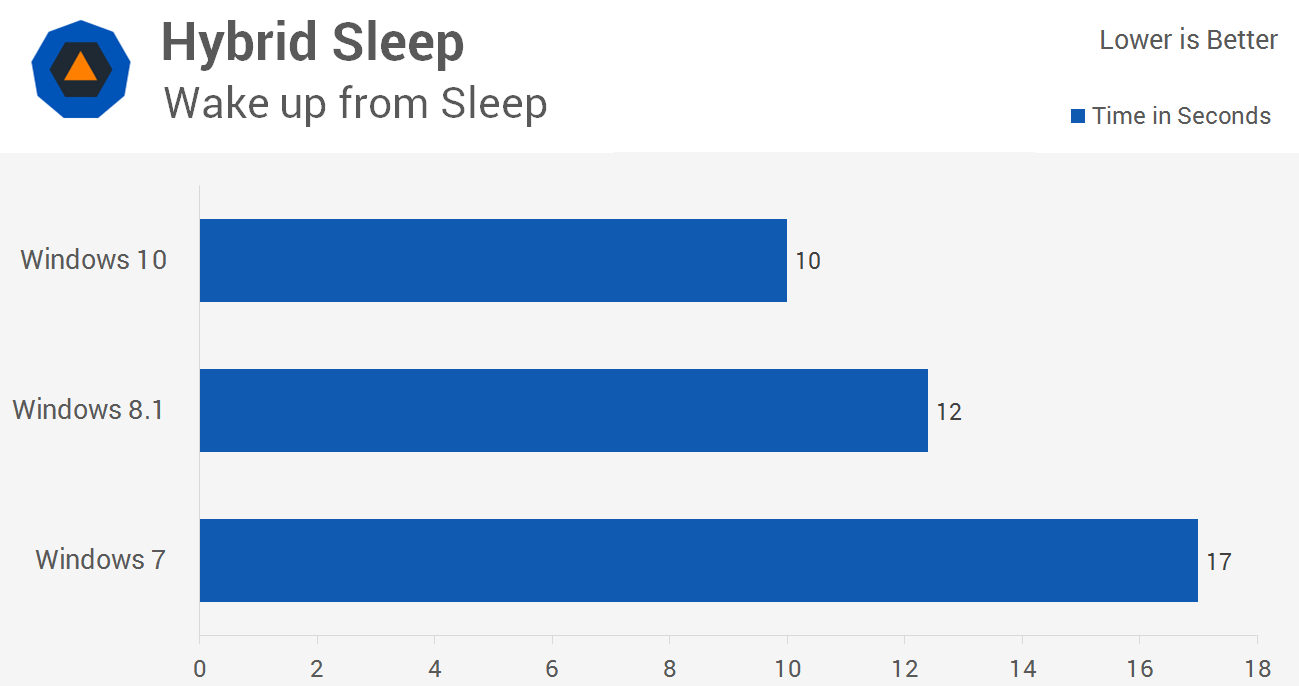
Here we measured the time it takes for the system to wake up from sleep. The test stops the moment the desktop is loaded and we induced sleep with a custom shortcut.
Windows 7 takes quite long to wake from sleep -- 17 seconds on average. Windows 8.1 is considerably faster taking just 12 seconds, though Windows 10 was able to improve on this shaving off an additional 2 seconds.
Editor's note (Update): Many readers have pointed out how slow these wake up from sleep times are compared to your laptop where either version wakes up almost instantaneously. The reason is that we ran all tests in a desktop PC, where Windows defaults to Hybrid Sleep. Hybrid sleep is a combination of sleep and hibernate meant to prevent users from losing work in case of a power failure.
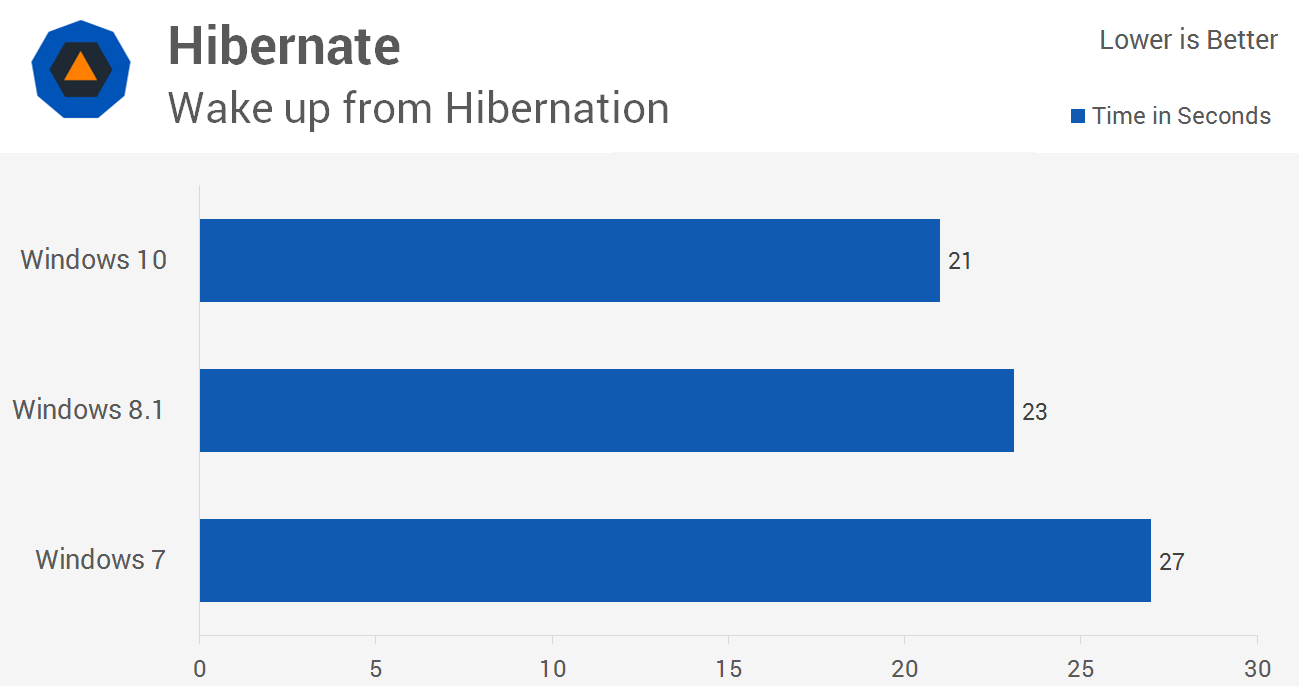
The wake up from hibernation results are similar to wake from sleep. Here Windows 10 took just 21 seconds, while Windows 8.1 was slightly slower taking 23 seconds and then Windows 7 at 27 seconds.
Synthetic Benchmarks
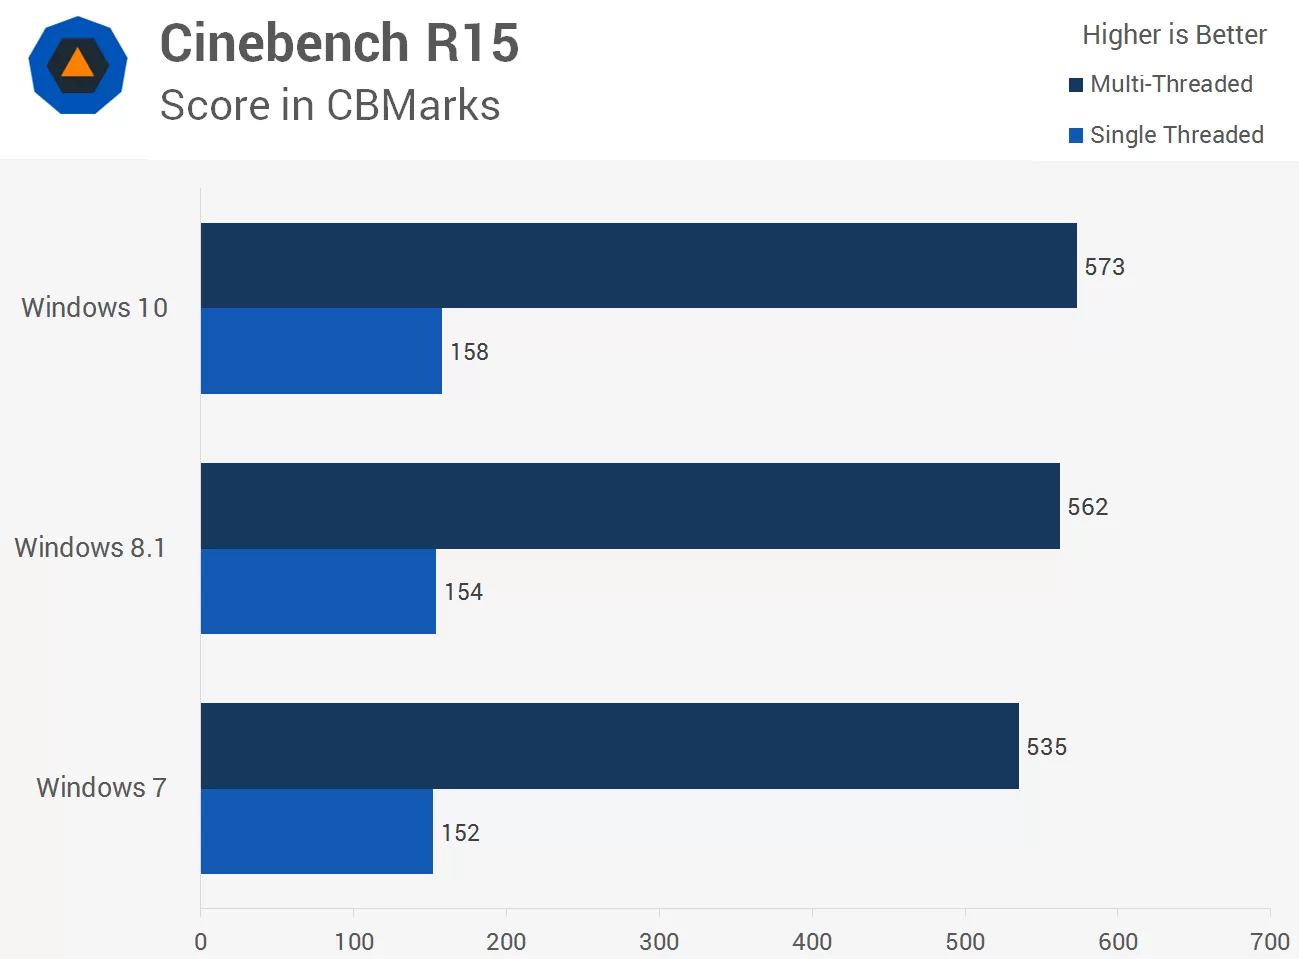
Cinebench R15 typically has an error margin of around 5%, though the impact of this can be reduced by taking an average of three runs, which is exactly what we have done. Looking at the single thread results we see a very slight increase in score from Windows 7 to 8.1 and then from 8.1 to 10. Certainly nothing to write home about, but this did have a greater impact on the multi-threaded results where Windows 10 was 7% faster than Win 7, though it was just 2% faster than Win 8.1.
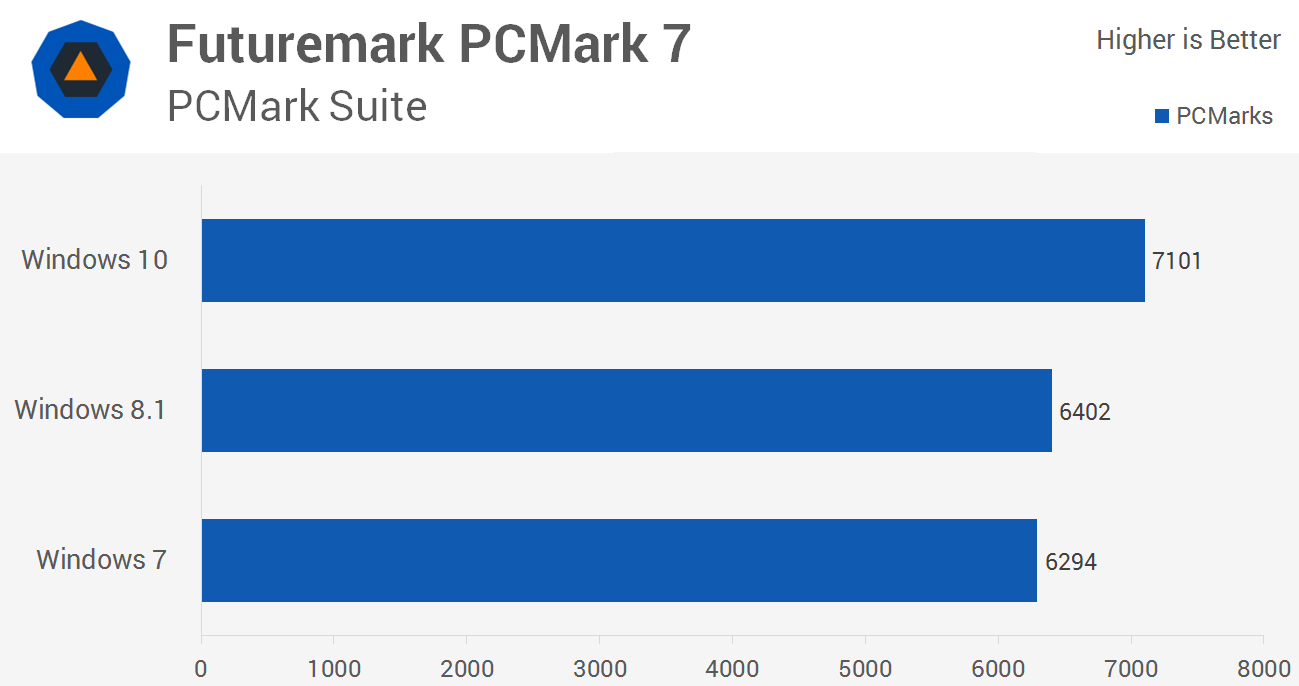
Next up we have PCMark 7 with some interesting results: Windows 8.1 was consistently faster than Win 7 by a little over 100pts while Windows 10 was around 600pts faster on average. Further examination reveals that for whatever reason PCMark 7 was showing much higher "video playback and transcoding / video transcoding" performance under Windows 10 than the previous Microsoft operating systems. The result was almost twice as fast in hitting 9600kB/s.
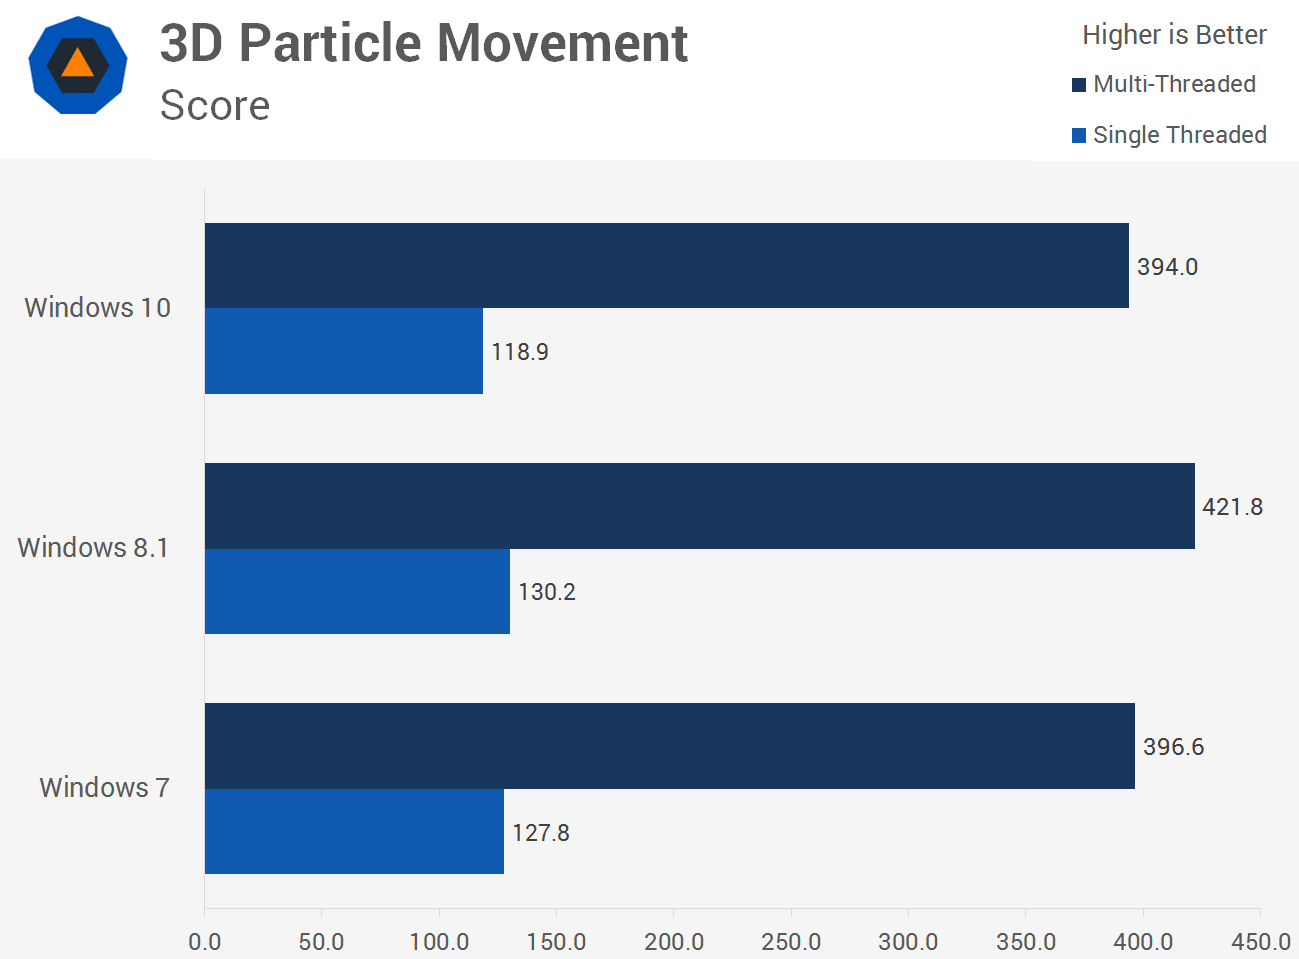
The last synthetic benchmark we are going to look at is 3D Particle Movement and here we see similar results across all three operating systems. Windows 10 was on average the slowest, while Windows 8.1 provided the best results.
Application Performance
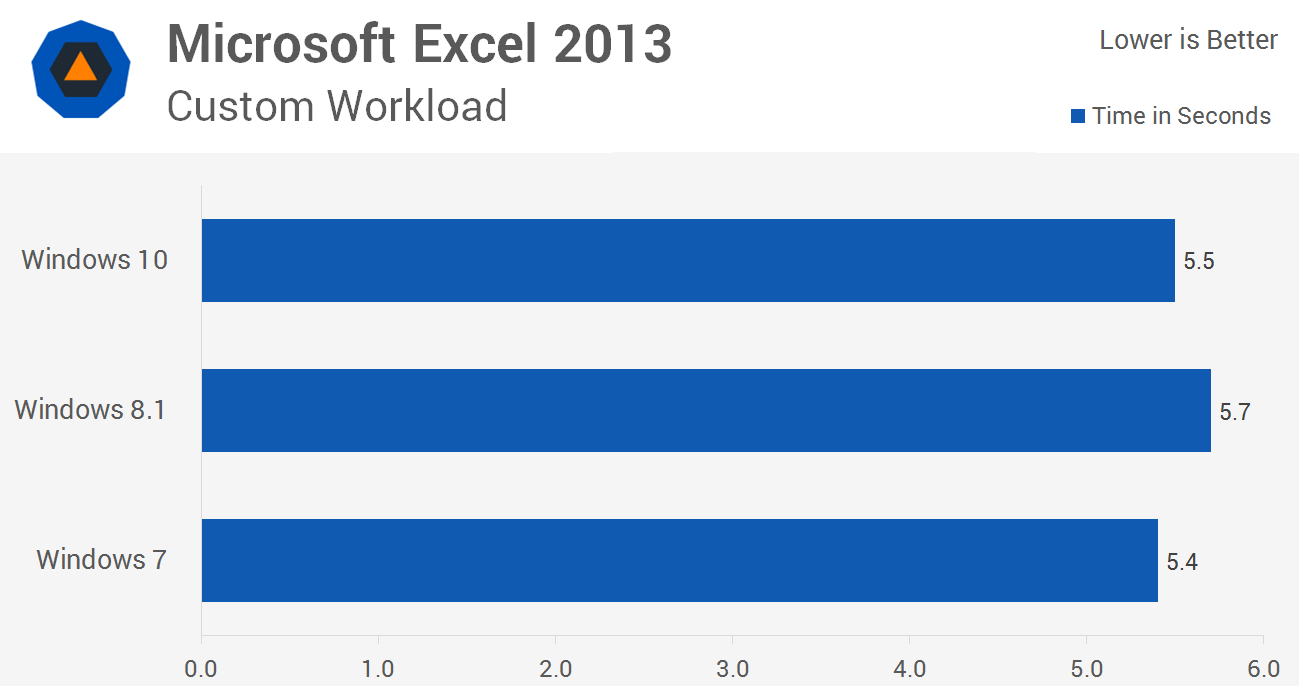
Windows 10 delivered similar performance to Win 7 in Excel 2013, while 8.1 was consistently slower.
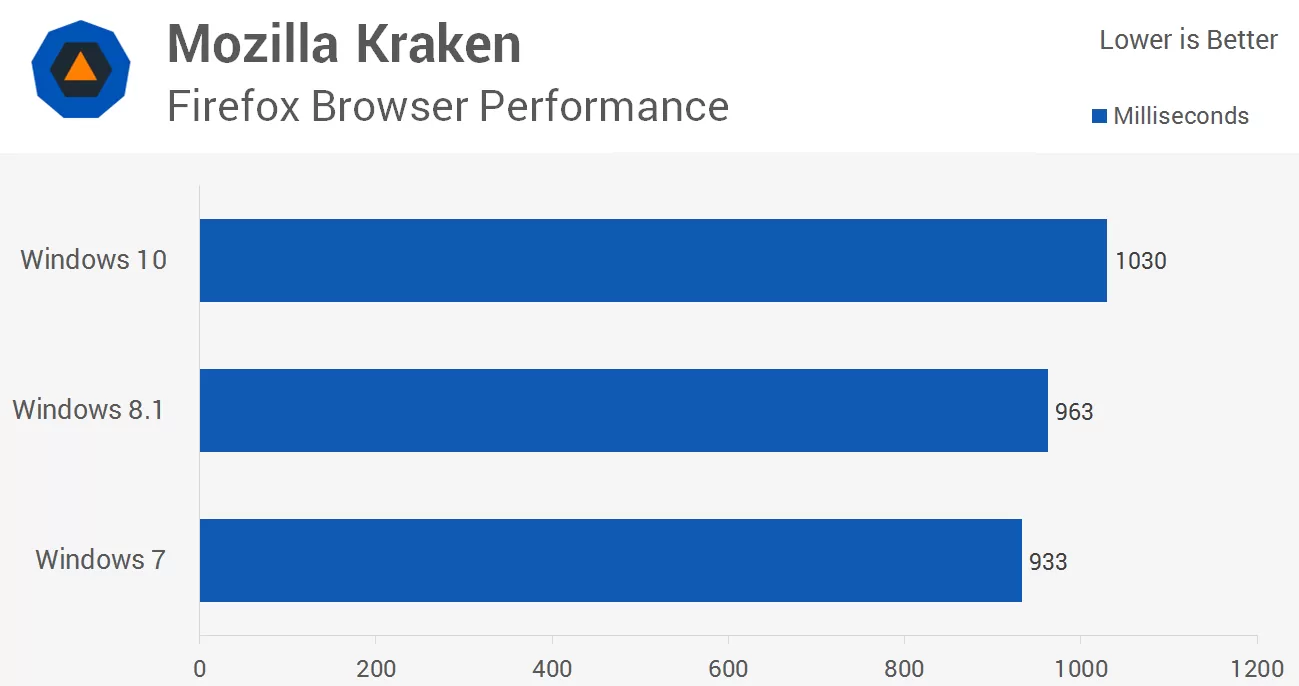
At this point Firefox is slower in Windows 10 when compared to 8.1 and 7, based on an average of 7 runs we found it was 7% slower.
Please note again that lower is better here despite the ordering of the graph suggesting otherwise. Rather than sort the data from fastest to slowest for this review we have locked each operating system in order. This should help make reading the data faster since each operating system will assume the same location on each graph, the randomness of the results shouldn't be too bad given there are just three configurations.
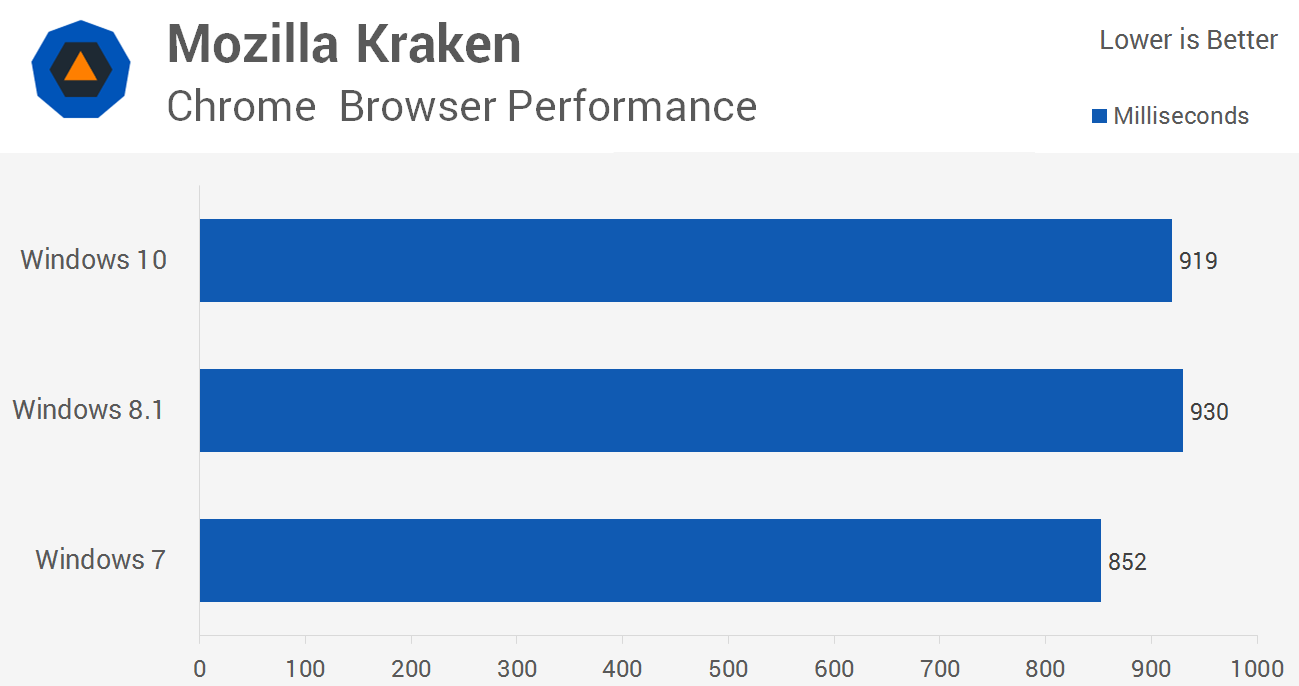
Interestingly both Windows 10 and Windows 8.1 were slower than Windows 7 when measuring Chrome performance in the Mozilla Kraken browser benchmark, quite a bit slower in fact.
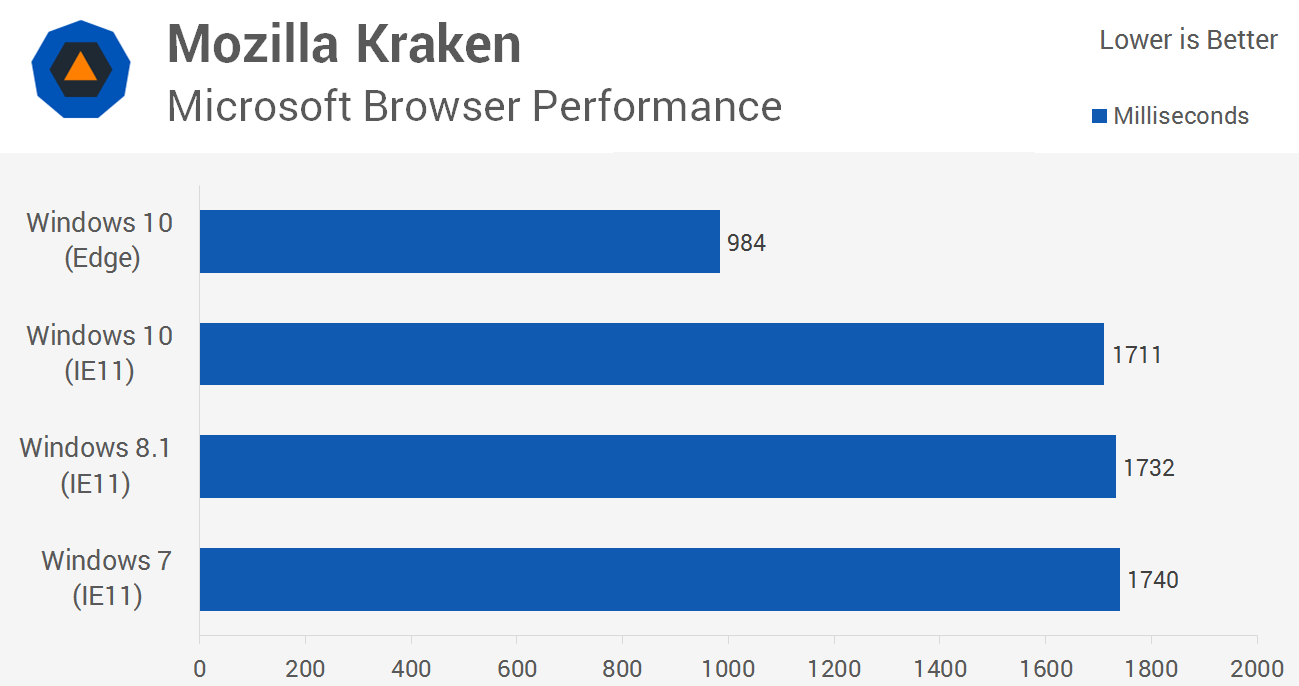
As you can see Internet Explorer 11 is very slow on all three operating systems compared to Firefox and Chrome. However, Microsoft's new Edge browser, which is exclusive to Windows 10, performs much better with comparable results to Firefox and Chrome.

The Windows 10 performance when testing with WinRAR wasn't great as it was consistently slower than 8.1 and 7 when measuring single and multi-threaded performance.

The best results with Photoshop CC were seen when using Windows 8, while Windows 10 matched the performance of Windows 7.
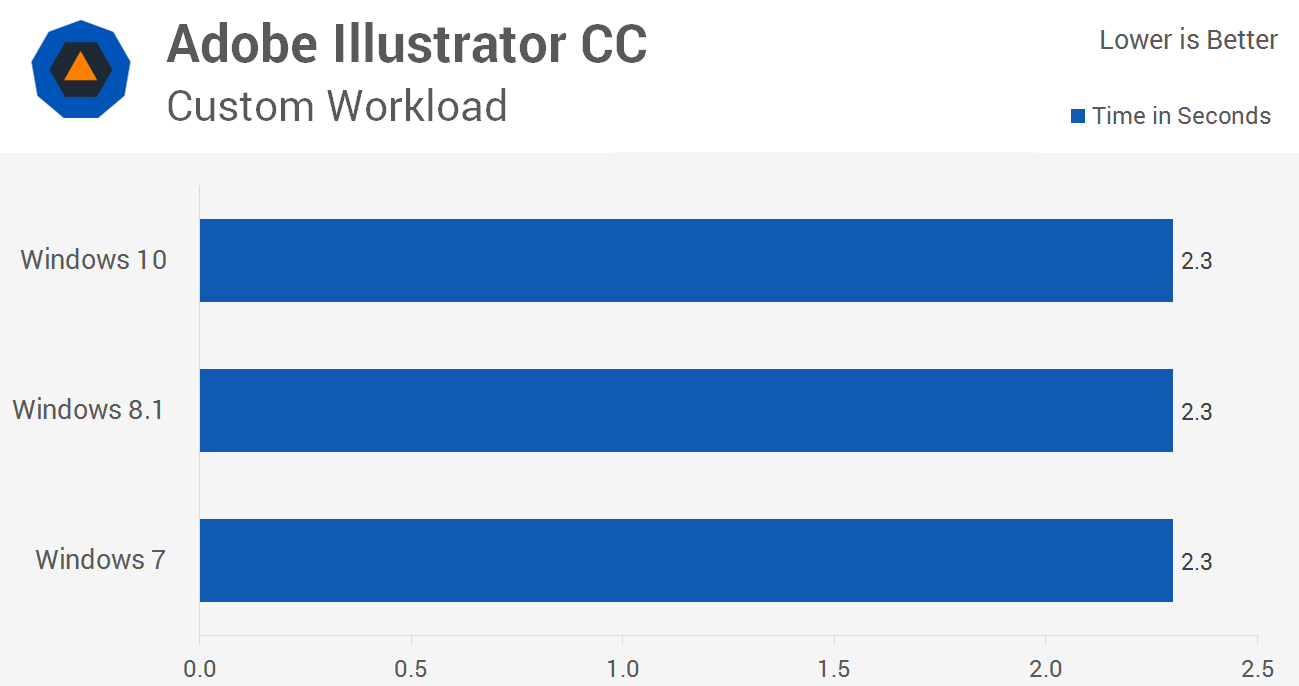
There's not a lot to say here as all three operating systems delivered the same performance in Illustrator CC.
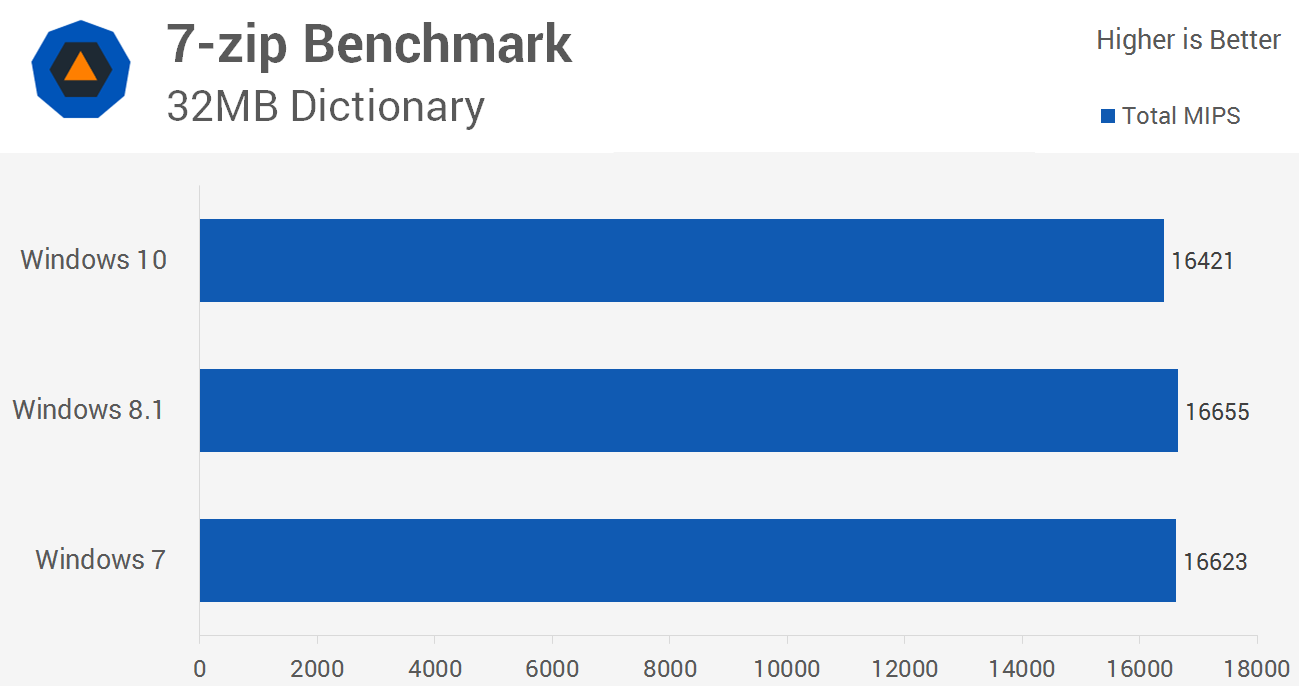
Like what we saw when testing with WinRAR, we find that Windows 10 is slower than both 8.1 and 7 in 7-Zip.
Storage Performance
We have updated the initial storage results testing both AHCI (Samsung SSD 850 Pro) and NVMe (Samsung SM951) solid state storage. The following tests were conducted using the Samsung 850 Pro 512GB SATA 6Gb/s SSD installed on the Asrock Z97 Extreme6.
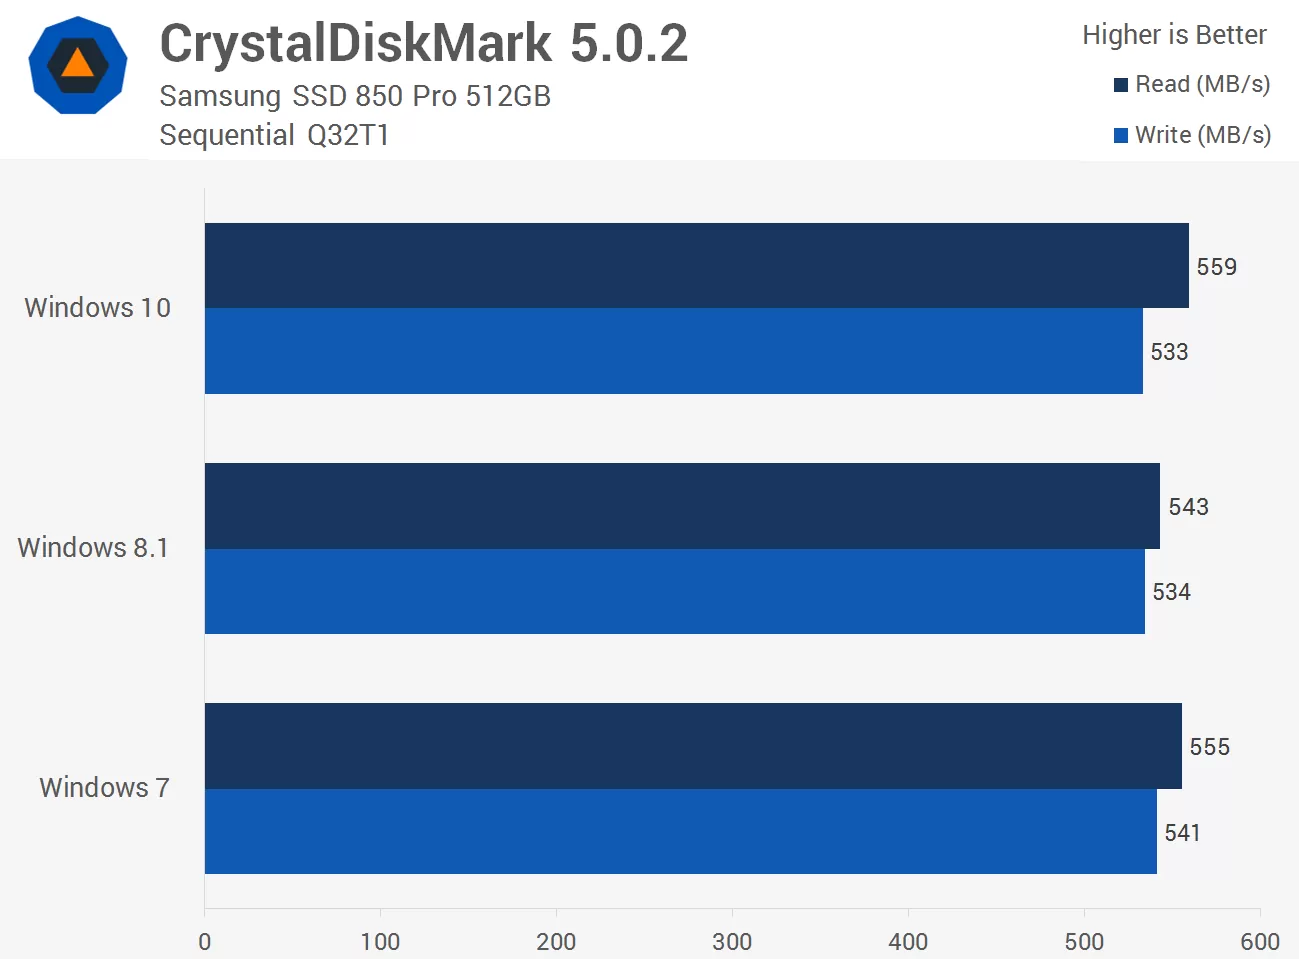
The CrystalDiskMark sequential 32 queues and 1 thread test provided similar results across all three operating systems using the Samsung SSD 850 Pro 512GB.
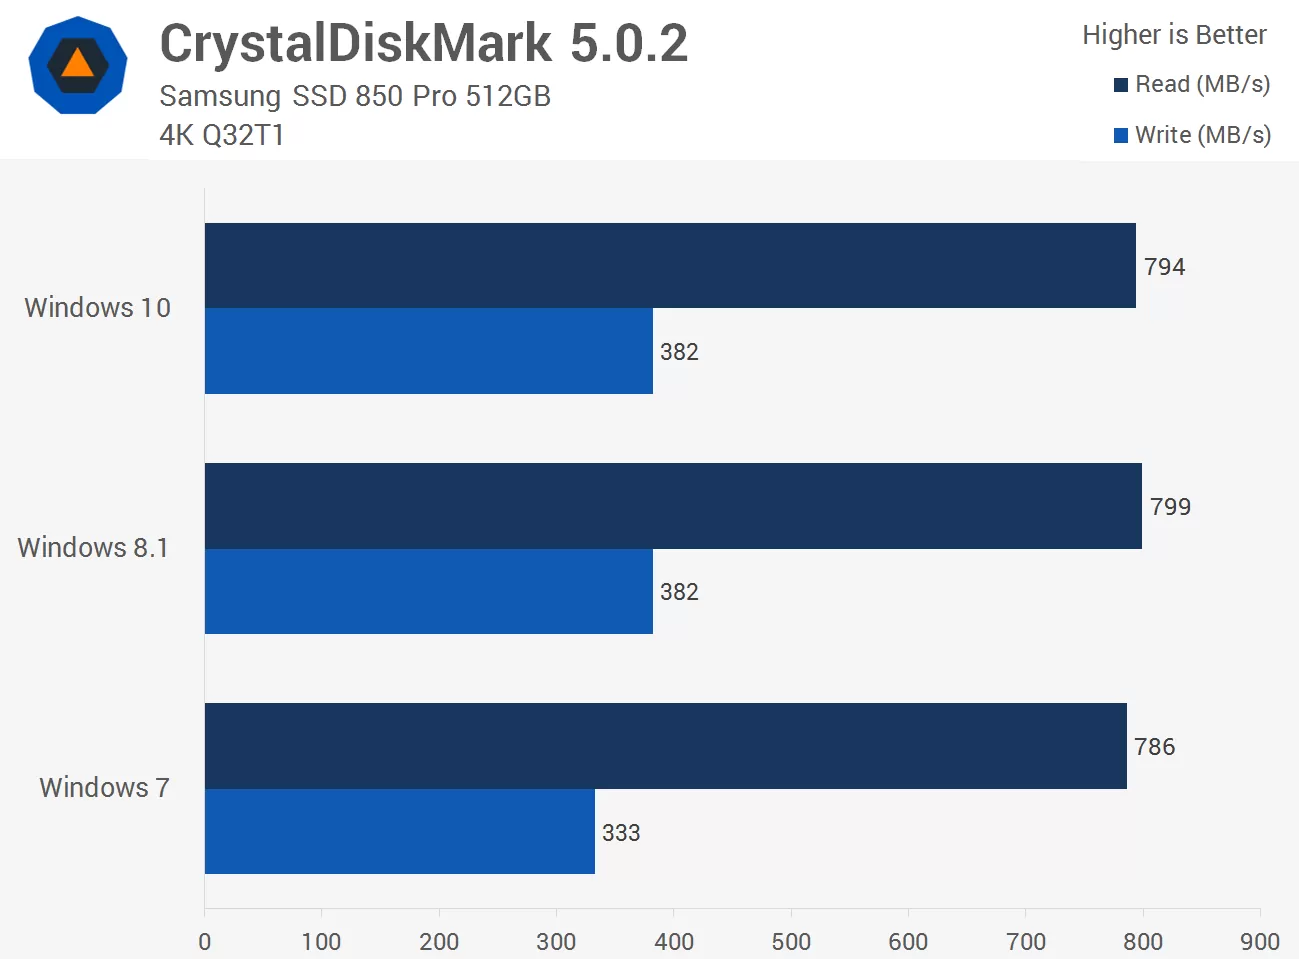
The 4K 32 queues and 1 thread test showed Windows 10 and 8.1 delivering similar read performance while Windows 7 was a fraction slower. That difference was amplified when looking at the write performance, here Windows 7 was noticeably slower.
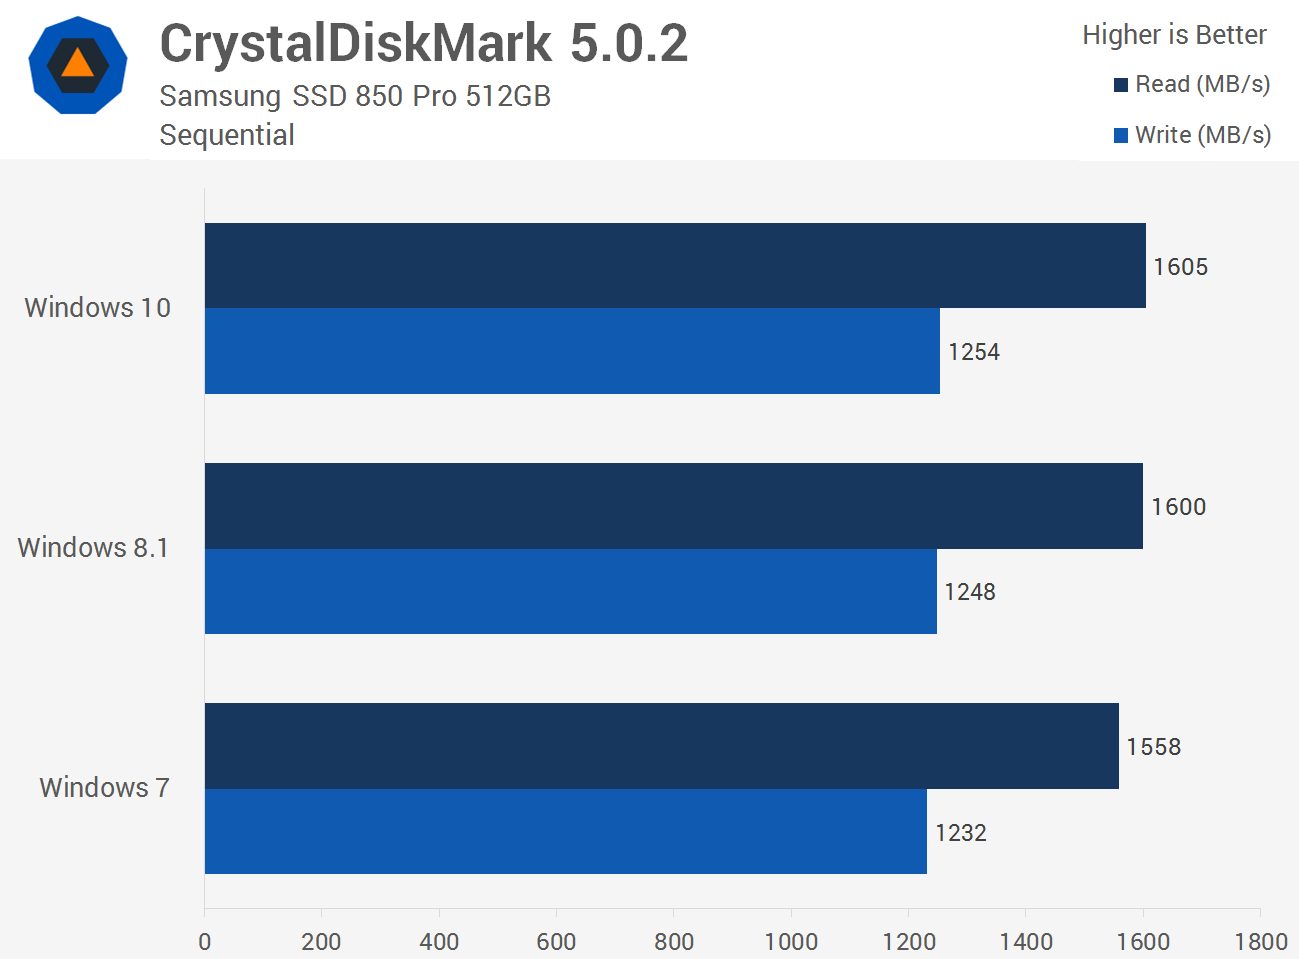
The sequential performance was again very similar as Windows 10 and 8.1 provided almost identical performance, Windows 7 was again just a fraction slower.
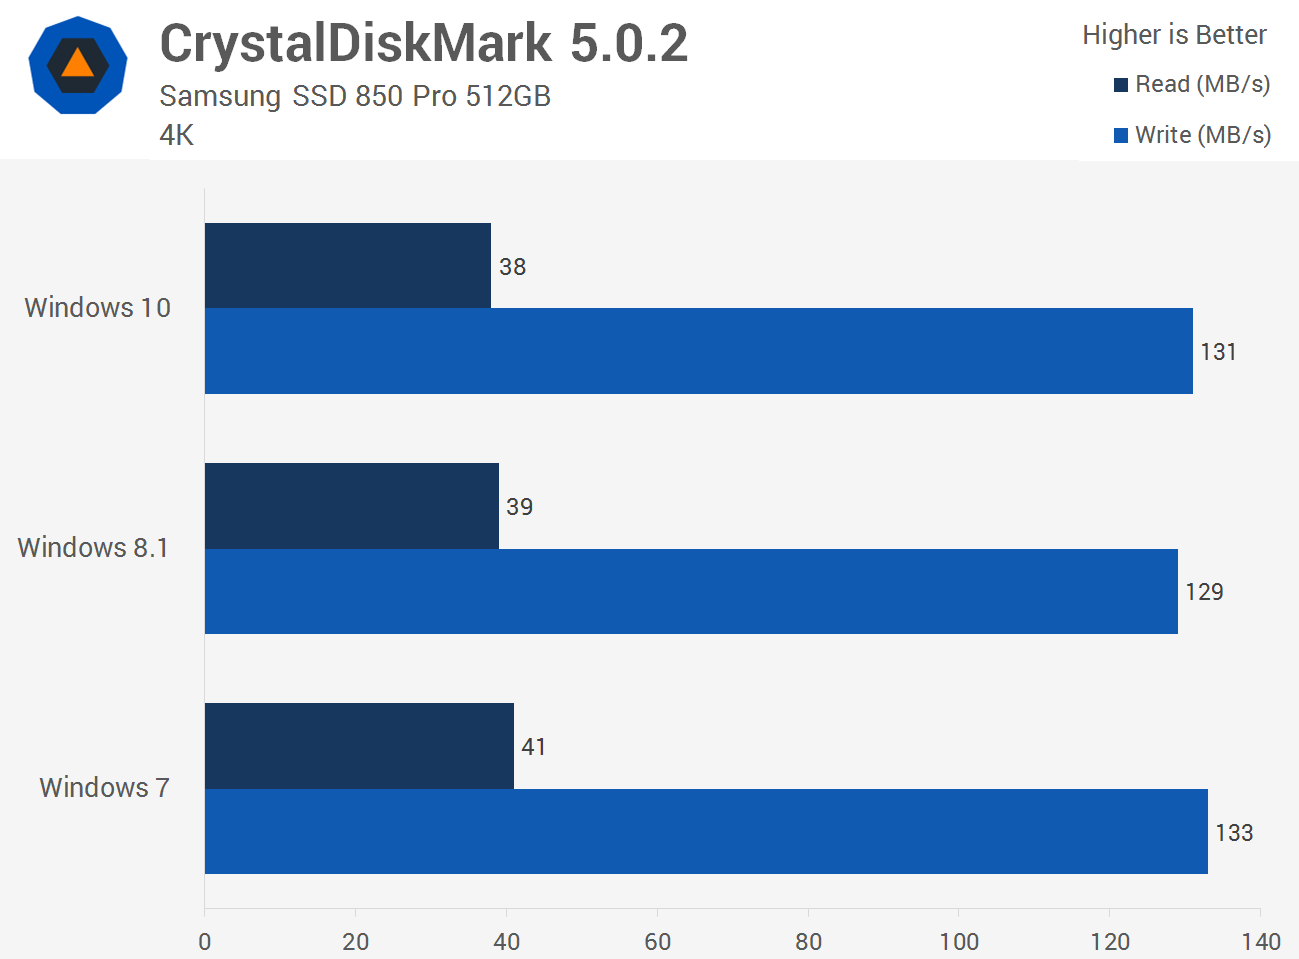
Finally the 4K performance with the Samsung SSD shows all three operating systems delivering similar results, this time Windows 7 is slightly faster than Windows 10.
Storage Performance with the Samsung SM951 NVMe SSD
The following tests were conducted using the Samsung SM951 256GB NVMe SSD installed in the Ultra M.2 slot on the Asrock Z97 Extreme6. Note we were unable to get the SM951 NVMe working in Windows 7.
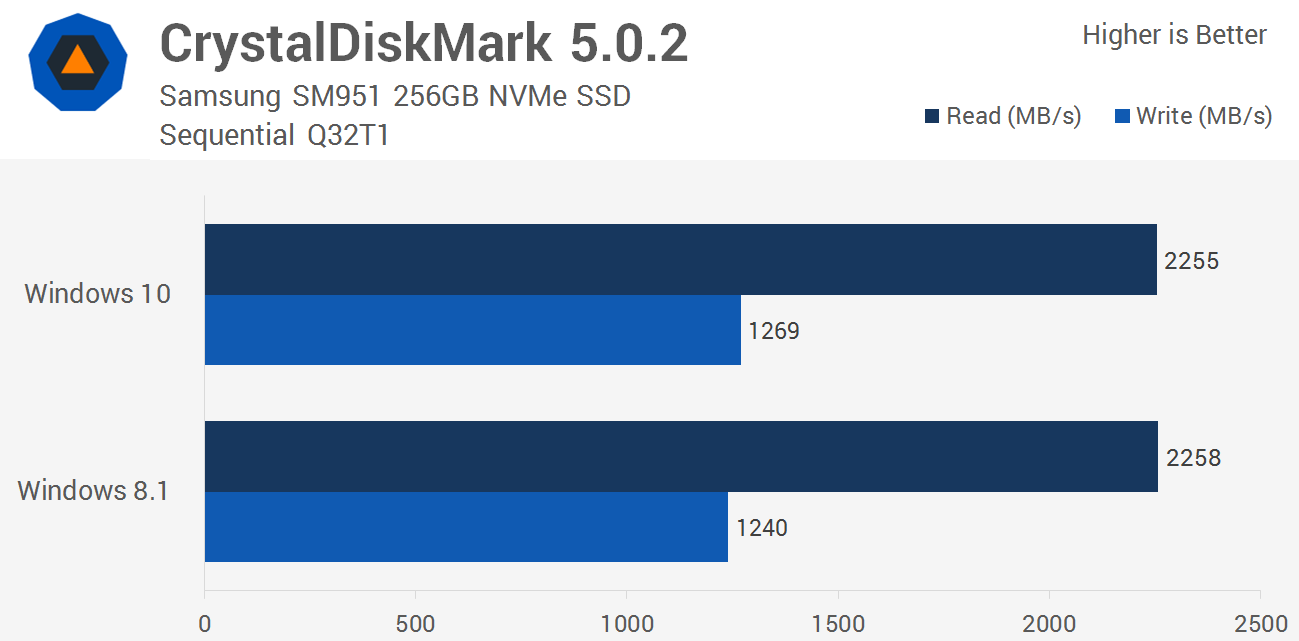
Windows 10 and Windows 8.1 show similar SSD performance when using an M.2 NVMe drive.
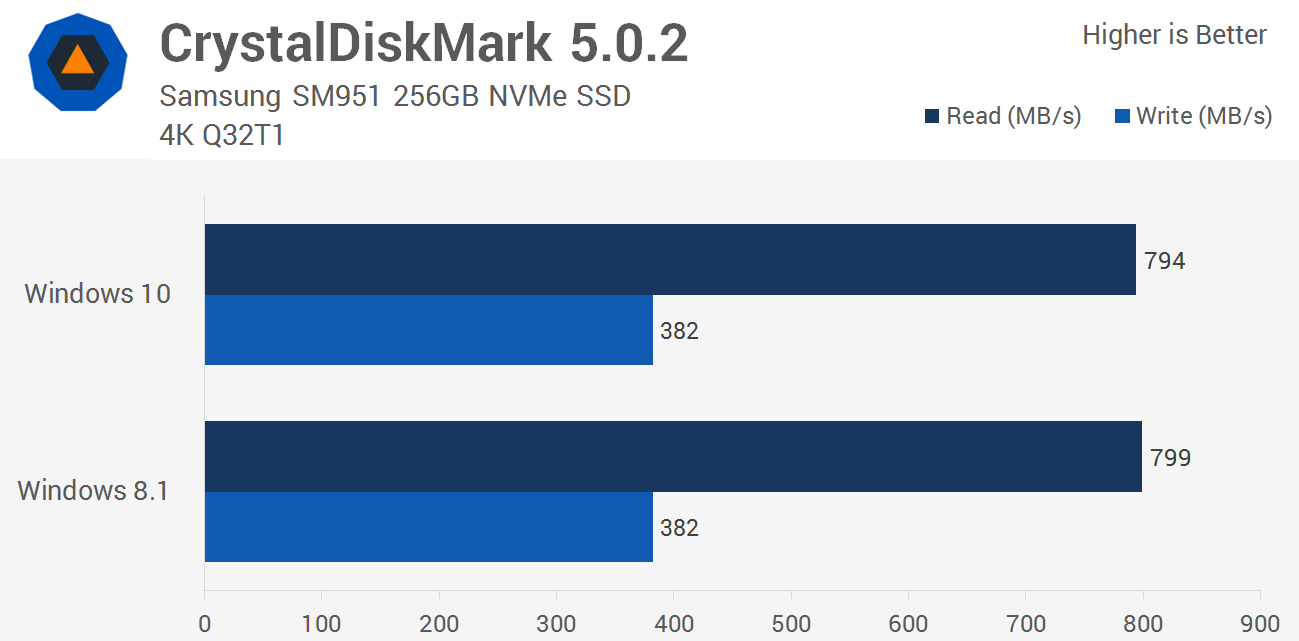
Again Windows 10 and 8.1 are evenly matched when measuring 4K Q32T1 performance.
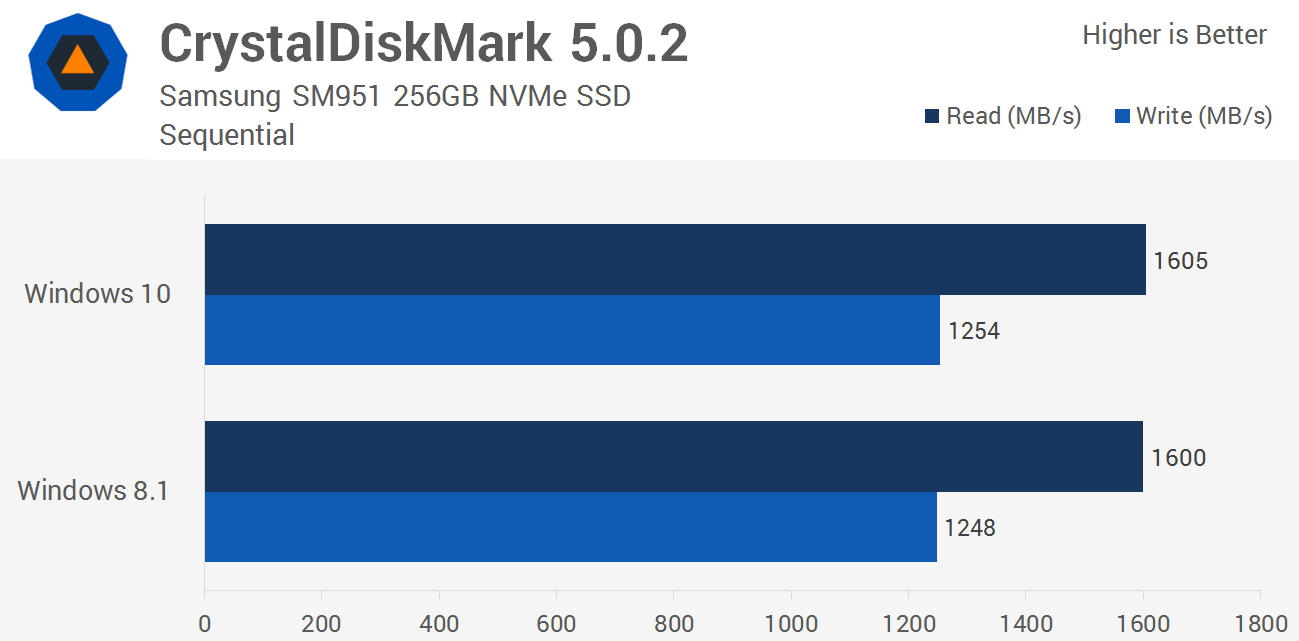
The sequential results are also much the same.
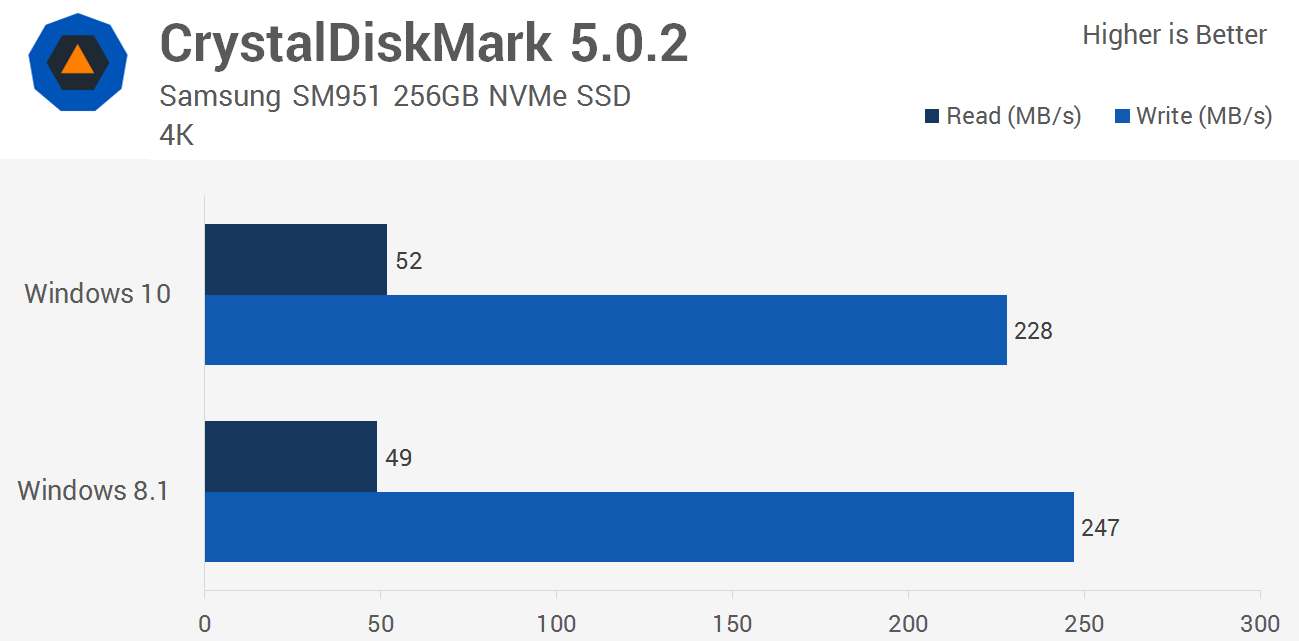
The 4K performance provides mixed results. Windows 10 was a fraction better when measuring read performance while Windows 8.1 was much better when comparing write performance.
Encoding Performance
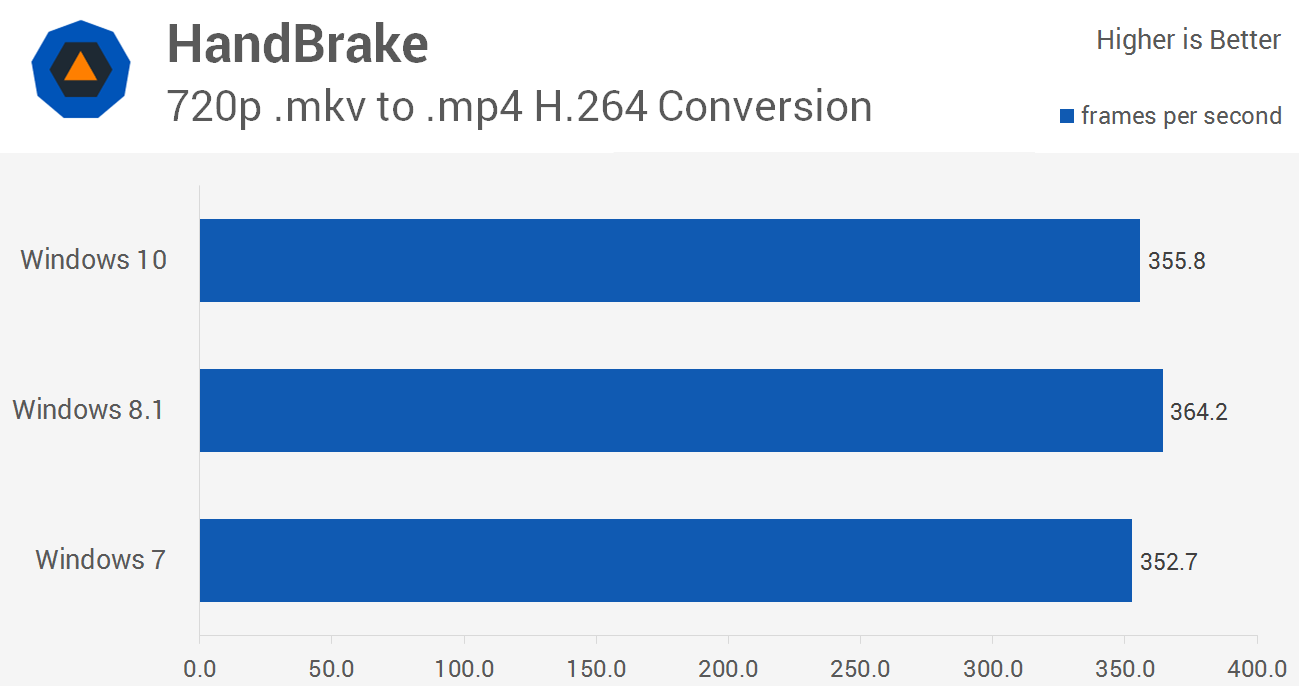
Windows 10 delivered similar performance to Windows 7 in our HandBrake encoding test while 8.1 was noticeably faster than both.
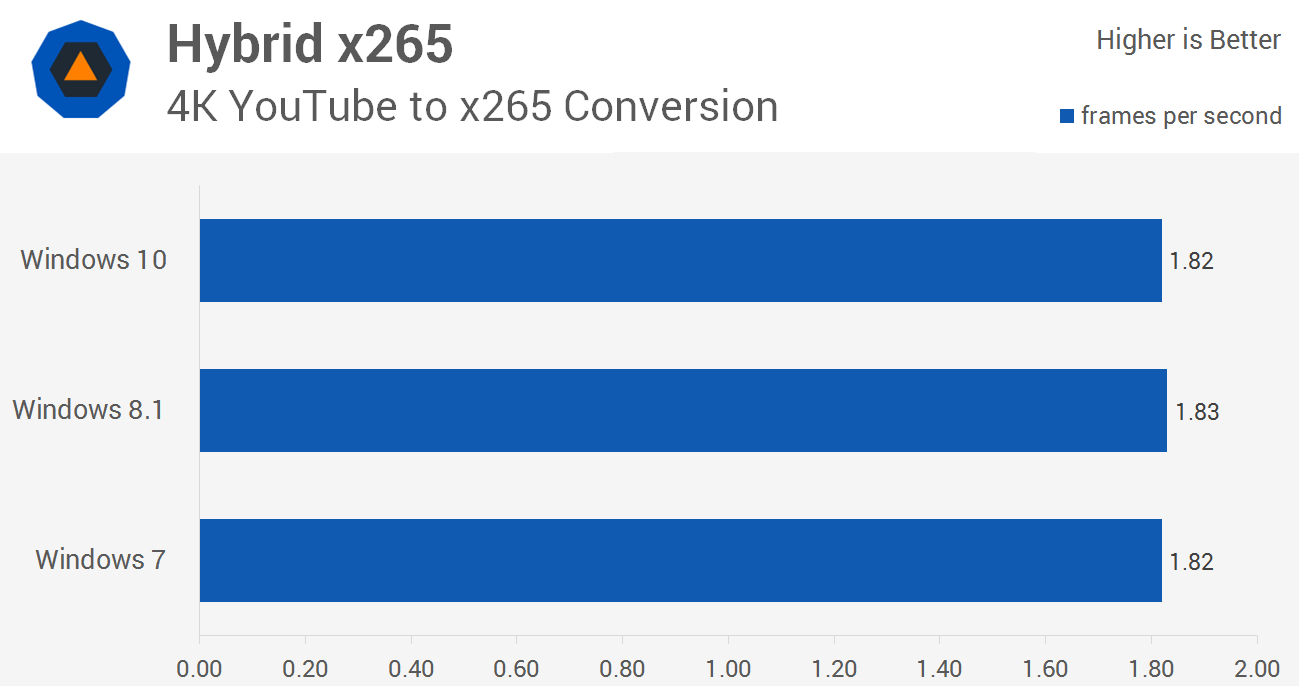
Our Hybrid 4K benchmark saw almost no difference in performance between the three operating systems, though again Windows 10 matched 7 while 8.1 was a fraction faster.
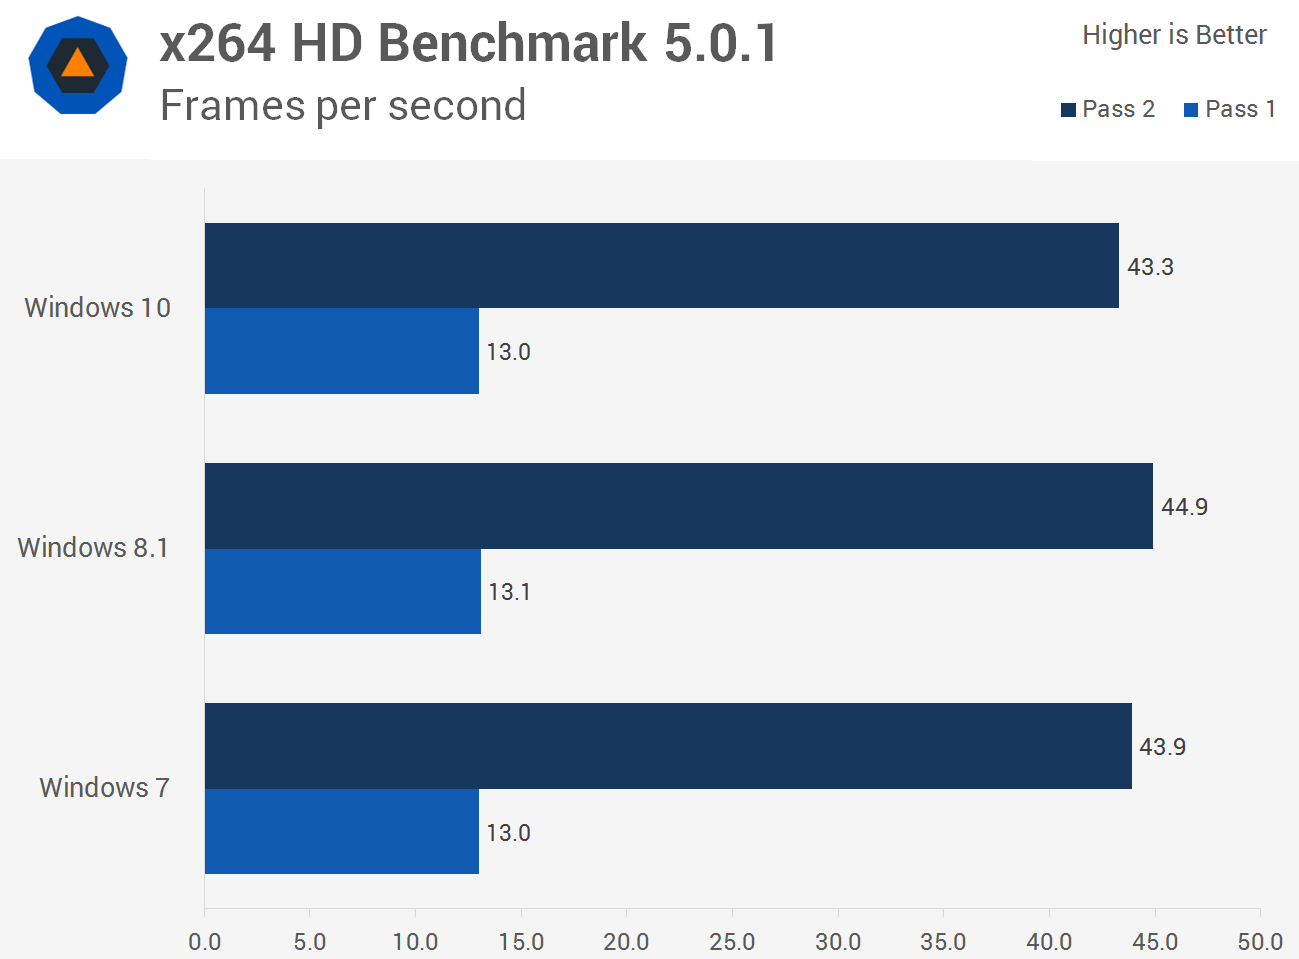
Yet again we see that Windows 10 matched Windows 7 while it was slightly slower than 8.1 -- I emphasize slightly.
Gaming Performance
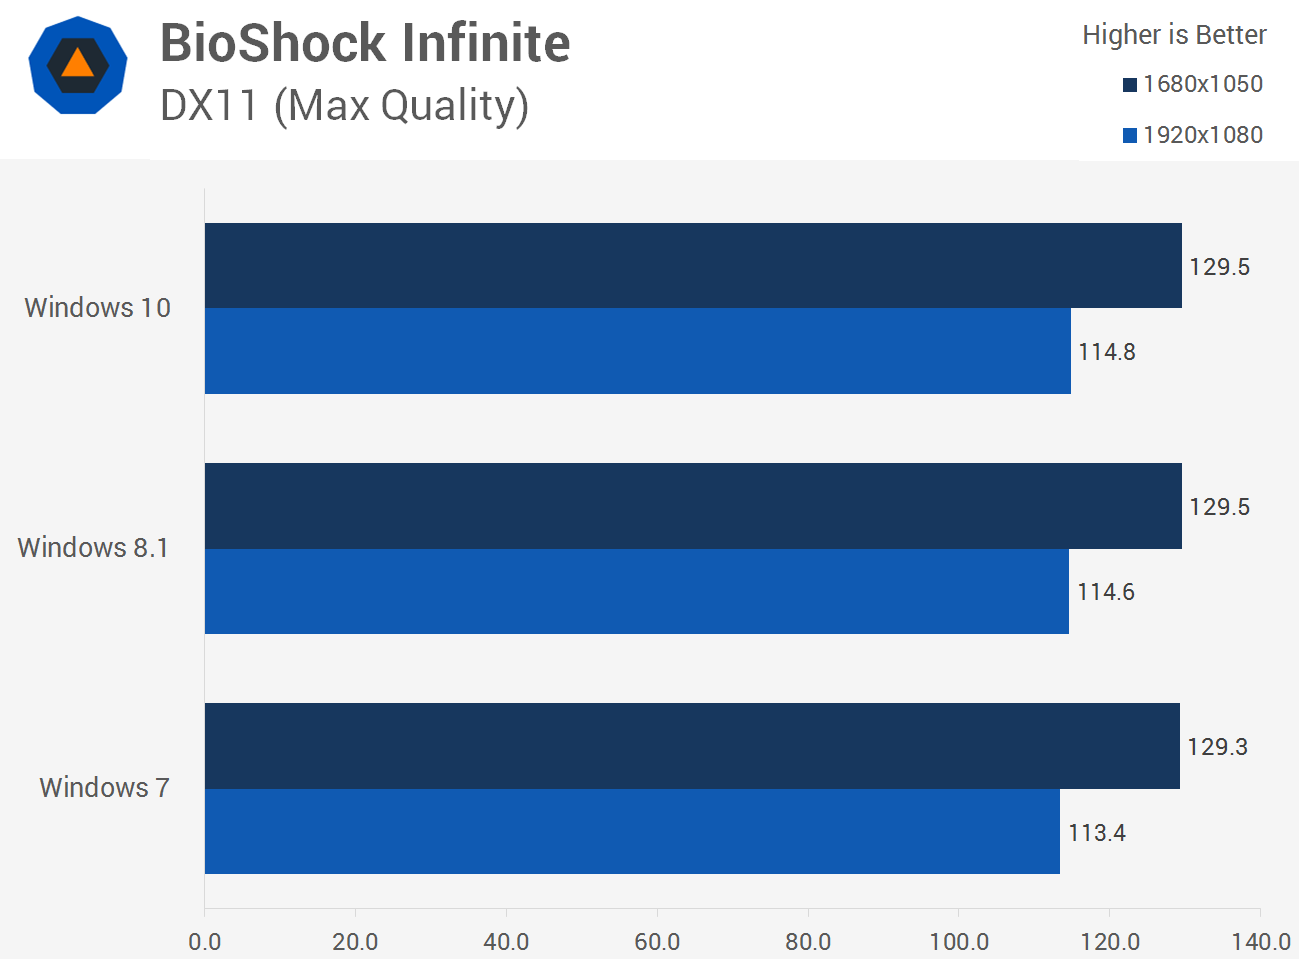
As anticipated, it looks like Windows 10 offers little to no performance advantages over previous versions when it comes to DX11 gaming, at least not in BioShock.
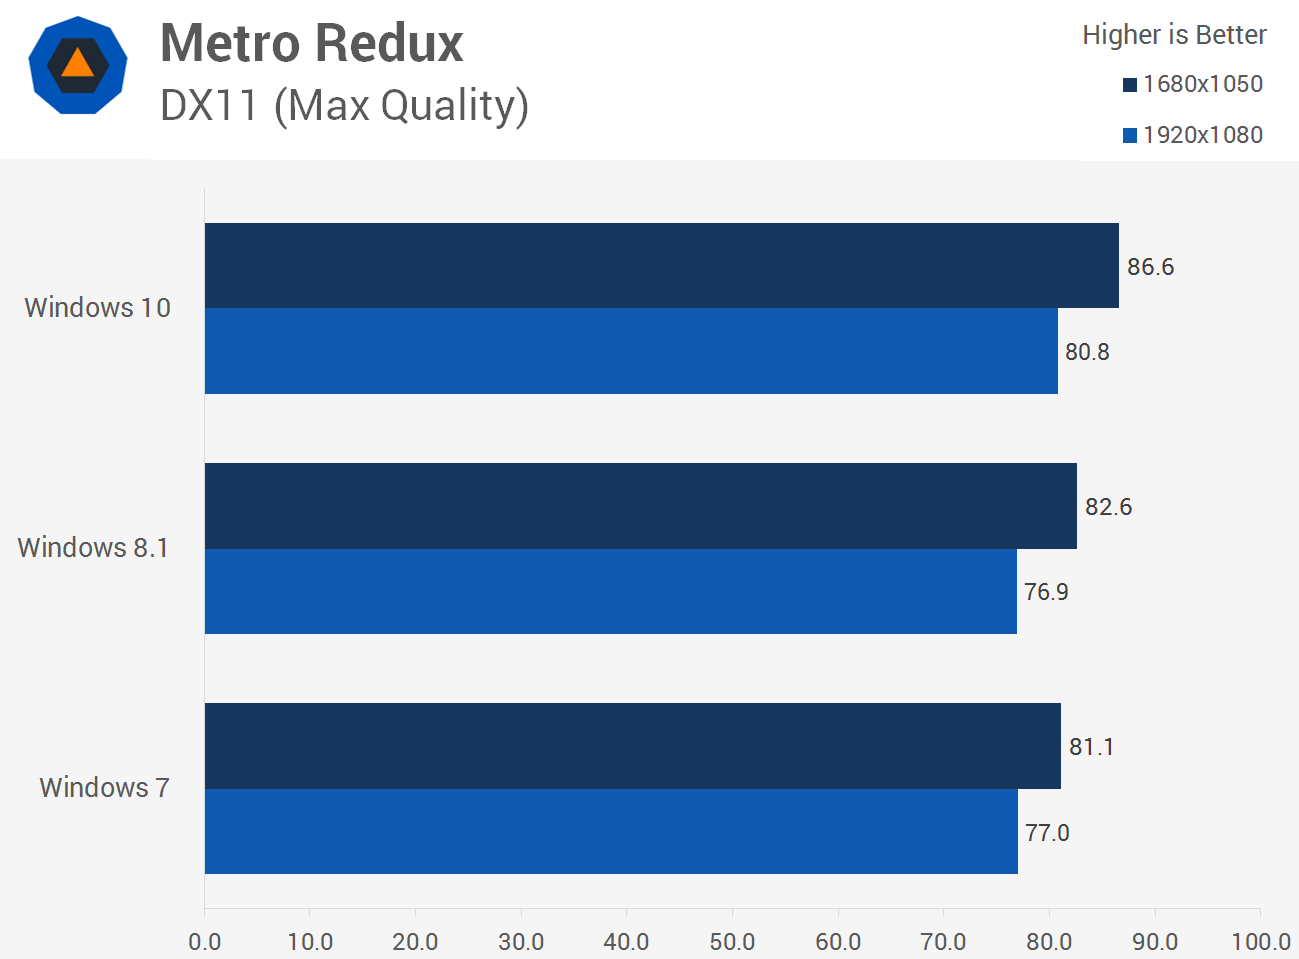
Surprisingly Windows 10 provided consistent gains in Metro Redux with the GTX 980. This could simply be an issue with the drivers though.
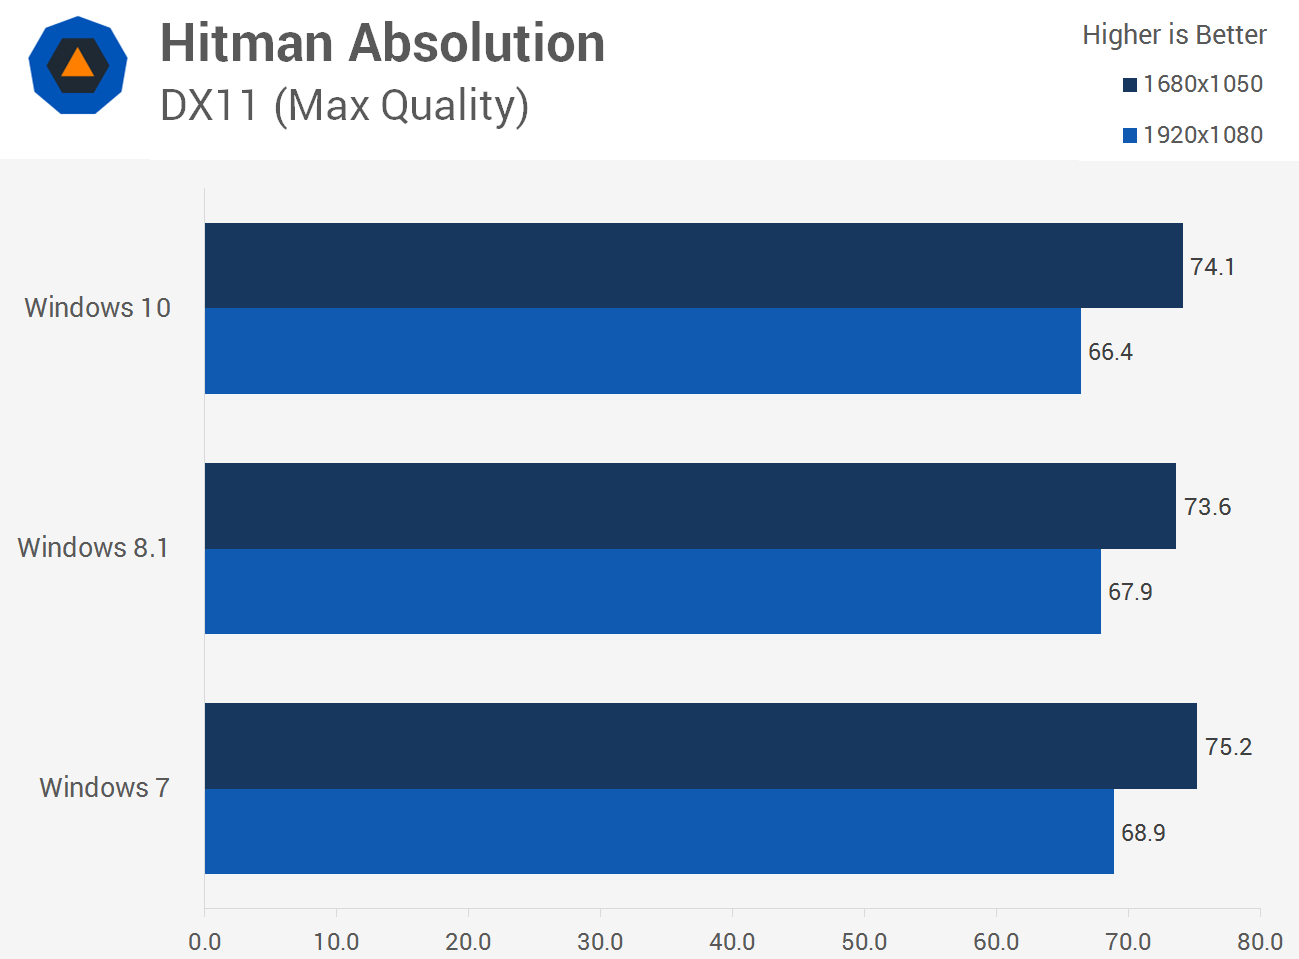
Performance slightly drops off in Hitman when moving from Windows 7 to 8.1 and then to 10.
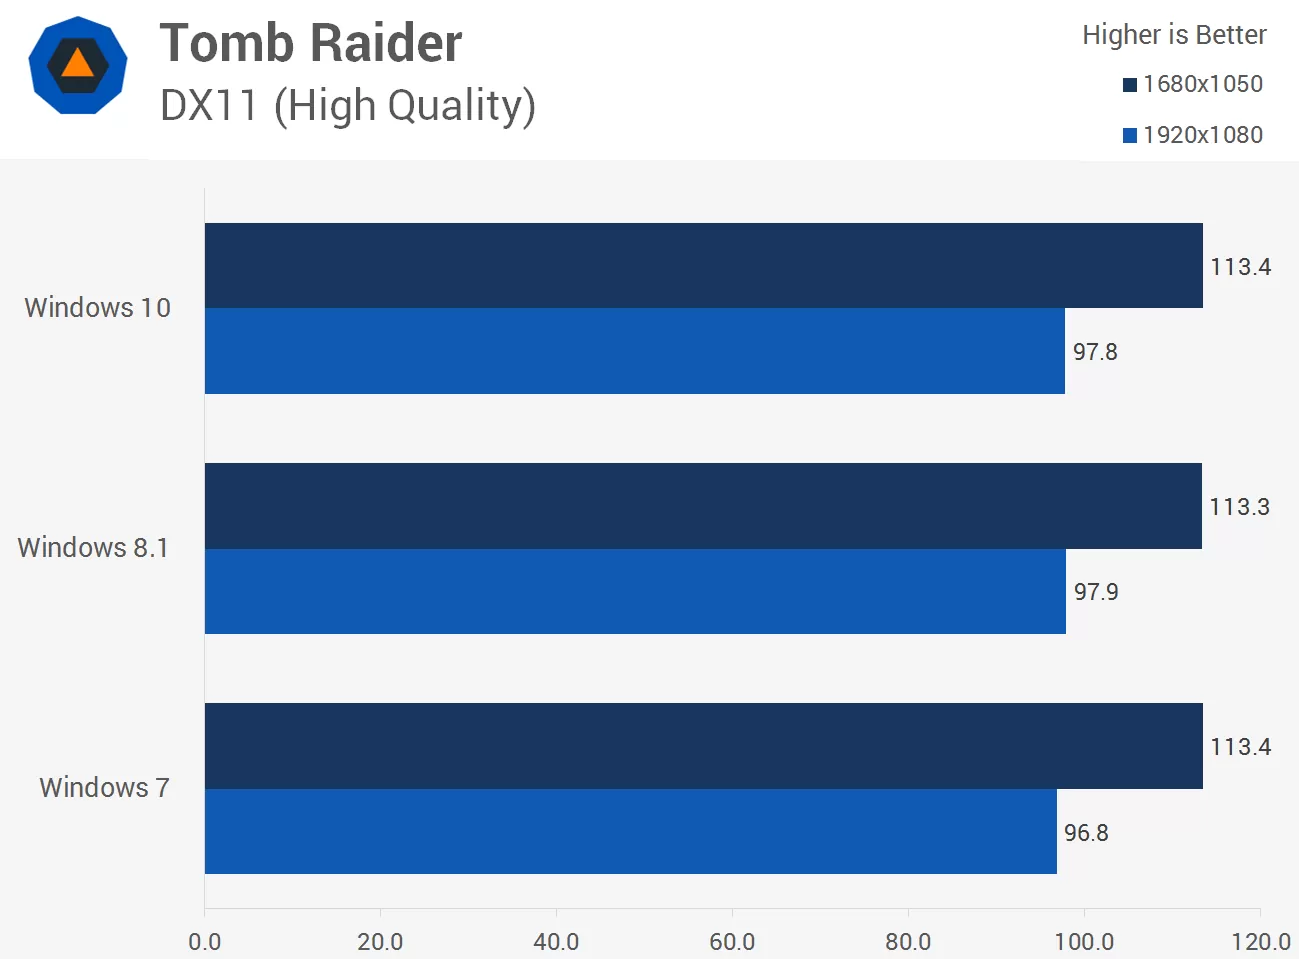
Tomb Raider delivered the exact same performance across all three Microsoft operating systems.
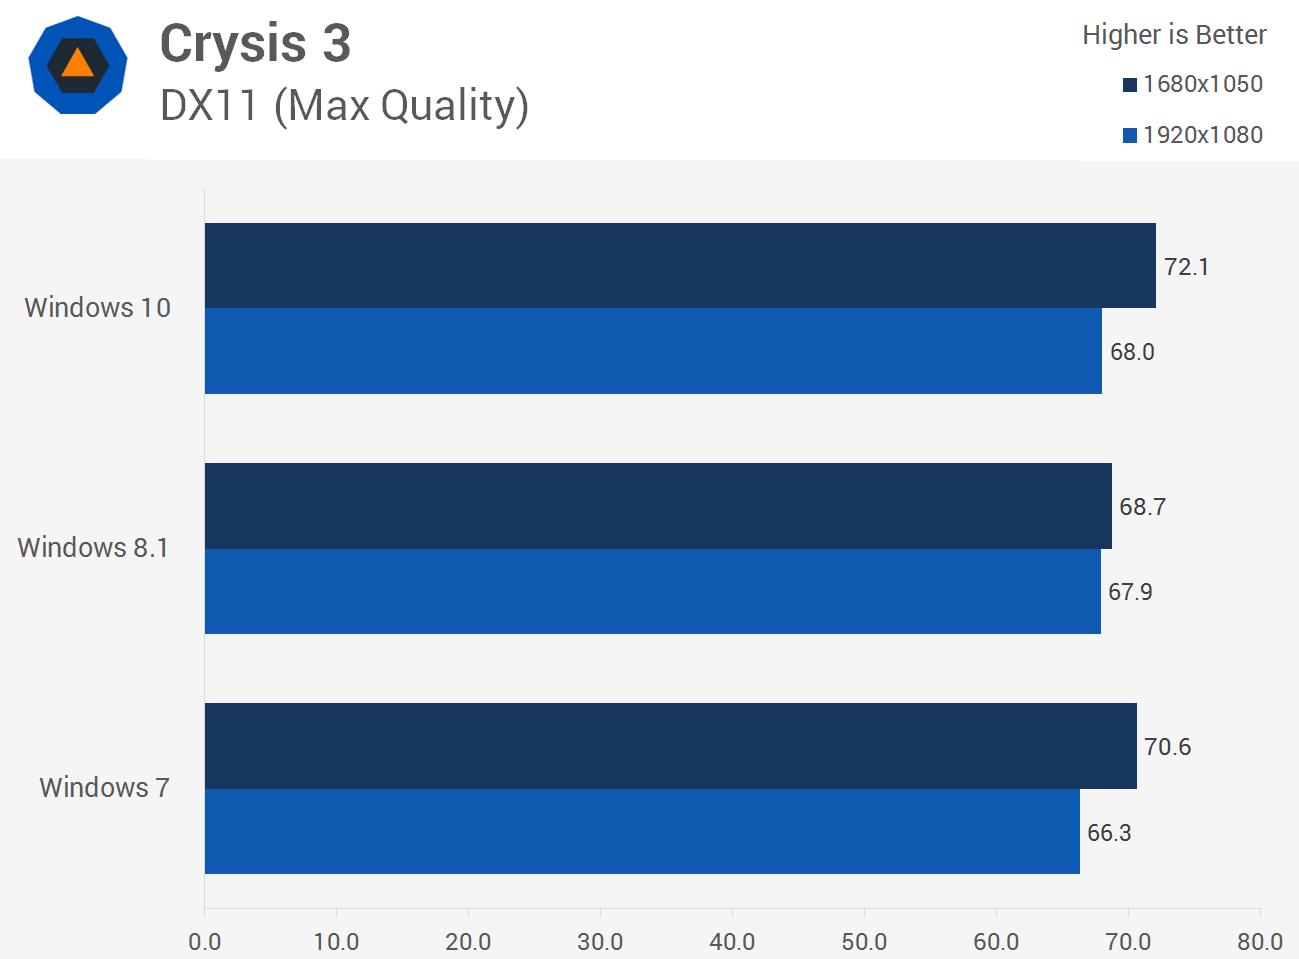
Finally we have Crysis 3 and here Windows 10 performed well, delivering strong performance at both tested resolutions.
Faster, Slower, Better?
After watching near-identical results pour in on most tests, from application to encoding, to storage and gaming, it's hard to read too much into results as there are many variables we can't control.
The same hardware that currently runs Windows 7 competently can be upgraded to Windows 10 with no issues whatsoever on the performance front.
We can ensure that the operating systems were evaluated using the exact same hardware, benchmarking software and methodology. However, we can't ensure that something such as GPU driversdidn't cause variations in performance. Moreover, technologies such Intel's Turbo boost feature can impact the accuracy of the results, though we generally run all tests at least three times, taking the average from multiple runs.
The short version of this conclusion is that a properly set up Windows machine equipped with semi-modern hardware should be capable of running Windows 7 or above more than adequately. The same hardware that currently runs Windows 7 competently can be upgraded to Windows 10 with no issues whatsoever on the performance front.
It used to be the case a few generations back that a new Windows release would need time to be at least on par with the performance of its predecessor. Possibly the most extreme example I can recall was the move from Windows XP to Windows Vista. Though that was partly due to immature drivers on the all-new platform, Vista was a resource hog, too.
We wouldn't be surprised if certain aspects of Windows 10's performance are improved over the coming months and into next year, but most importantly today, you can feel free to upgrade and know you won't be sacrificing performance in the process.
There are going to be future performance benefits of Windows 10 that we can't measure yet, and even once we can, we won't be able to compare the changes with previous operating systems -- DirectX 12 gaming, for example, will only be supported by Windows 10 and later.
On that subject, 3DMark features a DX12 API Overhead test but this is only useful for comparing different hardware as there isn't a DX11 version and it can only be run using Windows 10.
There are going to be future performance benefits of Windows 10 that we can't measure yet, and even once we can, we won't be able to compare the changes with previous operating systems -- DirectX 12 gaming, for example...
Benchmarks aside, Windows 10 appears to be a solid operating system, though my experience hasn't been quirk-free on the seven systems I have running Windows 10 (six of which have been upgraded from 8.1). The upgrade process is shockingly quick and easy. One of the systems I upgraded for example has well over 1TB worth of applications installed and it went smoothly all around regardless.
There have been a few minor issues so far. I haven't looked into this yet, but my photo and media libraries with thousands of items take a long time to load in Windows 10, whereas they loaded instantly before the upgrade from 8.1. Clearly a bug waiting to be fixed.
On the gaming front, I found strange input lag in StarCraft II. It wasn't hugely noticeable but scrolling and commands took slightly longer than they did in Windows 8.1, just enough that in a competitive game it felt sluggish.
After a quick Google search I found a number of users complaining about the same thing and all sources blamed Windows 10's Xbox application which is built into the OS and cannot be removed via conventional methods.
Despite never running this app or having an Xbox account to actually use it, it appears this was my problem. Fortunately, there's a Powershell command to disable the Xbox app and doing so eliminated the lag, allowing StarCraft II to play like it did on Windows 8.1. It was a disappointing discovery, but I'm glad it was relatively easy to overcome with some help from the Internet.
Source: https://www.techspot.com/review/1042-windows-10-vs-windows-8-vs-windows-7/