A place for sharing experiences and tips with Windows 10, 11, and beyond
Pages
3/26/2022
How to Bypass Windows 11 Minimum Installation Requirements
Try these alternative solutions when your device does not meet Windows 11 minimum system requirements to install the latest OS. By Zainab Falak, Published Feb 08, 2022
The Windows 11 release has proceeded at a lightning pace. The new
version includes many changes, which means there will be compatibility
issues you previously did not face in Windows 10.
For Windows 11, your PC must meet some strict requirements from
Microsoft, which has caused plenty of confusion and frustration among
the users. Fortunately, there are several ways to bypass the
installation requirements and install Windows 11 on incompatible PCs, so
all is not lost. So let's jump in to see how we can eliminate the
Windows 11 compatibility checks!
What Are Windows 11 Installation Requirements?
It is essential to understand that the minimum specifications
required to install the new operating system version are different from
the recommended specifications. Here is what is absolutely necessary:
Intel, AMD, or Qualcomm dual-core 64-bit processor running at 1 GHz or faster
At least 4GB of RAM
At least 64GB of storage
Supported and enabled UEFI Secure Boot
A Trusted Platform Module (TPM), version 2.0
Supports DirectX 12 or later, using WDDM 2.0 drivers
High definition (720p) display, 9" or greater monitor, 8 bits per color channel
Windows 11's stringent compatibility checks are most restrictive for
the processor requirements, and older hardware is less likely to pass
them. See our guide to Windows 11's requirements for more info, which is especially useful if you want to run Windows 11 on a Virtual Machine.
Use the Windows11Upgrade Tool From GitHub
It is easiest to bypass the Windows 11 installation requirements with the Windows11Upgrade tool, which provides the option of an in-place upgrade as well as a clean installation.
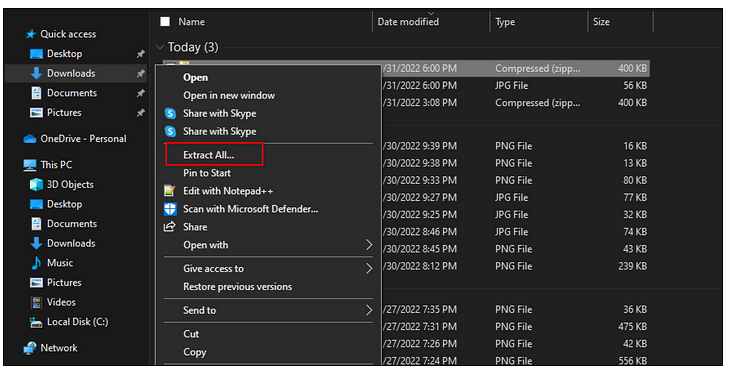
Click on the file named Windows11Upgrade_EN.zip and wait for the download to complete.
The downloaded file should be in ZIP format. Navigate to the download location and right-click on the file.
Select Extract All from the context menu.
Once done, access the extracted folder, right-click on the Windows11Upgrade file, and select Run as administrator from the context menu.
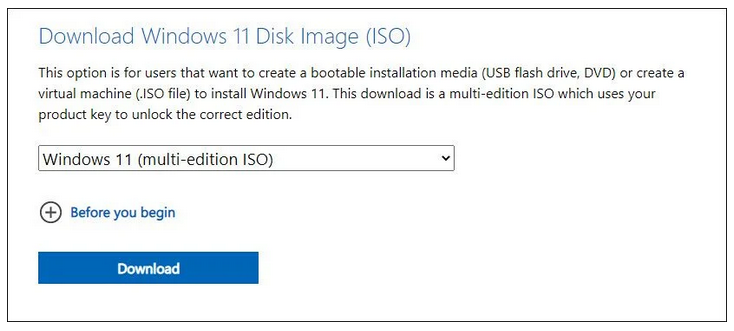
You should now see a pop-up window with two options. Click on Select Windows 11 ISO File if you already have an ISO file. If you do not have an ISO file of Windows 11, click on the Download Windows 11 ISO file option.
Locate and select the ISO file.
It should now give you three options; Upgrade, Data Only, and Clean Install.
Choose your preferred option and then click on Install System.
Then, follow the on-screen instructions to install Windows 11.
Bypass the TPM 2.0 and Secure Boot Requirements
Trusted Module Platform (TPM) protects data against hacking and other
threats at the hardware level. On the other hand, UEFI-level Secure
Boot prevents any operating system from starting that is not authorized
by the user.
Below we have listed two ways to bypass TMP 2.0 and Secure Boot
requirements for Windows 11. Proceed with the one that suits you the
best.
Use Rufus
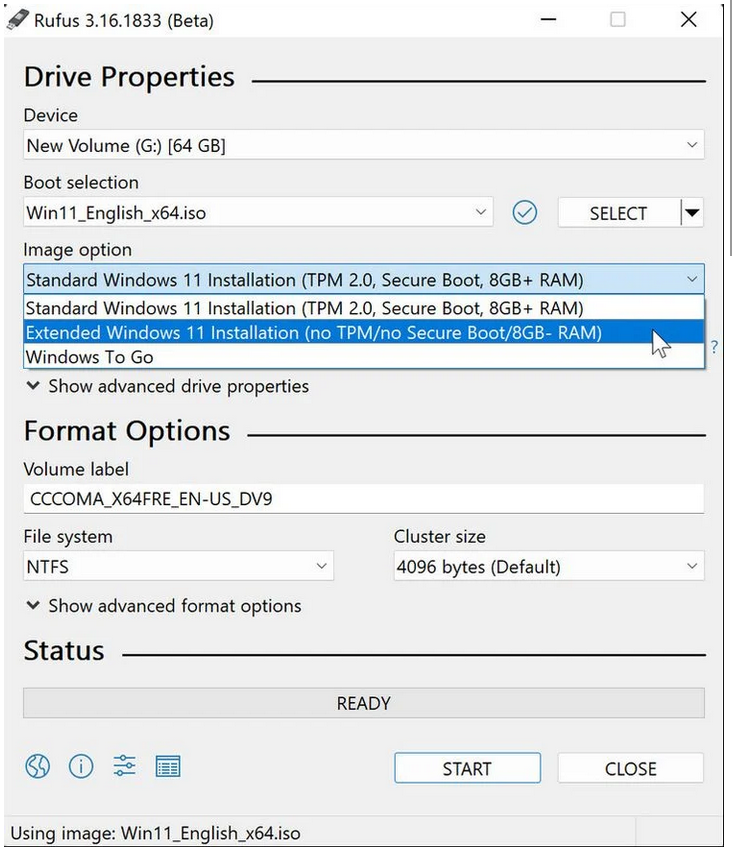
In this method, we will be using a third-party program called Rufus to bypass the TPM 2.0 and Secure Boot requirements.
To run Rufus, double-click the downloaded exe file.
Then connect the USB drive to your computer.
Click SELECT to select the ISO file that you downloaded.
In the Rufus dialog, expand the dropdown menu under Image and select the Extended Windows 11 Installation (No TPM/no Secure Boot/8GB- RAM)
option. By choosing this option, you will skip Windows 11's secure boot
and TPM 2.0 requirements, along with the minimum demand for 8GB of RAM.
Finally, to create Windows 11 installation media, click START.
Use the Media Creation Tool
In the second method, we will be using the Media Creation Tool to
bypass the requirements of TPM 2.0 and Secure Boot. Note, however, that
this method will only work for NTFS formatted OS partitions.
Once the process is completed, open the directory containing the Windows 10 USB disk and delete the install.esd or install.wim files. You are likely to find only one of these files inside the directory.
After you remove the file, mount the Windows 11 ISO.
Now head over to the same directory again and copy the install.wim file to your clipboard.
You can now paste the install.wim file you previously copied from Windows 11 ISO to the Windows 10 USB stick.
In the final step, boot from the modified Windows 10 USB stick and install Windows 11.
How to Make an Unsupported Windows 11 PC Compatible by Editing the Registry
Own an older PC? Don't worry, there's still a chance you can get Windows 11 running on it. Here's how.
Microsoft has enforced strict hardware requirements for Windows 11. The company has not backtracked over the TPM 2.0 and CPU model/family requirements, which means millions of people will be left out of the Windows 11 upgrade process.
In a display of consumer friendliness, Microsoft has shared a way to bypass the TPM and CPU model/family check for people who want to manually install Windows 11 on unsupported PCs. So, let’s take a look at how you can use the registry to circumvent the Windows 11 check.
Editing the Registry to Circumvent the Windows 11 Requirement Check
Before we discuss how to edit Windows 10’s registry, you have to understand that editing the Windows Registry can do irreparable damage to your machine if you fail to do it right.
In other words, strictly follow the instructions laid out in this article and don’t touch anything else in the registry. if you mess up, you might have to install Windows all over again.
Moreover, the following method will only bypass the check for TPM 2.0 and CPU model/family. Your computer still needs to have TPM 1.2 at the very least. If it doesn’t, then your PC is too old and you should buy a new PC.
Open up the Registry Editor by pressing Win + R, type regedit, and press Enter.
In the Registry Editor, navigate to HKEY_LOCAL_MACHINE > SYSTEM > Setup > MoSetup in the left panel of the Registry Editor.
Left-click on the MoSetup key and select New > DWORD (32-bit) value. Give it the name AllowUpgradesWithUnsupportedTPMOrCPU.
Double-click on the newly created entity, enter 1 in the Value Data field, and press OK.
Finally, close the Registry Editor and reboot your computer.
Your computer is now ready to install Windows 11 even if it doesn’t meet the minimum requirements. However, if you do intend to use Windows 11 for a long time, it might be worth shelling out for a new PC.
You can bypass the TPM 2.0 and CPU model check using this method. At
the very least, your computer should have TPM 1.2 to proceed. It is also
important to note that Windows Registry is an advanced-level utility,
which is why we highly recommend creating a Registry backup
before proceeding with the instructions. Creating a backup will help
you restore the current version of Windows Registry if anything goes
wrong.
Successful Installation of Windows 11 on an Incompatible PC
We hope one of the methods listed above did the trick for you. It's
worth noting that Microsoft has paid great attention to developing new
security features for Windows 11, which are in large part reliant on the
processing power of the latest processors.
If you've made it this far and think that Windows 10 is more suitable
for you until you switch to compatible hardware, you should know that
you can use it for another three years (till 2025).