Pages

2/28/2016

Remove Shortcut text, Shortcut Arrow from Shortcuts in Windows 10

Ultimate Windows Tweaker 4 for Windows 10 has been released. This tweaking software adds several new tweaks for the new operating system. Those of you who have upgraded to Windows 10, would definitely want to use it to judiciously tweak your Windows 10 and personalize your computing experience. With judicious tweaking, it can make your system faster, more stable, personal and more secure with just a few mouse clicks.
While you may be able to access all these via the Windows 10 Settings app, the Registry Editor or the Group Policy Editor, Ultimate Windows Tweaker makes things easier for you by offering all useful tweaks from its single UI.

Ultimate Windows Tweaker 4 for Windows 10

Ultimate Windows Tweaker 4 Windows 10


This tweaker is just 495 KB in size and includes over 200 tweaks. Like its predecessors, UWT 4.0 sports a clean minimalistic UI, offering links in the left panel, and tabs on the top, in some categories. Hover over any tweak and helpful tool tips will tell you what the tweak does.
What is new
Ultimate Windows Tweaker 4 for Windows 10 adds several new tweaks. Here are the highlights:
  1. Seeing the concerns being raised about privacy issues, several tweaks have been added under a new Privacy section.
  2. Many new tweaks in Context Menu for Store Apps to support Windows 10.
  3. The empty.ico file is not required now for “Remove Shortcut Arrows From Icons” to function properly
  4. It calculates Windows Experience Index from the main page. Click on Run assessment to recalculate the WEI.
  5. You can Run DISM command to fix corrupted system image
  6. You can now pin Drives to Desktop Context Menu
  7. Many new tweaks to customize Windows 10
  8. Newly designed interface with command link buttons
  9. Hover over a tweak, and get the description at the bottom of the tweaker.
All the tweaks have been neatly categorized as follows:
System Information: When you open UWT4 you will get to see some basic information about your system like Operating system version, Build, System Type, Processor, Installed RAM, Computer name, User name and the WEI Score, etc. You also have a buttons to open Recovery Options, run DISM, run the System File Checker or create a System Restore Point.
Customization: Under this category you will be able to tweaks settings of your Taskbar, Thumbnails, File Explorer and the Modern UI. You can opt to use Light or dark theme for OS or apps, disable Start animations, use default or change Battery Date & Time flyouts or change the Volume Control, show or hide Frequent folders or Recent files, etc.
User Accounts: Under the User Accounts tab, you will be able to change your User Account settings, Logon information and sign in options. You can also change the User Account Control settings here.
Performance tweaks: The Performance tab offers tweaks to optimize Windows 10 to best suit your requirements. While most of these settings are best left at their default values, this panel gives you quick access to change them, should you wish to.
Security tweaks: Harden your Windows 10 by changing some settings. If you want to restrict access to some Control Panel applets like Windows Updates you can do so easily. There is a new Privacy tab, where you can disable Telemetry, Biometrics, Advertising ID, Bing search, Cortana, Windows Update sharing, Feedback requests, password Reveal button, Steps Recorder, Inventory Collector and Application Telemetry.
Internet Explorer: Tweak your Internet Explorer 11 when you open this section. Tweak IE’s appearance and behavior.
Context Menu tweaks: Add Windows Store apps, features and useful functions to the right-click context menu. Add Scan with Windows Defender, Clear Clipboard, all built-in default Windows Store apps and more to the context menu.
Additional system tweaks: Under this category, you will see some additional system  and Network tweaks. You can also set UWT to behave the way you want it too. By default, when you apply a tweak and click Apply, UWT4 will automatically restart explorer.exe to apply the tweak. Change its behavior if you wish.

How to use Ultimate Windows Tweaker 4
  1. It is completely portable and does not require to be installed.
  2. Once you have downloaded the zip file, extract its contents and move the program folder to your desired location. Pin its executable file to your Start Menu for easy access. Do not separate out the contents of the download as it is important that the contents stay in the same folder.
  3. Create a system restore point first. You can use the Create Restore Point button which UWT offers. We insist you create one, before using the tweaker, so that you can revert back should you feel the need to.
  4. Tweakers are meant for users who what they are doing. We recommend that you do not over-tweak your system at one go. It is our experience that many people just apply all the tweaks at one go, but don’t remember which tweak was responsible for some change they wish to reverse. We suggest you apply tweaks for only 1 category every day, see how your system performs, before moving on to apply more tweaks.
  5. To apply the tweak, check or uncheck the box as the case may be. Once you have selected one or more tweaks, click on the Apply button. Some tweaks may apply instantaneously. If just an explorer restart is required, your explorer will restart automatically, and the tweaks will be applied. If a system restart is required, when you exit the application, you will be reminded to restart your computer.
Features:
  1. Easy to use user interface
  2. Tool tips offer you guidance as to what the tweak does.
  3. Offers accessible buttons to create a system restore point and restore default values
  4. Tiny tool, super lightweight at just around 495 KB
  5. Power-packed with 200+ meaningful tweaks
  6. Portable tweaker. Does not require to be installed. To uninstall it simply delete its program folder
  7. Does not contain any adware, nor does it push crapware – and we promise not to, ever!
  8. Report Bugs by simply using the button in the About tab. Else visit this page.
  9. Support available at TWC Forum.
  10. Checks for available update. Click the button in the About tab to do so. If any are found, download the latest version from this home page.
List of Tweaks: Go here to see the complete list of over 200 tweaks available in UWT4.
Image Gallery: To see its user interface and all that it has to offer, check out the image gallery of UT4.
Like the other 75+ freeware released by us, Ultimate Windows Tweaker 4 (UWT4) is a clean freeware and does not include any 3rd-party offers nor does it push crapware.
UWT has received rave reviews and coverage in the online and offline media and has been labelled as the best system tweaker for Windows.
NOTE: Some security software may report it as being suspect. This is because the tweaker changes Windows system setting. Rest assured that it is a false-positive. You will have to add it to your exceptions list and allow it, if you trust us.


Download


Ultimate Windows Tweaker 4.0.2.0 for Windows 10
has been developed by Paras Sidhu, for TheWindowsClub.com. It supports Windows 10, 32-bit & 64-bit and Internet Explorer 11. It requires.NET Framework 4 to work, which comes pre-installed in Windows 10.
Windows 7 & Windows Vista users should continue to use Ultimate Windows Tweaker 2.2, Windows 8 and Windows 8.1 should continue to use Ultimate Windows Tweaker 3.
Facing Windows 10 problems? Our FixWin 10 for Windows 10 will help you fix issues with a click.

Related Posts:


Source: http://www.thewindowsclub.com/ultimate-windows-tweaker-4-windows-10

2/18/2016

How to Update Out-dated Drivers on Windows 10

When you update your OS or create a new installation of Windows, one of the main issues you might face is the problems created by out-dated drivers. Drivers are required for proper functioning of the PC hardware. While you can update your drivers from the Windows update which also shows up third party drivers, sometimes they do not have the latest ones.
Driver Booster is a free tool for Windows (all versions supported including Windows 10), which allows you to keep all the drivers updated to the latest one. With more than 2,00,000 driver database, Driver Booster 3 helps you find rare and newly released audio driver, network driver, graphics driver, chipset driver, and more from over 3000 brands


image


The app is pretty simple to use, after installation just run the app and it automatically checks for the drivers installed and their latest versions. It shows all the out-dated drivers along with their latest version release date. You can either update all of them or selectively update. We suggest you to create a restore point in case anything goes wrong.
Once you hit the update button, the app will download the latest available driver and install it for you. You might have to restart the PC based on the driver requirements. Once the installation is complete, you can roll back or uninstall the drivers.


image
Driver Booster 3 does not only update out-dated drivers but also automatically scan and fix missing & faulty drivers, especially after upgrading your operating system or using your PC for long period time.
IoBit’s Driver Booster is a great way to update all your out-dated drivers which might be causing issues on your Windows.


Download Driver Booster


Source: http://www.nirmaltv.com/2016/01/21/how-to-update-out-dated-drivers-on-windows-10/

How to Get Back the Classic Look & Feel of Explorer in Windows 10

In modern versions of Windows, Microsoft made quite a few changes to Windows Explorer, the first of which is a new name—File Explorer. Another huge change that most will notice is that File Explorer now has a new look sporting the Ribbon interface.

The Ribbon interface, which was first unveiled in Office 2007 and has gained traction since then, is designed to be a replacement for the classic menu bar. File Explorer also has a couple of other visual tweaks and functionality changes, incorporating elements from previous versions of Windows while also integrating some new elements.
This new look and feel of File Explorer has definitely been a polarizing one. If you don't like these changes and want to get back the classic look and feel of Windows Explorer in Windows 10, then I've got you covered below.

Step 1: Download & Extract This Free Tool

OldNewExplorer is a free tool designed to bring back the classic look and feel of Windows Explorer. Once you have downloaded the program, use a free file extraction program like 7-Zip to open and extract the files from the archive to a folder which you can easily access like the Desktop.

Step 2: Install OldNewExplorer

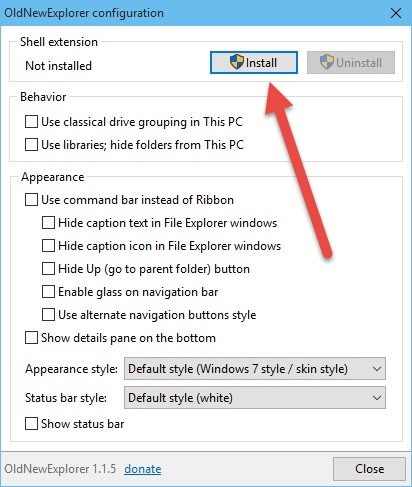
Inside the newly extracted folder you will see a file called OldNewExplorerCfg.exe. Run this file, then click on Install.
Click on Yes for any prompts that come up—any File Explorer windows that are open will automatically close.

Step 3: Customize as You Desire

The cool thing about OldNewExplorer is that you can use it to change as little or as much of File Explorer as you want. To see the changes, just open a new File Explorer window.

Behavior

You can turn on classical drive grouping in This PC to sort drives by their type. You can also choose "Use libraries; hide folders from This PC," though that option may be a bit buggy depending on the version of Windows 10 you're running, but expect an update to resolve this.

Appearance

This is a big one as you can disable the Ribbon, hide the window titles and icons, hide the up button (a Windows XP throwback), and enable the glass effect in the navigation bar.
Moving on, you can choose to use alternative navigation button styles which will change the look of the back and forward arrows.
You can also have the details pane showing on the bottom.
The details pane.
Lastly you can also change the appearance style from Windows 7 default to a couple of other ones and add the status bar and change the look of that as well.
The status bar.
If you ever want to rollback, just uncheck the changes you made and open a new File Explorer window.
Connect to Gadget Hacks' Facebook, Google+, or Twitter for more Windows 10 updates.

See Also


Source: http://windows.wonderhowto.com/how-to/get-back-classic-look-feel-explorer-windows-10-0163557/

2/15/2016

Nome Theme for Windows 10

Many people, including myself, have been a fan of the silver theme used in Apple and Chromium operating systems. There are themes like this available for some time for Windows 7 and 8. Now you can get that same look using the Nome visual style theme for Windows 10. Below is a link where to get it. Enjoy.


2/14/2016

Windows XP Themes for Windows 10

If you are longing for the look of your old Windows XP desktop, you now have an option. See below and where you can download it. Enjoy.


You can get it here"

http://sagorpirbd.deviantart.com/art/XP-Themes-Final-for-Win10-520345860

2/10/2016

How to create an image backup in Windows 10 and restore it, if need be

Safeguard everything on your hard drive with this guide.


0129 primary

Robin Hayes plans to create an image backup of his C: drive using Windows 10’s own tools. But he’s not sure how he can restore that backup should disaster strike. I’ll cover both the backing up and the restoration.
An image backup copies everything on your drive—operating system, boot sector, programs, and data files—into one compressed but still very large file. If disaster renders your Windows installation useless, an image backup will allow you to get it up and running again quickly.
I recommend you create an image backup, saving it to an external hard drive, three or four times a year. This is in addition to the far more important daily file backup of your data.
This article focuses on Windows 10. I’ve already covered the subject for Windows 7 and 8.
[Have a tech question? Ask PCWorld Contributing Editor Lincoln Spector. Send your query to answer@pcworld.com.]

Creating an image backup in Windows 10

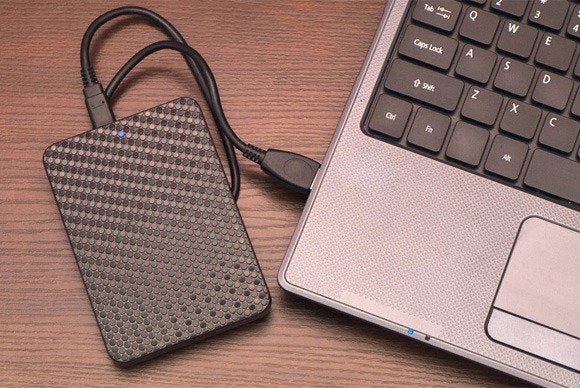
1.   Plug in your external hard drive—which should have enough free space to hold everything on your internal drive. Make sure Windows can access the drive.
2.   In Windows’ Search field, type file history, and select Control Panel’s File History program.
1217 file history control panel
3.   In the File History dialog box, click System Image Backup in the lower-left corner.
1217 file history 2
4.   In the resulting Backup and Restore dialog box (don’t worry about the “Windows 7” label), click Create a system image.
1217 backup and restore
 
5.   Follow the resulting wizard.
The backup may take a few hours. You can continue to work as it backs up. However, I prefer to start the backup at the end of the workday so it doesn’t slow anything down.
When the backup is over, you may be asked if you want a System Repair Disc. If your PC has an optical drive, create the disc.
If not, create a Recovery Drive: Plug in a blank flash drive, open Control Panel’s Recovery tool, click Create a recovery drive, and follow the prompts.

Restore the backup

When Windows is in a seemingly hopeless condition, you’ll need to get into the recovery environment to restore the image. Here are three ways to do that:
  • If you can still boot into Windows: Select Start > Settings > Update & security. Select Recovery in the left pane, then select Restart now.
    1217 settings
  • If Windows won’t boot and you have a System Repair Disc: Insert the disc into your optical drive and boot your PC. When you’re asked to “Press any key…,” press any key. Then pick a language.
    1217 press any key
  • If Windows won’t boot and you have a Recovery Drive: Insert the Recovery flash drive into a USB port and boot your PC. If your PC skips the flash drive and attempts to boot Windows, reboot and enter your Setup screen (F2 usually works; if it doesn’t, check your manual). Look for a boot or boot order option. Once you’ve successfully booted the flash drive, select a language.
Once you’re in a recovery environment, select Troubleshoot, then System Image Recovery. Follow the instructions.

Source: http://www.pcworld.com/article/3011736/windows/how-to-create-an-image-backup-in-windows-10-and-restore-it-if-need-be.html#tk.nl_pwr