Pages

8/02/2015

How to Clean Install Windows 10

The Windows 10 upgrade process drags old files, settings, and programs from your previous Windows system to your new one. Microsoft allows you to get an entirely fresh system by performing a clean install, but the activation process can be a bit confusing.

This is also useful if you’ve purchased a new Windows 10 PC and it includes manufacturer-installed bloatware you don’t want. Or, you may need to perform a clean install on a computer without an existing Windows system after installing a new hard drive.

Note that you won’t be eligible for the free “Windows DVD Player” app offered to users of Windows Media Center if you perform a clean install. However, you can always install VLC to get DVD playback or use one of the more fully featured Windows Media Center alternatives.

The Easy Alternative: Perform a Reset and Remove Everything

There’s an alternative to clean-installing. You can use the Reset feature to reset your Windows 10 system back to its fresh state.

If you installed Windows 10 yourself, this should give you a fresh Windows system. If you purchased a computer that came with Windows 10, this will likely bring back the bloatware that came with your Windows 10 PC. (There should be a way to prevent Windows 10’s Reset function from reinstalling the bloatware, but we’ll need to get our hands on a PC that comes with Windows 10 before we can find out how.)

Note that this may not be the perfect solution — while it should give you a perfectly like-new Windows system, some people have reported that it won’t fix some system corruption issues, in which case you’d want to perform a real clean install.

To reset your Windows 10 PC, open the Settings app, select Update & security, select Recovery, and click the “Get started” button under Reset this PC. Select “Remove everything.” This will wipe all your files, so be sure you have backups.


For the Free Upgrade: Have You Upgraded and Activated Your Windows 10 System?
If you want to perform a clean install of WIndows 10 and haven’t upgraded to Windows 10 yet on your Windows 7 or 8.1 PC, you have some extra work to do. You’ll need to take advantage of Microsoft’s upgrade offer before performing a clean install. (Obviously, if you have a PC that came with Windows 10 or you’ve purchased your own Windows 10 license, this isn’t necessary.)

When you upgrade a Windows 7 or 8.1 system to Windows 10, the installer confirms that you have a “genuine Windows” system installed and activates your computer for use with Windows 10. Note that you don’t actually get a Windows 10 product key — instead, your computer’s hardware is registered with Microsoft’s servers. When you install Windows 10 on that PC again in the future, it will check in with Microsoft’s servers, confirm it’s installed on a registered PC, and automatically activate itself.

If you don’t take advantage of the upgrade process first, this registration will never happen. There’s no way to enter a Windows 7 or 8.1 key into the Windows 10 installer, nor is there some sort of web form that will give you a Windows 10 key if you provide your Windows 7 or 8.1 key. Sorry — you’ll have to upgrade to Windows 10 before you can perform a clean install.

If you need to upgrade, you can download Microsoft’s Windows 10 media creation tool and tell it to “Upgrade this PC now.” It will automatically upgrade you to Windows 10 if your PC is running a genuine version of Windows 7 or Windows 8.1.


Once you’re done, confirm that Windows 10 is activated before performing a clean install. You can check this by opening Settings, selecting Update & Security, and selecting Activation.

Verify that you see “Windows is activated” here. Also, note the edition of Windows 10 you have installed — either Windows 10 Home or Windows 10 Pro. Most people will receive the Home edition as part of the free upgrade, but you’ll get Windows 10 Pro if you previously had a Professional edition of Windows 7 or 8.1 installed.

If Windows 10 isn’t activated, don’t try to perform a clean install until it is.


Download Windows 10 and Create Installation Media

Even if your Windows system has already been upgraded with the “Get Windows 10″ reservation process, you’ll need to download Windows installation media to install Windows 10 from scratch.

Download the Windows 10 media creation tool from Microsoft. This tool will download the correct Windows 10 installation files for your system, and it also has built-in functions to create USB installation media or burn an installer DVD. Select the “Create installation media for another PC” option to create installation media.


Be sure to select the correct type of installation media for the copy of Windows 10 that’s licensed for your PC — Windows 10 Home or Professional. You should also choose your language and select whether you want the 32-bit or 64-bit version of Windows here — most people will want the 64-bit version. However, you can create installation media that includes both the 32-bit and 64-bit version, and the installer will automatically select the most appropriate one when you use it to install Windows on a computer.


Install Windows 10 from the installation media like you would any other operating system. Restart your computer with the USB drive or DVD inserted and boot from that device. This may require you change a setting in the BIOS, access a boot menu, or use the “Use a device” option in the advanced startup options on a modern Windows 8 or 10 device that includes UEFI firmware instead of the traditional BIOS.

Select “Install Now” once the Windows installer starts. When you reach a screen asking for your WIndows 10 product key, click the Skip button. You won’t actually have a Windows 10 product key if you took advantage of the free upgrade offer.

If you do have a Windows 10 product key, enter it here.


Go through the setup process normally until you see the “Which type of installation do you want?” screen. Select the “Custom” option to ensure you’re performing a clean install and not an upgrade install.

Partition your system drive however you like. If you just have a single WIndows partition, you can tell the installer to overwrite it. If you have many partitions, you could delete them all and tell Windows 10 to install itself in the unallocated space.


You’ll be asked for the product key after the process is finished. Just click “Do this later” to skip this part and continue the setup process.

After you log into your new, clean-installed Windows 10 system, it should automatically activate itself after you connect to the Internet. If you took advantage of the free upgrade offer, it does this by checking your computer’s hardware and then checking in with Microsoft, verifying that your hardware configuration is authorized to use Windows 10.

When we reinstalled Windows 10 Pro on our computer, it activated immediately. But, if Microsoft’s activation servers are overloaded, so it may take some time before your system activates. You can open the Settings app, select Update & security, and select Activation to check your activation status. If it’s not activated, you may see information here that can help you activate.


Some people report having to reboot several times, while others have just waited. The following command can force an activation to occur if it’s not happening automatically after going through the steps above. First, open an Administrator Command Prompt by right-clicking the Start button or pressing Windows Key + X and selecting Command Prompt (Admin). Type the following command and press Enter:

slmgr.vbs /ato

Many people report having to run this command several times. if you see an error message, try rebooting and running it again, wait and run it again, or just wait and let Windows activate automatically. Microsoft’s servers may be overloaded at the moment you’re trying to activate.


Microsoft’s free upgrade offer depends on your PC’s hardware so it may not activate properly if you’ve swapped out hardware inside your PC. You may need to call Microsoft and complete the phone activation process, explaining what happened, if you changed the PC’s hardware after taking advantage of the offer. The phone support line can give you an activation code that will allow you to activate Windows 10, even if it won’t activate automatically. However, you may have to provide additional information.

Note that the free Windows 10 upgrade (as well as OEM copies of Windows and pre-installed copies of Windows 10) can’t actually be transferred to a separate PC. They’re tied to a single PC’s hardware.

Image Credit: Brett Morrison on Flickr

Source: http://www.howtogeek.com/224342/how-to-clean-install-windows-10/

8/01/2015

How To Clean Install Windows 10 From ISO File (Without USB/DVD)

Microsoft has started pushing out Windows 10 for users who have already registered for the free upgrade. Many users who have upgraded their Windows 7/8.1 installations to Windows 10 now want to perform a clean install of Windows 10.
After officially releasing Windows 10, Microsoft has released Windows 10 Media Creation Tool to help users download Windows 10 ISO images from Microsoft servers. The tool is useful for users who would like to clean install Windows 10 after upgrading to Windows 10.
Although the Media Creation Tool allows you create a bootable DVD or USB of Windows 10, many of you might be wondering if it’s possible to clean install Windows 10 right from the ISO image.

Install Windows 10 directly from ISO file

Well, it’s possible to clean install Windows 10 from an ISO file. Clean installing Windows 10 from ISO is not vastly different from clean installing Windows 10 from USB or DVD. The only difference is that we are not going to create bootable media while installing Windows 10 directly from the ISO file.
What about the product key?
Note that you won’t need a product key if you have legally upgraded your current PC from Windows 7/8.1 to Windows 10 and successfully activated it, before clean installing Windows 10 on the same PC.
When you are prompted to enter a product key during the product installation, click Skip button. Your PC will be automatically activated after installing Windows 10 as long as you have installed the same edition of Windows 10 was activated on your current PC by using the free upgrade offer.
However, when you clean installing Windows 10 on a different PC or newly built PC, you will have to enter a valid product key.
WARNING: Many users are reporting on Microsoft support forums that they are unable to activate their Windows 10 installation after the clean install. It looks like many users are having this issue. So, clean installing Windows 10 at this point of time might not be a good idea.

Perform clean install of Windows 10 from ISO image

Here is how to clean install Windows 10 from ISO image file without having to create bootable USB or DVD.
Step 1: If you haven’t downloaded your Windows 10 ISO yet, please follow the instructions in our download Windows 10 ISO from Microsoft guide to download the ISO image file.


Clean install from ISO Windows 10

Step 2: On your Windows 10 PC, where you want to perform clean install of Windows 10, back up all data as we are going to clean install Windows 10 by removing installed programs and personal files. So it’s a good idea to backup everything using a good backup software.
Step 3: Right-click on the Windows 10 ISO image file, and then click Mount option to mount the ISO image.


Clean install Windows 10 from ISO file step1


Step 4: Open up This PC, and then open up the newly mounted drive (containing Windows 10 installation files) by right-clicking on the drive and then clicking Open in new window.


Clean install Windows 10 from ISO file step2

Step 5: Double-click on the Setup.exe file.
Step 6: When you see the following screen, select the first option labelled Download and install updates (recommended), or you can also select the option titled Not right now, as we can always download and install updates after clean installing Windows 10.

Clean install Windows 10 from ISO file step3

If you have selected Download and install updates option, the setup will check for available updates and download them if available.
Step 7: Next is the user agreement screen where you need to click Accept button to accept the license terms to install and use Windows 10.

Clean install Windows 10 from ISO file step4

Step 8: Once again, the setup might start looking for updates and download them.
Step 9: Once everything is ready, you will see Ready to install screen.
Step 10: Here, select Keep nothing if you want to perform a clean install of Windows 10 by removing all installed programs and data. We have selected Keep personal files and apps as we don’t want to lose installed apps and important data.

Clean install Windows 10 from ISO file step5

And if you want to keep you data, please select Keep personal files option by clicking Change what to keep link.
Step 11: Finally, click Install button to begin installing Windows 10.
Note that although the installation screen shows “Upgrading” message, it’s actually clean installing.

Source: http://www.intowindows.com/how-to-clean-install-windows-10-from-iso-file-without-usbdvd/

Windows XP Themes For Windows 10

Windows XP, once the darling of computer users, has not been receiving any updates from Microsoft since April, 2014. Although Microsoft has stopped supporting Windows XP, even today, there are more computers running Windows XP than Windows 8.1.
Many computer users love Windows XP for its simple user interface. The decade old operating system doesn’t ask for powerful hardware unlike its successors. And above all, most of the software out there still support Windows XP. Despite all these good things, the fact is that Windows XP is now outdated and users are slowly but steadily switching to Windows 8.1 as well as the latest Windows 10.

Windows 10, the successor to Windows 8.1, is receiving appreciations from PC users, especially from those who were not happy with Windows 8/8.1. In addition of the much requested Start menu, Windows 10 is full of new features and surprises. Moreover, Windows 10 is absolutely free for current Windows 7 and Windows 8.1 users who upgrade in the first year after the RTM release of Windows 10.

Windows XP Themes for Windows 10

Five Windows XP themes for Windows 10

If you have already installed and using Windows 10 but not happy or bored of the default Windows 10 theme (visual style), you can now download and install Windows XP themes on your Windows 10.
Sagorpirbd, a member of DeviantArt, has released a pack of Windows XP themes for Windows 10. The pack includes Windows XP’s Luna, Metallic, Royale and Zune for the latest Windows 10.
As you can see, all Windows XP themes that have been ported to Windows 10 looking well on Windows 10. In addition to those five themes, the pack includes original Windows XP wallpapers as well.

Windows XP Themes for Windows 10 awesome

If you love the idea of having Windows XP themes on Windows 10 but not sure to how to download and install them, here is how.

Installing Windows XP themes in Windows 10

Before installing any visual style, we recommend you manually create a system restore point just to be on the safer side. If anything goes wrong, which is very unlikely, you can use the previously created restore point to restore earlier settings with a few mouse clicks without losing data.
Step 1: Windows 10 (any other version of Windows for that matter) doesn’t support third-party themes. To prepare your Windows 10 for third-party themes, you need install the latest UXStyle, which can be downloaded from here.

Windows XP Themes for Windows 10

Step 2: Next, visit this page of DeviantArt and download Windows XP themes for Windows 10. You need to extract the downloaded RAR file (learn how to extract RAR files in Windows) to get Windows XP themes for Windows 10 folder.

Windows XP Themes for Windows 10 picture1

Step 3: Now open up Windows XP Themes for Windows 10 folder to see the Theme folder. You need to copy all files and folders exist in the Theme folder to the Themes folder present in your Windows 10’s drive.
To quickly open the Themes folder of Windows 10, open Run command box by simultaneously pressing Windows and R keys, type %windir%\Resources\Themes\ in the box, and then press Enter key.

Windows XP Themes for Windows 10 picture3
Windows XP Themes for Windows 10 picture5

Step 4: Finally, right-click on the desktop, click Personalize, scroll down to see all installed Windows XP themes, and then click on a theme to apply the same.

Windows XP Themes for Windows 10 picture2

That’s all!

7/29/2015

Five Windows 10 Configuration Tips for new or upgraded systems

Windows 10 at the end of July 2015 thanks to Microsoft pushing upgrade offers as Windows updates to machines running those previous versions of Windows.
While the upgrade may retain some functionality and customization from the previous version, it is likely that at least some things need to be configured again.
This guide looks at a couple of improvements for Windows 10 that you may find useful. All improvements start with a general explanation first before the actual tweak or modification is listed.
Lets get started.

1. Automatic logon


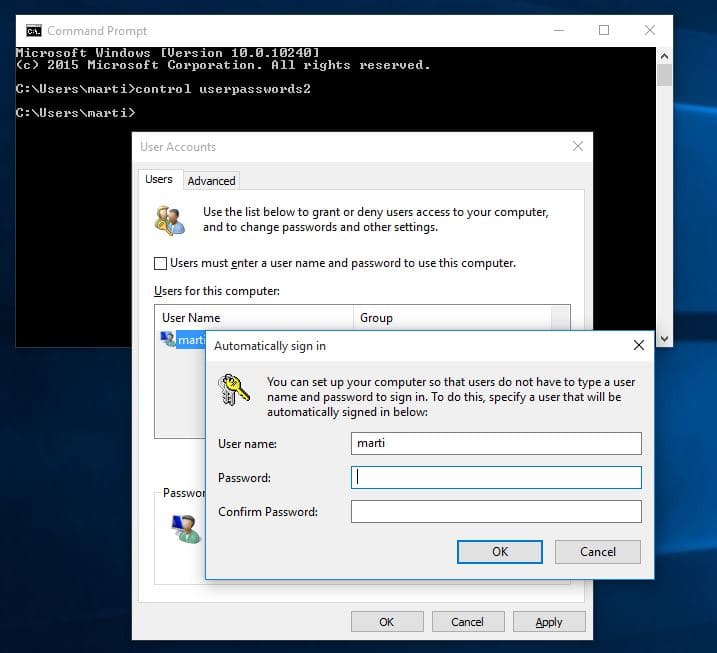
windows 10 automatic log in


Windows 10 displays a log in prompt whenever you start the operating system. This is useful on multi-user systems to separate and protect data from each user, but also to protect the data from third-parties who may have access to the PC.
If you use the PC alone, and if there is no chance that someone else may access it, then you may want to enable an automatic log in instead.
This can also be useful if you have encrypted all of the storage devices of the machine as you are already entering a master password on start then before Windows gets loaded.
  1. Tap on the Windows-key, type cmd and hit enter. This should open the command prompt.
  2. Type control userpasswords2 and hit enter.
  3. You may be asked for an administrator password at this point which you need to enter.
  4. Locate the "users must enter a user name and password to use this computer", remove the checkmark, and click on apply afterwards.
  5. Once you hit apply you are prompted to enter the account password of the user name displayed to you. You can modify the user name, for instance to sign in automatically with another account on the system.
  6. Restart the PC afterwards to make sure everything is configured correctly.
2. More details in Task Manager


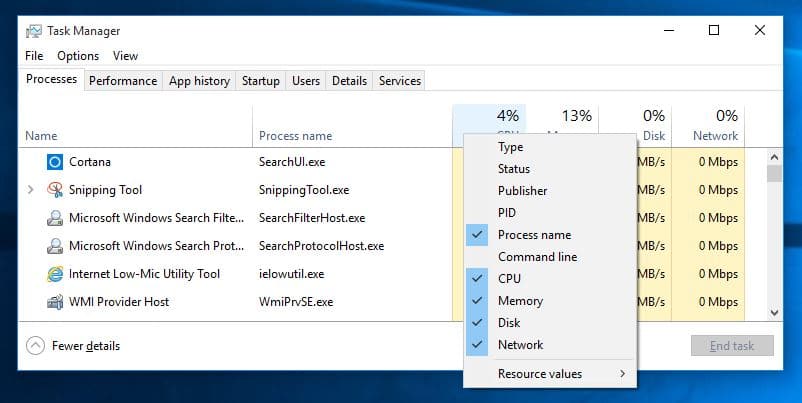
windows task manager add information


The Windows Task Manager displays only apps and programs started by the user on launch. It is not really useful and you may want to expand the selection so that you get additional information and details about all running processes on the machine.
  1. Use the keyboard shortcut Ctrl-Shift-Esc to open the Task Manager.
  2. Click on "More details" at the bottom of the screen to switch to the advanced view which you may know from previous versions of Windows.
  3. Windows 10 sorts processes into groups which you may disable under View if you dislike that.
  4. You may also click on the header to add information to the listing, for instance the process name.
3. Cleaning up the Start Menu


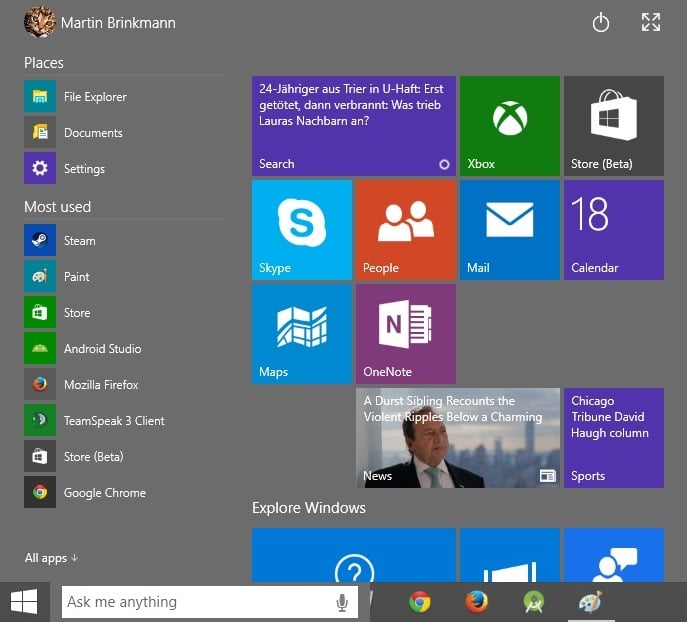
start menu pin

If you upgrade to Windows 10, you will notice that the Start Menu is not looking exactly like it used on Windows 7 or Windows 8.
You find listed there programs and apps you have installed, and on the right of that tiles that link to a selection of apps that come pre-installed with the operating system.
While you may find some of those useful, for instance the weather app as it displays weather information whenever you open the start menu, you may not use others.
In addition, you may want to add programs that you run regularly to the selection there to make them more accessible.
  1. Click or tap on the Start Menu button to display the menu on the screen.
  2. You manage apps and programs with a right-click on them, or via drag and drop.
  3. To delete an entry, right-click on it and select "unpin from start".
  4. There you also find options to resize it, turn live tiles on if supported, and to pin it to the taskbar.
  5. If you right-click on apps and programs on the left however, you get options to pin them to start as well.
  6. Last but not least, you may find the grouping feature useful. You may create or delete as many groups as you like to sort apps and programs into them.
4. Manage Quick Access in File Explorer


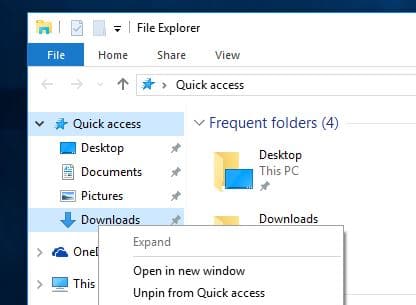
quick access


The favorites in File Explorer (former Windows Explorer) have been replaced by the new Quick Access menu. It is still possible to go back to displaying Favorites in File Explorer instead if you prefer that.
The main difference between Quick Access and Favorites is that Quick Access contents (files or folders) may get added dynamically based on use.
You may still pin some folders to have them displayed at all times though. This can be useful if you want to access specific folders quickly from the explorer sidebar.
  1. Open File Explorer with a click or tap on the icon in the taskbar.
  2. To pin a folder to Quick Access, right-click on it and select "pin to quick access" from the context menu.
  3. You may also remove folders from Quick Access by selecting "unpin from Quick access" instead.
  4. Folders that show a pin icon are permanent while all other folders are dynamic based on use.
5. Configure Notifications


notifications


Windows 10 throws more notifications at you than Windows 7, and probably also as Windows 8. These can be useful, for instance when you receive new emails but also annoying at times, for instance that new apps were installed or tips about Windows that Microsoft may display using the notification system.
You may disable some notifications on the system to bring the overall count down.
  1. Click or tap on the notification icon in the System Tray area of the operating system.
  2. Select All Settings, and switch to System > Notifications & actions.
  3. There you may turn off the following notification options:
  4. Show me tips about Windows.
  5. Show app notifications.
  6. Show notifications on the lock screen.
  7. Show alarms, reminders and incoming VOIP calls on the lock screen.
  8. In addition, you may configure quick actions displayed when you click on notifications in the System Tray area.
  9. Lastly, you find options to hide or show notifications for specific applications there as well.
Side Tip: If you open Ease of Access > Other Options, you may change for how long notifications are displayed on the screen (the default is 5 seconds).

Source: http://www.ghacks.net/2015/07/20/five-windows-10-configuration-tips-for-new-or-upgraded-systems/

7/19/2015

Use Old And New Start Menu Together In Windows 10

When it comes to third-party Start menu programs for Windows, there is nothing better than the free Classic Shell. It has been around for a couple of years now and has recently got support for the latest Windows 10 as well.
Since Windows 10 comes with its own Start menu, most users will not think of installing a third-party Start menu such as the Classic Shell. That said, there are still many users who aren’t exactly happy with the native Start menu of Windows 10 as it includes some elements of the Start screen.

Use old and new Start menu together in Windows 10

Although the native Start menu of Windows 10 can be transformed as a classic Start menu by unpinning all tiles, users who are interested in getting the Windows 7 like Start menu have no option but to install third-party Start menu programs.


Use old and new Start menu together in Windows 10 OS

Windows 7 and Windows 10 style

One of the advantages of Classic Shell and many other third-party Start menu programs is that they don’t completely disable the native Start menu of Windows 10. Instead, they just open up old-style Start menu when you click the Windows logo button on the taskbar or when you press the Windows key on the keyboard.
And when you open up the Windows 7-style Start menu in Windows 10 (after installing Classic Shell), you just need to click the Start Start icon to reveal the Windows 10’s native start menu.
What this means is that you can actually use both Windows 7-style and Windows 10’s native Start menu together to get the best of both words.
In fact, you can make this better by moving (pinning) the Start screen icon from the Classic Shell’s Start menu to the taskbar of Windows 10, meaning you can actually launch both Windows 10 and Windows 7-style Start menu in Windows 10 with a click or hotkey. This setup is ideal for users who love some of the features of Windows 10’s Start menu but can’t live without Windows 7-style Start menu.


Use old and new Start together in Windows 10 OS


Installing and setting up the Classic Shell is pretty easy. Anyone who has ever installed an application in Windows can install Classic Shell. Since the setup of Classic Shell is free from third-party browser toolbars and other malwares, you don’t need to pay a lot of attention during the installation.
That said, if you are installing Classic Shell just for its Start menu, you might need to uncheck other features such as Windows Explorer and Internet Explorer during the installation to avoid installing them.


classic shell

Enjoy Windows 10!


You can download Classic Shell here: http://www.classicshell.net/

Source: http://www.intowindows.com/use-old-and-new-start-menu-together-in-windows-10/

6/20/2015

How to grab a free genuine copy of Windows 10

The newest version of Windows, Windows 10, will be released on July 29 to a worldwide audience. It is Microsoft's attempt to win back unsatisfied users who did not like the Windows 8 operating system.
The company wants to achieve that through various means, for instance by moving away from the two interfaces of Windows 8 or by re-implementing a start menu, but also by offering the operating system as a free upgrade to Windows 7 and Windows 8 users.
Updates were released for Windows 7 and 8 that promote the free upgrade to Windows 10 to reach most "home" customers and get them to upgrade to Windows 10.
While it is unclear at this point in time how successful the promotion will be, it is very likely that it will push Windows 10 to millions of systems.
It was not clear up until now how Microsoft would handle systems that run Insider Builds of Windows 10. These preview builds of the operating system can be installed on PCs meeting the system requirements for free.
Microsoft's Gabe Aul revealed in a new blog post published on the official Blogging Windows blog yesterday that these installations will receive the upgrade to Windows 10 final and remain activated under certain conditions.
As long as you are running an Insider Preview build and connected with the MSA you used to register, you will receive the Windows 10 final release build and remain activated.
The only requirement is that a Microsoft Account is linked to the operating system. The Insider Build of Windows 10 final remains activated (read genuine) if that is the case.

windows-10

This means in turn that anyone interesting in a free copy of Windows 10 can grab one by installing a Windows 10 Insider Preview on a compatible PC and linking it to a Microsoft Account.

Aul notes furthermore that users may do a clean install at any time after they have installed and activated the build successfully to start over again with a clean install.
Once the final version has been activated, Inside Preview users may leave the program and stay on the final build. There is no requirement to remain an Insider after activation and it seems as if there are not any drawbacks to leaving the program after installation and activation of the final Windows 10 build.

It should be clear that the version will be linked to the PC it was installed on and the Microsoft Account it was linked to.

This means that anyone with compatible hardware and a Microsoft account can grab a free copy of Windows 10 and use it indefinitely on a single machine. Considering that Windows 10 Pro retails for $199, that is an interesting proposition which should further boost the operating system's reach especially during the first few months of general availability.

It is unclear -- but likely -- that the offer is only available in a time-limited window. Microsoft has not revealed yet any restrictions but if you are interested in the free copy, you may want to install an Insider Preview build as soon as possible on a PC and link it to a Microsoft account.
Starting with the next Insider build, Insiders who have not linked a Microsoft Account to the operating system will receive notifications to do so to continue receiving new Windows 10 Insider Preview builds.

You can download the Windows 10 Preview here:
http://windows.microsoft.com/en-us/windows/preview-iso?OCID=WIP_r_May_Body_DLISO

Source: http://www.ghacks.net/2015/06/20/how-to-grab-a-free-genuine-copy-of-windows-10/

6/11/2015

How To Change The Default Theme In Windows 10

Desktop theme feature was first introduced with Windows 7 and is exist in the latest Windows 10 as well. While a desktop theme usually includes a bunch of cool wallpapers, it’s possible to bundle mouse cursors, sound schemes, desktop icons and screen savers with it.
In Windows 7 and 8/8.1, we could easily install new themes and switch between installed themes by opening the Personalization window.


Change default desktop theme in Windows 10 picture5


In Windows 10, when you right-click on desktop and click Personalize option, the Personalization section of Settings app is launched instead of the classic Personalization window. Because of this, if you want to change the default theme to a newly installed one in Windows 10 or uninstall a desktop theme to free up some disk space, you need to follow a couple of extra steps.
Whether you want to switch between installed themes or uninstall a theme in Windows 10, you can use the directions mentioned in below given methods.
NOTE: Desktop themes are completely different from visual styles. This guide covers only installing and switching between desktop themes and not visual styles.
Method 1 of 3

To change the current theme

Step 1: Right-click on desktop, click Personalize option to open and navigate to Personalization section of Settings app.


Change default desktop theme in Windows 10
Change default desktop theme in Windows 10 picture1


Step 2: On the left-side of the Settings app, click Themes.
Step 3: Click the Theme settings link on the right-side to open the classic Personalization window.


Change default desktop theme in Windows 10 picture2


Step 4: Here, click the installed theme that you would like to use to apply the theme. That’s it!


Change default desktop theme in Windows 10 picture3


And if you want to change the default color, please follow our how to open Color and Appearance window in Window 10 guide. The theme color can be changed under Settings app as well.
Method 2 of 3

To install a new theme

Step 1: There are many safe places on the web from where you can download hundreds of elegant themes. One of them is Microsoft’s own personalization gallery page.
Visit the official Windows personalization gallery page to download as many themes as you want. The Personalization gallery features over 300 themes. Note that themes that were released for Windows 7 and Windows 8 are compatible with Windows 10 as well.
Step 2: After downloading themes, double-click on a theme to install and apply the theme.


Change default desktop theme in Windows 10 picture4


Alternatively, you can right-click on a theme and then click Open option to install and apply theme.
To switch between installed themes, please follow the instructions mentioned in Method 1 or Method 3.
Method 3 of 3

Another way to change the existing theme

Step 1: Open the Run command box by simultaneously pressing Windows + R keys (Windows+R).
Step 2: In the box, type Control Desktop, and then press Enter to open the classic Personalization window.


Change default desktop theme in Windows 10 picture6


Step 3: Here, click on the theme that you want to apply to apply the same. Good luck!


Change default desktop theme in Windows 10 picture5


As you probably know, you can download hundreds of themes from the official Windows personalization gallery page by clicking Get more themes online link located in the classic Personalization window.

Source: http://www.intowindows.com/how-to-change-the-default-theme-in-windows-10/

6/05/2015

5 Ways To Open Control Panel In Windows 10

The Settings app in Windows 10 aims to replace the classic Control Panel. Microsoft has overhauled the Settings app to include new settings and options.
The Settings app includes almost all the settings and options available in the classic Control Panel and some more. In fact, some of the newly added settings and options are available only in the Settings app. For instance, the settings to customize the Start menu or screen are present in Settings app only.
In short, Microsoft wants everyone to use the new Settings app in Windows 10 as it’s easier to use. In addition to that, the Settings app, unlike the classic Control Panel works great on touch devices as well.


Open Control Panel Windows 10 step01


While it’s true that the Settings app is easy-to-navigate and use, long time Windows users always prefer the classic Control Panel over the Settings app while running Windows 10 desktops and laptops.


Open Control Panel Windows 10 step02


In Windows 10, as said before, Microsoft wants users to use the Settings app to access and change Windows settings. To support this, with default settings, only Settings app is pinned to the Start.
That said, Control Panel is still exist in Windows 10 and is identical to the one in previous Windows iterations. If you prefer using the classic Control Panel over the Settings app, simply follow the instructions mentioned in one of the given below methods to open the classic Control Panel in Windows 10.
Method 1: Open Control Panel using Run command
Method 2: Access Control Panel from desktop
Method 3: Launch Control Panel using search
Method 4: Create Control Panel shortcut on desktop
Method 5: Pin Control Panel to Start or taskbar
Method 1 of 5

Opening Control Panel in Windows 10

Step 1: Open Run command box by simultaneously pressing Windows and R keys (Windows+R).


Open Control Panel Windows 10 step1


Step 2: In the Run dialog box, type Control and then press Enter key to open the classic Control Panel.
Method 2 of 5

Access Control Panel in Windows 10 from desktop

This is probably the easiest way to launch Control Panel with a mouse.
Step 1: Right-click on the Start button (Windows logo button at the bottom-left corner of the desktop) and then click Control Panel to open the same.


Open Control Panel Windows 10 step2


Method 3 of 5

Launch Control Panel using search

Step 1: Open Start menu or screen.
Step 2: In the search box, enter Control Panel and then press Enter key to open the same.


Open Control Panel Windows 10 step3


Tip: You can quickly access the search with the help of Windows + C hotkey.
Method 4 of 5
Create Control Panel shortcut on desktop
Step 1: Right-click on desktop, click New, and then click Shortcut.


Open Control Panel Windows 10 step4


Step 2: In Type the location of the item box, type the following path.
explorer shell:ControlPanelFolder
Click Next button.


Open Control Panel Windows 10 step5


Step 3: In the Type a name for this shortcut box, type Control Panel, and click Finish button.


Open Control Panel Windows 10 step6


Open Control Panel Windows 10 step7


That’s it! You can now double-click on the Control Panel icon on the desktop to quickly launch the same.
Method 5 of 5
Pin Control Panel to Start or taskbar
Step 1: In the Start search box, type Control Panel.
Step 2: When you see search results, right-click on Control Panel entry and then click Pin to Start to pin it to the Start menu or screen.


Open Control Panel Windows 10 step8


Tip: Clicking Pin to taskbar will pin the Control Panel to taskbar!

Source: http://www.intowindows.com/5-ways-to-open-control-panel-in-windows-10/