While the upgrade may retain some functionality and customization from the previous version, it is likely that at least some things need to be configured again.
This guide looks at a couple of improvements for Windows 10 that you may find useful. All improvements start with a general explanation first before the actual tweak or modification is listed.
Lets get started.
1. Automatic logon

Windows 10 displays a log in prompt whenever you start the operating system. This is useful on multi-user systems to separate and protect data from each user, but also to protect the data from third-parties who may have access to the PC.
If you use the PC alone, and if there is no chance that someone else may access it, then you may want to enable an automatic log in instead.
This can also be useful if you have encrypted all of the storage devices of the machine as you are already entering a master password on start then before Windows gets loaded.
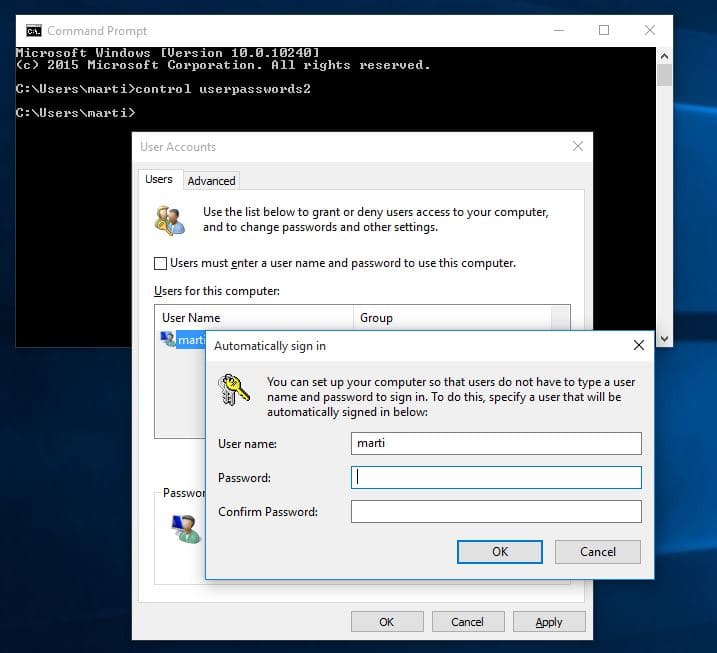
- Tap on the Windows-key, type cmd and hit enter. This should open the command prompt.
- Type control userpasswords2 and hit enter.
- You may be asked for an administrator password at this point which you need to enter.
- Locate the "users must enter a user name and password to use this computer", remove the checkmark, and click on apply afterwards.
- Once you hit apply you are prompted to enter the account password of the user name displayed to you. You can modify the user name, for instance to sign in automatically with another account on the system.
- Restart the PC afterwards to make sure everything is configured correctly.

The Windows Task Manager displays only apps and programs started by the user on launch. It is not really useful and you may want to expand the selection so that you get additional information and details about all running processes on the machine.
- Use the keyboard shortcut Ctrl-Shift-Esc to open the Task Manager.
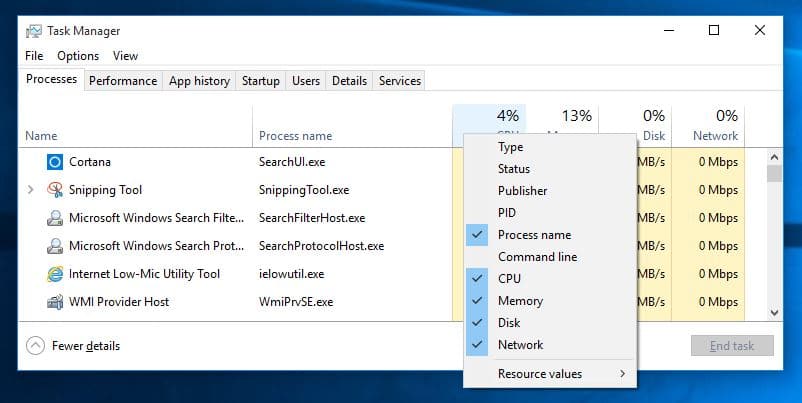
- Click on "More details" at the bottom of the screen to switch to the advanced view which you may know from previous versions of Windows.
- Windows 10 sorts processes into groups which you may disable under View if you dislike that.
- You may also click on the header to add information to the listing, for instance the process name.

If you upgrade to Windows 10, you will notice that the Start Menu is not looking exactly like it used on Windows 7 or Windows 8.
You find listed there programs and apps you have installed, and on the right of that tiles that link to a selection of apps that come pre-installed with the operating system.
While you may find some of those useful, for instance the weather app as it displays weather information whenever you open the start menu, you may not use others.
In addition, you may want to add programs that you run regularly to the selection there to make them more accessible.
- Click or tap on the Start Menu button to display the menu on the screen.
- You manage apps and programs with a right-click on them, or via drag and drop.
- To delete an entry, right-click on it and select "unpin from start".
- There you also find options to resize it, turn live tiles on if supported, and to pin it to the taskbar.
- If you right-click on apps and programs on the left however, you get options to pin them to start as well.
- Last but not least, you may find the grouping feature useful. You may create or delete as many groups as you like to sort apps and programs into them.

The favorites in File Explorer (former Windows Explorer) have been replaced by the new Quick Access menu. It is still possible to go back to displaying Favorites in File Explorer instead if you prefer that.
The main difference between Quick Access and Favorites is that Quick Access contents (files or folders) may get added dynamically based on use.
You may still pin some folders to have them displayed at all times though. This can be useful if you want to access specific folders quickly from the explorer sidebar.
- Open File Explorer with a click or tap on the icon in the taskbar.
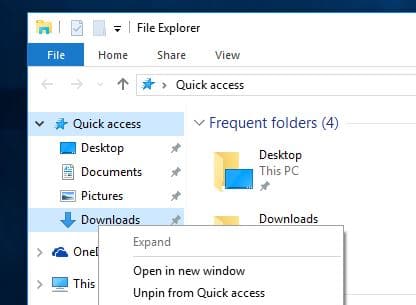
- To pin a folder to Quick Access, right-click on it and select "pin to quick access" from the context menu.
- You may also remove folders from Quick Access by selecting "unpin from Quick access" instead.
- Folders that show a pin icon are permanent while all other folders are dynamic based on use.

Windows 10 throws more notifications at you than Windows 7, and probably also as Windows 8. These can be useful, for instance when you receive new emails but also annoying at times, for instance that new apps were installed or tips about Windows that Microsoft may display using the notification system.
You may disable some notifications on the system to bring the overall count down.
- Click or tap on the notification icon in the System Tray area of the operating system.
- Select All Settings, and switch to System > Notifications & actions.
- There you may turn off the following notification options:
- Show me tips about Windows.
- Show app notifications.
- Show notifications on the lock screen.
- Show alarms, reminders and incoming VOIP calls on the lock screen.
- In addition, you may configure quick actions displayed when you click on notifications in the System Tray area.
- Lastly, you find options to hide or show notifications for specific applications there as well.
Source: http://www.ghacks.net/2015/07/20/five-windows-10-configuration-tips-for-new-or-upgraded-systems/


