Pages
7/30/2014
7/20/2014
How to Change a Windows 8 User Account’s Picture
By Andy Rathbone from Windows 8 For Dummies
For every newly created user account, Windows 8 chooses a generic silhouette. Feel free to change the picture to something more reflective of the Real You: You can snap a photo with your computer’s webcam or choose any photo in your Pictures library.
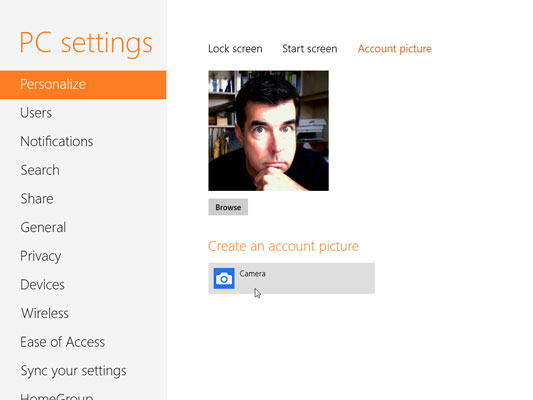
To change your user account’s picture, head for the Start screen and click your picture in the screen’s top-right corner. When the menu drops down, choose Change Account Picture.

The Account Picture page offers three settings:
To change your user account’s picture, head for the Start screen and click your picture in the screen’s top-right corner. When the menu drops down, choose Change Account Picture.

The Account Picture page offers three settings:
- Browse: To assign a picture already on your computer, click the Browse button. A new window appears, this time showing previous account photos you’ve chosen. To see photos in your Pictures library, click the word Files and choose Pictures from the drop-down menu. Select a desired picture from the folder and click the Choose Image button. Windows 8 quickly slaps that picture atop your Start screen.
- Create an Account Picture: This option, available only for people with a camera attached to their computers, lets you choose which app should handle the photo shoot. You can find the Windows 8 built-in Camera app listed here, as well as any other photo-snapping apps on your computer.
Here are a few more tips for choosing your all-important account photo:
- After you’ve chosen an account photo, it attaches to your Microsoft account and anything you sign into with that account: Your Microsoft phone, for example, Microsoft websites, and any Windows 8 computer you sign in to with your Microsoft account.
- You can grab any picture off the Internet and save it to your Pictures folder for use as your user account picture. (Right-click the Internet picture and, depending on your web browser, choose Save to Picture Library or Save Picture As.)
- Don’t worry about choosing a picture that’s too big or too small. Windows 8 automatically shrinks or expands the image to fit the postage-stamp-sized space.
- Only holders of Administrator and Standard accounts can change their pictures. (Guest accounts are stuck with the faceless gray silhouette.)
For more information about Windows 8 and its features, explore Windows 8 For Dummies, available online.
http://www.dummies.com/how-to/content/how-to-change-a-windows-8-user-accounts-picture.html
http://www.dummies.com/how-to/content/how-to-change-a-windows-8-user-accounts-picture.html
7/11/2014
Turn Windows 8 into Mac OS X Yosemite
Windows users have several options when it comes to modifying the visual appeal of their system. From installing standard themes that do not require any system changes whatsoever but only change some visuals such as the background wallpaper to full themes and total conversions that change it dramatically.
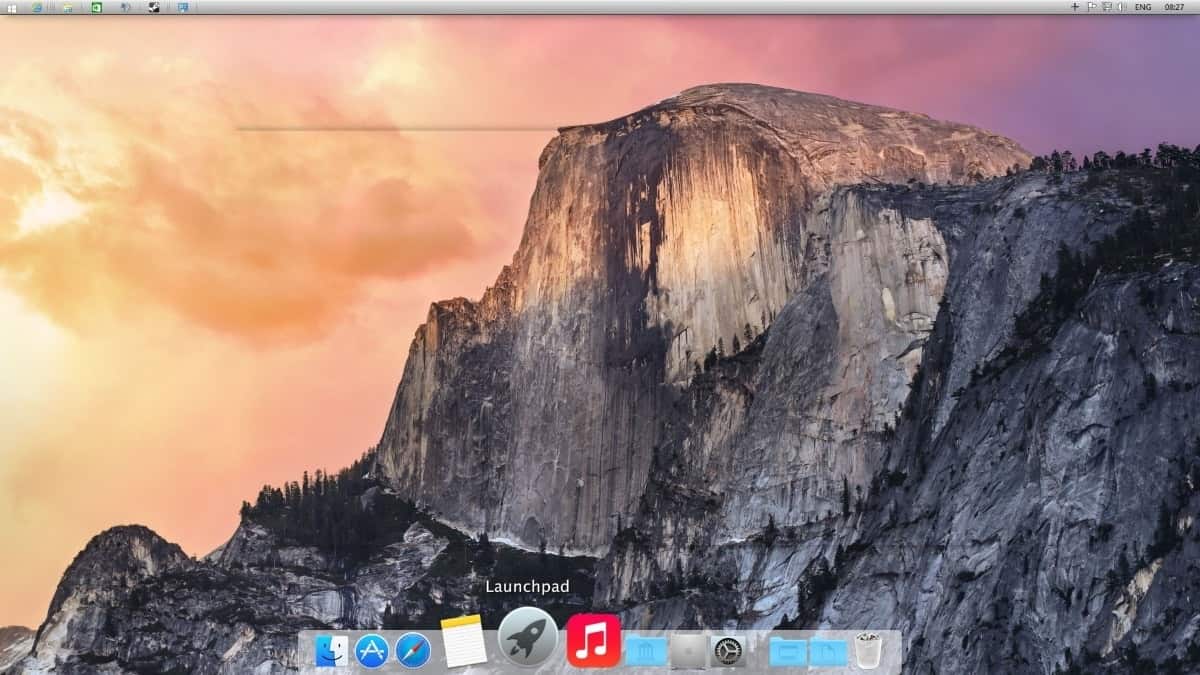
It did not take long for someone to create a total conversion package for Windows. Using it you can change the theme of Windows that you are currently running to Mac OS X Yosemite.
Note: It is highly recommended to back up the system before you apply the theme as it will make modifications to the system. If things go wrong, you can restore the backup. We did not notice any issues installing the theme on a Windows 8.1 Update 1 system but that does not mean that you won't So, better safe than sorry. At the very least, create a system restore point.
Installation of the package is actually pretty easy
- Download the right package for your system from the authors website. There is one universal version for Windows XP and newer, and one special edition that is only for Windows 7 and newer.
- Rename the .zip_ extension to .zip and extract the contents of the 50 Megabyte file on your system.
- Run the installer afterwards with elevated privileges. Right-click the file and select Run as administrator from the context menu.
- A configuration page is displayed. One thing that you may want to do here is to disable the "make WindowsxLive the homepage" option in the lower left corner.
You can configure various features on the page that will be applied during installation. Among them are the following options:
- Use the system font configuration or select three alternatives.
- Enable or disable the dock and auto-hide.
- Select which taskbar you want. You can select system default here if you want to use the Windows taskbar.
- Enable the Start Orb.
- Enable left side OS X caption button style.
- Enable OS X Yosemite frame UI (not compatible with AERO).
- Enable Spaces (Ctrl-Alt-Arrow).
- Dasboard (F12 to display or scroll to bottom left corner).
- Enable Launchpad.
- Activate hot screen corners for dashboard and launchpad.

We did not notice any issues using the theme. While some features lead to Windows programs instead of the ones mentioned by the theme -- a click on Safari for instance opens the default system browser instead -- it resembles the new Mac interface.
Verdict
If you like how Mac OS X Yosemite looks like and run Windows, you may want to give this a try. It may take a while to get accustomed to the new features though, especially if you have never worked on a Mac system before. (via Deskmodder)You can get it here:
http://sagorpirbd.deviantart.com/art/Swift-for-Windows-8-8-1-461060001
Source: http://www.ghacks.net/2014/06/08/turn-windows-mac-os-x-yosemite/
